Tuesday, November 29, 2011

Branching Out Scarf

branching out scarf

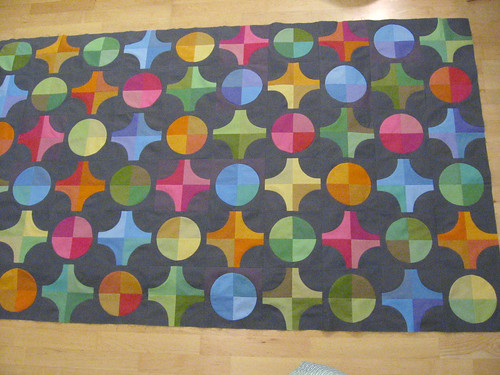
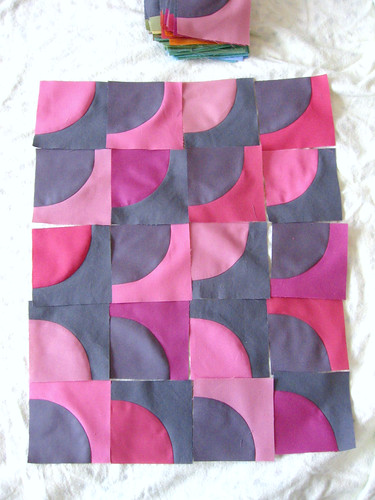
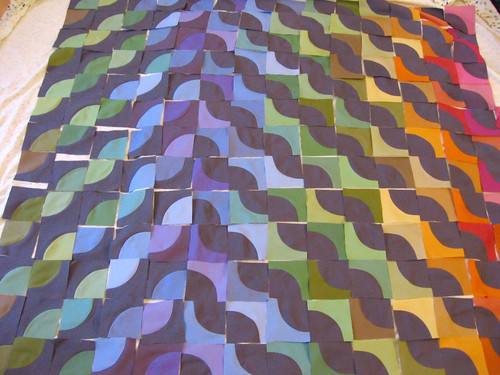
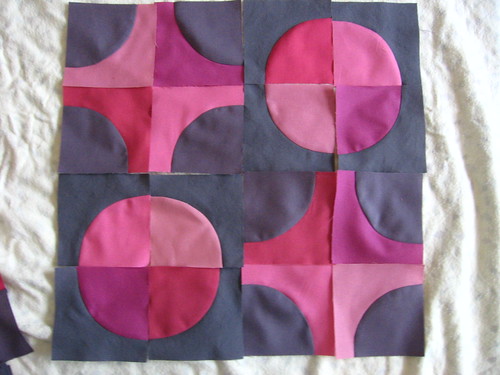
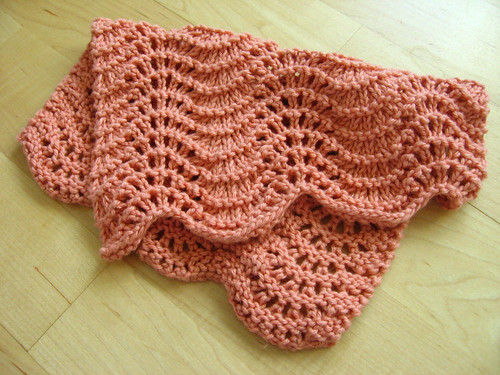
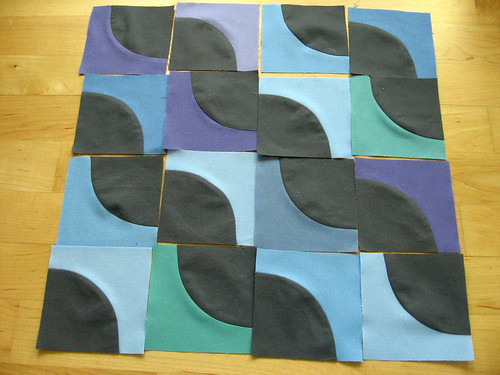
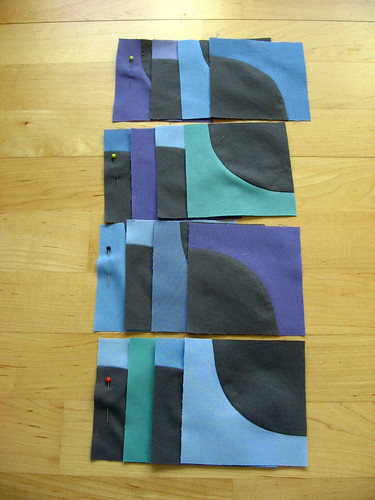
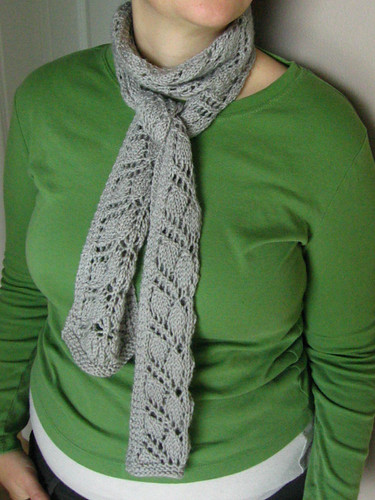
One of the great things about the long thanksgiving weekend was that not only did I have plenty of time to sew (and finish my Drunkard's Path quilt top - thanks everyone for your nice comments!), I also had lots of nice time to knit! I was really excited to finish my lacy branching out scarf (originally mentioned here).   I love how it turned out, and was really impressed that I was able to get a whole scarf out of one skein of Knit Picks Gloss Fingering yarn (and the yarn is really lovely - super soft and it has great drape).

branching out finished

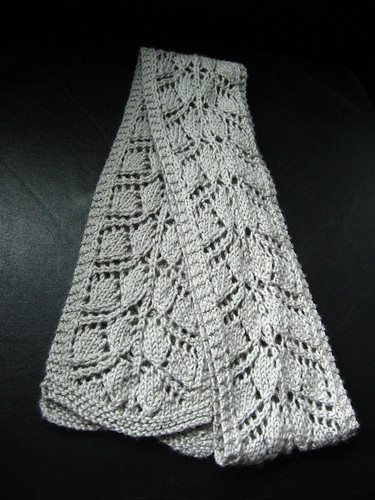
I love the leaf motif and it is a nice light weight that is perfect for the cool but not frigid weather we've been having here in Portland.  It will get lots of use I am sure, since most of my other scarves are very heavy weight (and in fact, all of them except one are actually in storage).

Green Lotus Hat

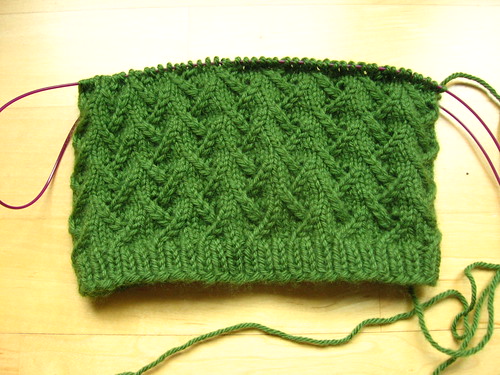
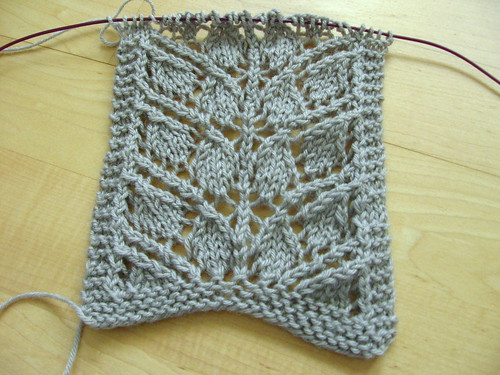
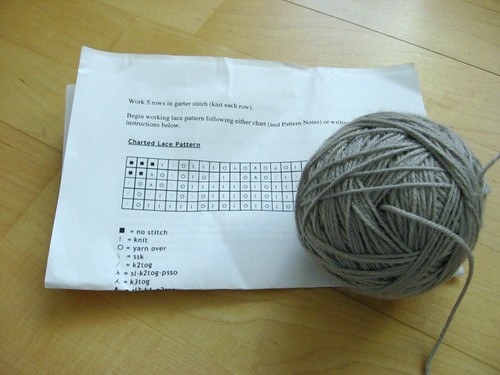
I also only have one hat not in storage, and was overdue to make myself a new hat anyways, so as soon as I finished the scarf I cast on for a lotus hat using this lovely green cashmere blend yarn, also from Knitpicks (Capra).  While this yarn is technically DK weight, and the pattern calls for worsted, the gauge called for on the pattern and the gauge on the yarn ball were the same, so I figured it would be OK (and no, I didn't knit a swatch... that would be too practical).  The pattern calls for three repeats of the lace pattern before you start decreasing, but suggests you do four repeats if you want it to be less of a beanie and to actually cover your ears.  Well, I did four repeats and then went ahead and did all the decreases... and it was way too short.  I am guessing that since the yarn is a bit lighter weight the whole thing is just a bit smaller and while it can stretch to be wide enough, that makes it even shorter.  So I frogged back to just before the decreases and am thinking I will add another two repeats of the pattern before decreasing again.  I think I will still be able to make the hat with one ball of yarn, but I do have a second one if needed.

Green Lotus Stitch Detail

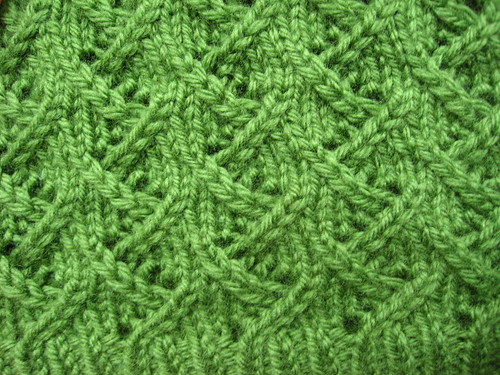
I love the stitch pattern - it is lacy but not so much that my head will get chilly, and actually looks a bit like a cable pattern at first glance.  I am not planning to block it since I like how it looks as knitted and don't want to emphasize the lace aspect too much.  If I can swing it with my second ball of yarn, I am hoping to make a pair of matching fingerless mitts, modifying a basic pattern like this one.

I am on a bit of a scarf/hat knitting kick, so I may well knit another one of each after this, too, or a cowl.  How about you, have you been doing any knitting?

Monday, November 28, 2011

Drunkard's Path - Finished Quilt Top and Link-up


Well, I can't believe the end is here! I have had so much fun with this quilt-along - and really my favorite part has been seeing all of your quilts progress, and especially hearing that this QAL inspired some of you to try something you wouldn't have otherwise. I can't tell you how happy that makes me! I hope you all enjoyed it and can't wait to see your finished quilt tops.

Drunkard's Path Quilt Top

Speaking of which, I finished my own quilt top yesterday afternoon, just in time - and unfortunately at a time when photography conditions/lighting weren't great. So apologies for the somewhat grainy photo. I am excited about how the design turned out though and can't wait to quilt and bind this so that we can start using it as our couch throw! Can you believe that this will be the first quilt that I have ever kept? Lawson was very excited when I told him that this quilt was for us.

Your turn! Link up your finished quilt top using the linky below for a chance to win one of the fabulous prizes donated by Fabric Shoppe and Fresh Squeezed Fabrics. The linky is open for a week and then Kristie and I will draw winners next Monday 12/5. You can link up either here or on Kristie's blog, it will work either way :). If you have a blog, link up your blog post so we can all come say hi, but if you don't have a blog, feel free to link up a flickr photo instead.


Thanks again so much for joining in the QAL!  I hope you all had as much fun as I did!!

{This post is part of the Drunkard's Path Quilt-Along that I am hosting with Kristie from OCD.  Check out my Drunkard's Path QAL page for the schedule and links to the posts so far, and feel free to join in any time!}

Tuesday, November 22, 2011

Pumpkin Orange Muffins

pumpkin muffins

As I mentioned yesterday, I made these pumpkin orange muffins to bring to work and they were delicious!  The recipe is from Mollie Katzen's Sunlight Cafe (also the source of the decadent sticky buns I posted previously) - I really enjoy having a book of all breakfast and brunch recipes in my cookbook collection, and it was fun to have a chance to try out another one from this book!  I may have slightly undercooked these as we were running out the door to catch a movie so I didn't have time to put them in for another few minutes, but they were still very yummy, just not as golden and crispy on the top as they might have been otherwise.  Adding the chopped orange zest is what really makes this recipe - the tangy orange taste is a great balance to the sweet pumpkin flavor.  If you find yourself with leftover pumpkin puree this season, or if you just feel like making a yummy pumpkin breakfast treat, I heartily recommend them!

Pumpkin Muffins
Adapted from Mollie Katzen's Sunlight Cafe
  • Nonstick spray, or cupcake liners
  • 1 1/3 cup white whole wheat flour (or whole wheat pastry flour, or just regular all purpose flour if you don't have either or prefer white flour)
  • 2/3 cup all purpose flour
  • 1/2 teaspoon salt 
  • 1 1/2 teaspoons cinnamon
  • 1 teaspoon ground ginger
  • 1/4 teaspoon ground allspice
  • 1/4 cup sugar
  • 1 tablespoon chopped orange zest (use a vegetable peeler to peel just the outer layer off about 1/2 an orange, then finely chop)
  • 1/3 cup packed brown sugar
  • 1 cup pumpkin puree (or she says you can substitute cooked sweet potato or winter squash)
  • 1 egg
  • 1/2 cup milk
  • 1 tablespoon vanilla extract
  • 4 tablespoons (1/2 stick / 1/4 cup) butter, melted
Preheat oven to 400, lightly spray 12 muffin cups in a muffin pan with non-stick spray, or use cupcake liners (I inadvertently used both because I wasn't paying attention, which was kind of overkill).  Combine dry ingredients through orange zest in a bowl and mix together.  Add the brown sugar and mix together until blended using a pastry blender thing or your hands, or just a spoon.

Mix together the remaining (wet) ingredients except the butter in a second bowl, whisking or stirring until well blended.  Pour the wet ingredients and the butter into the dry ingredients and mix together until everything is moist, but without overmixing.  Spoon the batter into the muffin pan and bake for 20-25 minutes, until browned on the top and a toothpick inserted into the top comes out clean.  Let cool on a rack before serving.


I'm linking up over at Tuesday at the Table at A Quilter's Table again - and this time there is a (fabric!) giveaway if you link up - anything about your cooking or your table.  You can link up through Friday night, so check it out!

Monday, November 21, 2011

What's Cooking

black bean soup with cilantro lime sour cream

I haven't posted a ton of recipes lately but I have been cooking away when I find time and making some good things.  So I thought that I would pop in with a few tips if not full recipes.

The soup above is a Cuban black bean soup from Deborah Madison's awesome Vegetable Soups cookbook (previously mentioned here) - the soup is good, although I tweaked the recipe a bit this past time and it wasn't quite as good as I remembered it.  I'll probably post a recipe here at some point in the future, once I have played around with it a bit more and gotten it just right (or, stopped trying to take shortcuts in what is a good recipe that just takes a while).  In the meantime, I wanted to share what I think is the best part of this soup - you top it off with a delicious lime cilantro sour cream.  This is literally just 1/2 cup sour cream with 3 tablespoons of chopped cilantro and 2-3 tablespoons of lime juice.  I love it with this soup, but I have also served it with other black bean soups and dishes and it really just hits the spot!

The other night I made a veggie lasagne which turned out pretty well;  I tested the theory that you can pretty much always use uncooked lasagna noodles whether or not they are actually labelled as no boil, and they were fully cooked by the time it was done.  I actually think doing it that way is a good idea in general with veggie lasagna since it can tend to be a bit watery, and that helps to absorb some of the extra liquid.  I also sauteed mushrooms and kale and layered that in with layers of ricotta/egg/parmesan mixture, low-fat mozzarella, and tomato sauce.  Overall turned out quite good, which is a good thing since we have a lot left over. 

I loved the vanilla caramels that I made from Sweet Confections so much, I couldn't wait to try the pumpkin caramels recipe from the book.  I picked up a can of pumpkin at the store the other day, and made them up the other night, so they are all ready for thanksgiving (and super yummy)!  Then I remembered that I had said I would bring muffins to work, and I found a recipe for pumpkin muffins that used up just the amount of pumpkin puree that I had left over - perfect!  They were really yummy, so I'm planning to post the recipe tomorrow - just in case any one else has half a can of pumpkin puree to use up in the coming week :).

How about you - what have you been cooking up lately?  Any tips to share?

Sunday, November 20, 2011

Awesome Pillow from Jacey

pillow from jacey

I was super excited to find this pillow in my mailbox... Jacey from Jaceycraft held a giveaway on her blog earlier this month where she would make you a personalized pillow and I was lucky enough to be one of the winners chosen!  I was extra thrilled since I had met Jacey at Sewing Summit and she is just super nice - so having her make something specifically for me felt even more special.  I like so many different styles of quilting that I was pretty open-ended in what I said I liked, and I am so thrilled with the pillow she made, it is so gorgeous, and in my favorite color green!  Literally when I opened the package and showed it to Lawson, the first thing that he said was "Wow!  It's so you!"  Although I think he likes it too, he has been curled up on the couch with it pretty much since it got here.  It is extra appreciated since we are living in a furnished apartment for the time being, and the apartment isn't really decorated in our style - so this makes it feel much more like our space.

fabric from jacey

Jacey was so sweet, she also included some nice fabric in the package for me too!  Check out those cool birds and butterflies, and the awesome green swirl.

Thank you so much Jacey!!  I love it all!

Tuesday, November 15, 2011

Drunkard's Path QAL: Assembling your quilt top


So here we are, at the final post in the QAL instructions - and it's really not too complicated. To finish your quilt top, go ahead and sew together the blocks or strips/rows that you pieced, following the same general approach that I described in the last post, about assembling your blocks.  Many of you have already moved right along to this step, and have your tops all finished up already, great work!  It has been so fun seeing your quilts come together. 

Since we are both running a bit behind, and guessing that some of you may be too, Kristie and I decided to add another week to the schedule before we post the link-up to show off your finished quilt top - it will not be posted on Monday, November 28th.  We'll leave it open a week to give everyone lots of time to pop by and link up their finished quilt top, and then we'll draw for the great prizes from Fabric Shoppe and Fresh Squeezed Fabrics on Monday, December 5th... so make sure you finish up your quilt top and then come back to link up!

As far as where I am in my sewing... I finished sewing, ironing and trimming all my 1/4 circle blocks on Friday, and then spent some time mulling the different layout options.  I thought that I wanted to go with a scalloped or wavy line design, but when I tried laying out the blocks, I just wasn't feeling it.

Pink Scallop


I even tried laying out almost all the blocks in this design below - and it just felt to rainbow-y for this quilt, which we plan to use on our couch.  Also I guess I think that this would look better on a larger scale, it just makes the blocks feel to small I think.

Rainbow wiggle


Inspired by this quilt, which I saw linked to somewhere recently and now can't remember where it was, I tried a similar design (the same layout, but my + blocks are the inverse of the way they did it), and I decided to go with this.  My plan is to have the colors more interspersed with eachother rather than in rainbow order, which should help make it feel less rainbow-y.  I also appreciate that this means that I can just sew each set of four 1/4 circles into a small block and not try to keep track of the larger design until later!

cross and O design


I have been sewing away and getting this assembled, so stay tuned for the finished quilt top!

{This post is part of the Drunkard's Path Quilt-Along that I am hosting with Kristie from OCD.  Check out my Drunkard's Path QAL page for the schedule and links to the posts so far, and feel free to join in any time!}

Sunday, November 13, 2011

Sweet Confections Giveaway Winner!

Sweet Confections Cover


Thanks to everyone who entered the giveaway for the great candy-making book, Sweet Confections!

And the winner is...


Congrats!  I have sent you an email to get your mailing address.

Saturday, November 12, 2011

Knitting Update

You may have noticed, I haven't been too good at doing regular blog updates lately other than the QAL... I am hoping that as we settle in and get into more of a routine here I will be able to get back into a more regular blogging schedule.  I have also been having a lot less time to read blogs and to comment when I do get a chance to read them - often I seem to be reading blogs in spare minutes here and there on my phone, when I am waiting in a line or something, and it really isn't easy to comment then.  So if I seem to have disappeared, I apologize!  I am really still reading many folks blogs and try to pop in and comment when I can, but I do miss getting to be a more active participant in this online community.  I actually had a chance both to catch up on my quilting and my blog-reading a bit yesterday with the holiday, which was really nice.

In any case, even though I haven't been posting regular knitting updates I have been getting a fair amount of knitting done, since I have a pretty long commute and am in a carpool, which gives me lots of good knitting time. So here is a roundup of my knitting projects from the past couple months (for more details like specific yarns used etc, all of these are up on my ravelry account):

2011 birthday socks

I finished Lawson's 2011 birthday socks, last mentioned here (I forget exactly when - definitely late but I think within a month of his actual birthday, so good enough).   I really enjoyed knitting those quick sport weight socks for him, so I promptly cast on a pair for myself using yarn which I had bought in Maine.  They really are so fast to knit, very fun!

purple and green socks

I love knitting myself socks and was tempted to cast on another pair after I finished those, but I decided that I should turn my attention to some holiday presents.  I had made a number of cotton/linen knitted washcloths as gifts a few years ago and had a request for some more this year.  I knit the peach one below in a feather and fan pattern, and then knit the two grey ones below in a waffle pattern and a garter stripe pattern respectively.

feather and fan washcloth

grey cotlin washclothes

I think that is it for knitted holiday gifts on my plate (although I may think of more), so I have turned my attention to making myself some new winter scarves and hats.  Most of our stuff is still in storage and while I have a hat and scarf that are not in storage, they aren't my favorites, so it seemed like a good chance to knit up some nice new ones.   Plus I actually don't love any of the scarves that I have now, even the ones that are packed up.  To start, I am knitting this fun lace scarf with a leafy motif, one of my favorite design elements.  I have actually made a lot more progress since I took these photos a number of days ago, so I am probably halfway done - I'm using knitpicks gloss fingering weight yarn and I just love it - it is so soft and squisy, but not pilly so far.

branching out scarf in progress

I have knitted a number of projects with lace designs, but this is the first time that I have really figured out how to read a chart and relied on that while knitting rather than written instructions.  I think that partially this is because the design is less repetitive/intuitive to me, so I haven't memorized it and really do have to look at the chart as I go.

center pull ball and lace chart

I also made a center pull ball for the first time, which worked very well.  I just wrapped the ball pretty much as I normally would, but was carefully not to wrap it too tightly at first and was also careful to leave the end hanging out the whole time.  I was going to link to a tutorial showing how to do this but all the ones I found involve either wrapping it around a paper tube to start, or your thumb!  So I guess I made up my own way without realizing it... it worked fine but one of the other methods might be more foolproof.  I especially like that now I don't have to worry so much that my yarn will roll all over the place if I accidentally drop the ball.  I actually dropped my ball of yarn at a movie theater once and it rolled down quite a few rows, then I had to go and retrieve it after the movie ended... and I tried not to think about what is on the floors of movie theaters where it had been rolling around, yuck.

Tuesday, November 08, 2011

Drunkard's Path QAL - Assembling your Blocks


OK, I have a confession... I am behind in making my blocks and not ready to assemble them yet!  I feel bad about this, but luckily we left lots of time in the schedule for the next two steps so I should be able to catch up by next week.  Hopefully this is reassuring if you are running a bit behind too! 

Not to make excuses, but just so no one gets turned away from this QAL thinking that it takes forever to sew the curves... really the problem has just been that I have had next to no time to sew in the past few weeks.  I had a really bad cold and then last week we finally bought a car after our move.  This past weekend I spent a good chunk of time sewing and got most of my curved blocks sewn, but not quite all of them, and I just know that I am going to want to play around with layouts and see how they all look, so I really didn't want to rush this step.

laying out blocks


So, OK, I am a delinquent, but the QAL goes on regardless!  I took some photos to illustrate this step and it's not too complicated, so hopefully this is enough of an explanation.  You can also jump over to Kristie's blog to see her post, which should be more complete than mine :).

Once you have picked out your layout, you are going to want to assemble your smaller 1/4 square blocks into larger blocks before you assemble those blocks into the quilt top.  The number of smaller squares in each of your larger blocks will depend on the layout that you choose, but a good size is a 4x4 block as I have laid out above.  If you are lucky enough to have a design wall, you can lay out your whole quilt on the wall and then sew the blocks one by one.  If not, depending on your design you can probably lay the blocks out one at a time as you sew them, or lay it all out on the floor and then keep the squares for each block organized using cardstock or paper.  Or really whatever works for you!

rows to piece


When I sew together blocks like this, I like to make stacks for each of the rows that make up the block so that I can pick up a stack to sew at my machine and keep things in the correct order.  Putting a pin on the first (far left) block can help you to keep track of which block is at the end (and which way is up) as you sew across the row. You may or may not have to use pins as you sew these seams depending on whether your layout involves matching any circle edges - if your design has 1/2, 3/4 or full circles, then you will need to pin at least the seam where the quarter circles meet to keep those edges lined up.  You can of course pin all your seams if you find it helpful, but if you find it easier for any seams that don't have to match the circles, you can skip pinning them and just place them together.

I keep track of the order of the rows by keeping them laid out in the right order or stacked on top of each other; if you are worried about keeping track of the right order as you move them around, you could also label them with numbered sticky notes.  You'll press each row before you sew them together to make the overall quilt block.  I like to press my seams open, but many folks prefer to press seams to one side, and then alternate which direction they press for each row so that the seams lock together as they sew their rows together, so go ahead and press whichever way you prefer.  When you sew the rows together, you will definitely want to use pins to keep all the corner seams nice and lined up.  Go ahead and press the seams again, and you have a completed block.

If you are on a roll and sew all your larger blocks together to make a quilt top, I will understand - but technically that step is next week in the QAL.  This should be a relief if you are running a bit behind, like me! 

I'd love to hear how the QAL is going for you!  It's been fun seeing everyone's photos in the Flickr group - if you have been quilting along but aren't on Flickr (or haven't had any photos to post yet), feel free to leave a comment here and share how it's going.

{This post is part of the Drunkard's Path Quilt-Along that I am hosting with Kristie from OCD.  Check out my Drunkard's Path QAL page for the schedule and links to the posts so far, and feel free to join in any time!}

Sunday, November 06, 2011

Sweet Confections - Book Review and Giveaway!

Sweet Confections Cover

I was so excited to receive this candy cookbook, Sweet Confections, in the mail from Lark Crafts to review.  I have a big sweet tooth, but I have never really made candy before, so I was pretty sure I was going to love it.  I was super impressed with the beautiful photographs, excellent how-to section and wide range of recipes.

Candy Temp Chart

The beginning getting started section has clear instructions and lots of step by step photos on everything you need to know, from candy temperatures (above), how to cook sugar and how to carmelize sugar, how to temper chocolate, how to hand dip and hand roll chocolates, and also a helpful overview of ingredients and tools.

Orange Walnut Choc Nougat

Each of the recipes in the book has a big mouthwatering photo...

Choc Nougat 2

And then a full page of ingredients and instructions and often more photos.  Being able to see a photo of every single recipe is so great, and the extra photos showing a cut open view and the like are super useful too.

Candied Citrus Peel

There's also a section at the back with recipes for some of the ingredients that you could make yourself - like this candied citrus peel that is used in the recipe above.

Mixed Nut Choc Truffles

One of the things that I was most impressed by was the range of recipes included in the book - it really covers the gamut of candy-making, from fancy stuff like chocolate truffles...

Peanut Brittle

To peanut brittle, toffee, candied nuts and the like...

Jelly Candies

To chewy candies like these jellies...

Vanilla Marshmallows

And even marshmallows, yum!  I also loved the fact that it included both basic recipes (like many of the ones shown above) and more interesting, unique combinations - like vanilla cheesecake fudge, pear hazelnut truffles, and pecan pie truffles.  While I am totally new to making candy and found this book a great introduction, I am sure that even an experienced sweet-maker would find something delicious and new to try.

Vanilla Caramels-1

When I got the book, I couldn't wait to try my hand at making one of these yummy treats, and while I was tempted by many of the recipes I had no trouble deciding to go ahead with these vanilla caramels.  Soft caramels are one of my favorite candies and also were something that I had never thought to try to make before, so I was super excited to learn how!

Caramel ingredients

One thing about making your own candy is that you can no longer play dumb about how bad it is for you... with this set of ingredients, no wonder caramels are so yummy!

For the most part, the recipe was clear and easy to follow.  The instructions on how to caramelize sugar (in the starting up section) were super helpful and showed exactly what to do.  After you caramelize the sugar, you add the remaining ingredients (which have been warmed and mixed together), and it kind of bubbles all over the place as you cook it until it reaches the specified temperature.  I was a bit worried that I might be doing that part wrong, but in the end the caramels had great taste and texture, so it all worked out.

The only real pitfall that I had was that the recipe instructed you to pour the cooked caramel mixture into a pan lined with plastic wrap... and maybe I was supposed to let it cool for a minute first, or maybe I have cheap plastic wrap or something, but it started to melt when I poured the hot caramel in!  I freaked out a bit and pulled out the plastic wrap and threw it out (which sadly meant I lost some of the caramel with it).  Then when the caramel cooled I just scraped it out of the pan, which wasn't actually as hard as I had feared - and the caramels were totally delicious, so I was still very happy with the result.  I will definitely make this recipe again, but next time I will probably just use parchment to line the pan.

Vanilla Caramels

I wrapped up the finished caramels in waxed paper as suggested and they looked totally professional!  I brought them in to my office for halloween and everyone was very impressed.  I am planning to make the pumpkin caramel recipe in the book next, for thanksgiving.  Yum!

Not only did the generous folks at Lark send me a copy to review, they also sent me a second copy to giveaway to one of you!  To enter the giveaway, simply leave a comment below - I'd love to hear if you have ever tried making candy before and how it went.

Since I am paying for the shipping, the giveaway is open to U.S. residents only.  The winner will be picked by random number, and I'll keep the giveaway open through next Sunday, November 13 at 9 pm PST.  I will contact the winner by email so make sure you have an email address in your blogger profile, or leave on in your comment!

GIVEAWAY CLOSED!


Disclosure: This book was provided to me as a free review copy by Lark Crafts, but all opinions expressed are my own.

Related Posts Plugin for WordPress, Blogger...