Tuesday, December 27, 2011

Lotus Hat and Mitts

Lotus hat side

I actually finished my lotus hat several weeks ago, and even got Lawson to take some quick photos of me wearing it, but haven't had time to post about it with all the last minute holiday gift-making around here (more on that soon).  I am really happy with how the hat turned out, the yarn (Knit Picks Capra) is so soft and comfy with the cashmere - not at all itchy.  As I mentioned before, I ended up having to do more repeats than the pattern called for to get it long enough, so the pattern is a bit smaller scale than as written in the pattern, but I love how it looks, and now it is long enough to cover my ears, which is key.

Lotus hat top

I love the cool pattern the stitches make as they come together at the top of the hat - the charted pattern is really clear and turns out great.

Lotus mitt

I had bought 2 skeins of yarn and the hat used just a bit more than one, so I was thrilled that I had enough to knit up a matching pair of mitts!  I modified a basic fingerless mitts pattern using the stitch pattern from the hat and also making them longer and adding ribbing at all the edges.

Lotus mitts-1

Since I finished these up, I have been continuing to knit away - I just finished a hat for Lawson and gave it to him for Christmas, so I'll be sure to show you that once I get a picture of him in it.  And I just cast on for this cowl/infinity scarf for myself in a grey gloss DK (also lovely and soft) - it is knitting up pretty quickly, I can't wait to finish it up and get to wear it!

Sunday, December 18, 2011

Giveaway Winner and Ornament Ideas


Thanks so much to everyone who entered my giveaway! I had so much fun reading about handmade ornaments you have made or ideas you would like to make - definitely got me inspired. I actually got inspired and made some ornaments myself (even though I should have been sewing holiday gifts...) - more on that below. First, the winner!


Congratulations, JuneBug!  I've emailed you to find out which pattern you would like.

If you didn't win but wanted to get a pattern, they are available in my meylah shop (with instant downloads!) and in my etsy shop :).

So, here are some photos of the quick ornaments I made:

paper ornament 2


paper ornament 1


paper ornament 4

To make these, I glued together two sheets of lightweight scrapbook paper to get a heavier weight paper with patterns on both sides, then cut strips and made them into various shapes.  The middle ornament was inspired by a felt ornament in fa la la la felt, and I think the top one (and other similar sphere ones I made) was subconciously inspired by this ornament that I had seen probably last year.   The glueing together two sheets of scrapbook paper wasn't ideal, really, and the paper puckered a bit on some of the ornaments I made but overall I was happy with most of the ones I made.  I used perle cotton to sew knots and hold them together, and to make the hanging loops.  I actually think these would be even better if you used fusible web to fuse together two pieces of fabric and then cut strips of that to work with, I may try to do that at some point.

Since you all were so nice to share your inspiration, I thought that I would share the ornament ideas that I have been feeling inspired by lately:

Paper flower ornament
Spiky paper starburst ornament
Paper ball ornament made from circles
Felt snow ball ornaments
Another felt ball ornament
String ball ornament
Water marbled glass ornament

And here are some great lists/roundups/sources for more ideas:

How About Orange (you may have noticed I love her ornaments!)
Martha Stewart Crafts
Craftzine
Pink Chalk Studios round-up
Stumbles and Stitches Christmas in July (includes several free patterns from Fa la la la felt)

Hope you all have a great holidays!!  I may be back before then with a blog post, but I may be too busy finishing up making the last of my gifts (and possibly getting distracted making more fun ornaments).

Sunday, December 11, 2011

Giveaway Day!


I've had so much fun participating in Sew Mama Sew's giveaway day in the past, both as a giver-away and as a winner, so I'm excited to participate again this time!

I'll be giving away a copy of one of my PDF sewing patterns  (also for sale in my meylah shop and my etsy shop) - the winner can choose:

Either the yoga mat bag sewing pattern -


(check out how it has a zipper up the front AND a zippered pocket for your essentials... sweet!)


OR a copy of my free-motion applique messenger bag pattern


(Two fun applique designs included, and the bag has lots of handy pockets)


To enter, all you have to do is leave me a comment telling me - what kind of handmade ornaments have you made or would you like to make?  (This is actually for a purpose - my coworker told me she wanted to make handmade ornaments and was looking for ideas - I had a bunch but would love to pass on yours as well!  Links to tutorials are welcome).

The winner will be picked at random, and the giveaway is open to both U.S. and international entries.  The giveaway will close at 5 pm pacific on Friday December 16th and I will contact the winner via email - so make sure you have an email address in your blogger profile, or include it in your comment!

Thanks and good luck!


--GIVEAWAY CLOSED!--  Thanks to all who entered!  Winner's posted here.

Monday, December 05, 2011

Drunkard's Path QAL - Winners!


Thanks to everyone who joined in our QAL and thanks to Kristie for being an awesome partner in crime (er, curves)!  I loved seeing all your quilt tops (and finished quilts - you guys are way more on top of this than I am!) - if you didn't see them yet, check out all the links here.

Thanks again to our lovely sponsors who donated the prizes... now it's time to draw our winners!

The winner of the fat quarter bundle of Tula Pink's Prince Charming fabric donated by The Fabric Shoppe is:

Alli at B. Yazoo, and...

The winner of the $40 gift certificate from Fresh Squeezed Fabrics is:


Beth at Sewing for Sanity!

Yay, congrats to both of you!  We'll be in touch to get you your prizes.

{This post is part of the Drunkard's Path Quilt-Along that I am hosting with Kristie from OCD.  Check out my Drunkard's Path QAL page for the schedule and links to the posts so far, and feel free to join in any time!}

Sunday, December 04, 2011

Asterisk Bee Blocks and tips

asterisk blocks

For last month's do.good stitches blocks for the Love circle, Lee from Freshly Pieced asked us all to make asterisk blocks in pinks, oranges, greys and whites - what a lovely winter palette!  She directed us to 
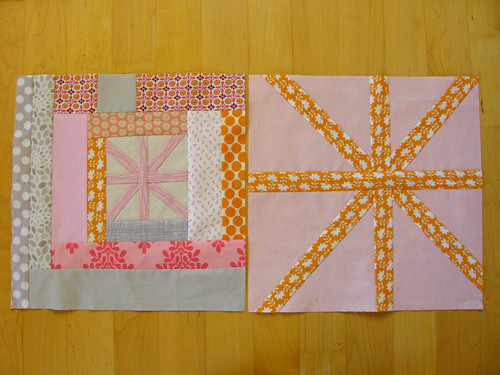
this tutorial for the basics of how to make an asterisk block, but gave us free rein to play around with the blocks as long as they had one or more asterisk in them.  I love these kinds of structured creative challenges so these were fun blocks to put together!

asterisk log cabin block - do.good stitches november

I made a smaller asterisk for one of my blocks and used it as the center of an improvisational log cabin block, which was really fun to make!

asterisk block - do.good stitches november

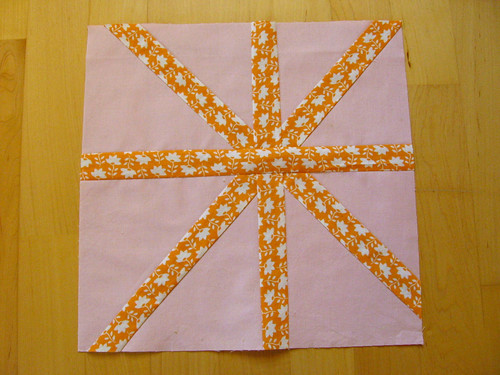
For my other block, I wanted to make a wonky/off-center asterisk with thicker fabric strips than the original tutorial called for.  I didn't go much thicker, I used 1.5" strips (1" finished), rather than the 1" strips/0.5" finished that the tutorial called for.  I wanted to share a quick tip for how to keep your asterisk strips aligned when using a wider strip.  I imagine others have figured this out and may have blogged about it elsewhere, but I thought I would share in case this is helpful to anyone!

The original tutorial is great because it uses 1" strips of fabric, which means that when you cut the fabric and then insert the pieced strip, the 1/2" of the original quilt square eaten up by the two seam allowances is exactly replaced by the 1/2" of strip that shows on the top after it also loses 1/2" to seam allowances.  So everything stays well aligned. 

misaligned asterisk

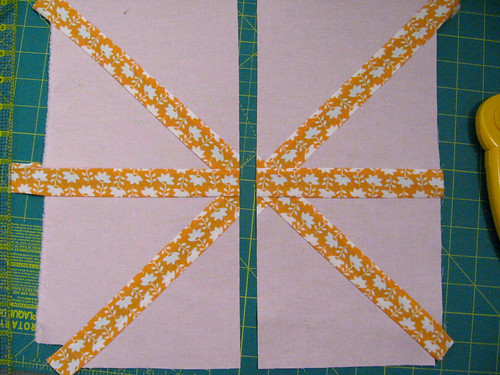
You may have seen asterisk blocks where the strips get kind of misaligned...  I cut my in progress block and pulled it apart about 1/2" to show how this can happen - this is about how far apart the two sides would be if I had just cut it and then pieced in my 1.5" strip.  It's not too extreme with such a small misalignment, but you can see that each of the diagonal strips kind of jumps across the divide rather than being a straight line.  This problem would be more extreme and much more noticeable when using even wider strips, since the two pieces of the quilt block would be getting moved even farther apart.

asterisk with section removed

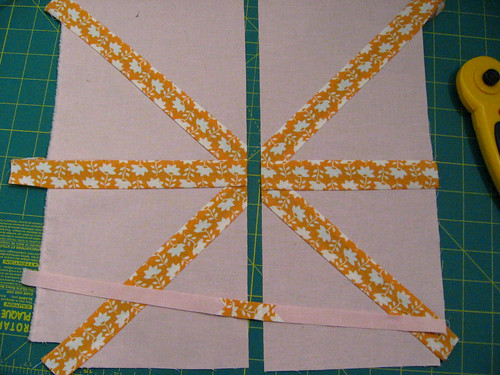
The solution is simply to cut a strip out of the block where you are going to add the pieced strip.  To figure out how wide a strip to cut out, you just subtract 1" from the size strip you are piecing in, to account for the 1/2" in seam allowances eaten up from each of the background and the strip you add.  So, for my block, I cut out a 1/2" strip, since I was using 1.5" strips.  I only did this for the final strip that I added, but in looking at it and thinking it through, I think I really should have done it for the final two (eg, the straight up and down segments, not the diagonal segments).  You could do it for every strip you add, but it's definitely not necessary for the first one (nothing to line up yet) and for the second one, you can eyeball it to keep it lined up.  I think my block turned out fine even though I only did this for the last strip, since I was not piecing with super thick strips, but I will remember to do it for both of the last two next time.

I definitely recommend the asterisk block if you have never made one before - they are really quick and fun to make!
Related Posts Plugin for WordPress, Blogger...