Showing posts with label gluten free. Show all posts

Wednesday, June 22, 2011

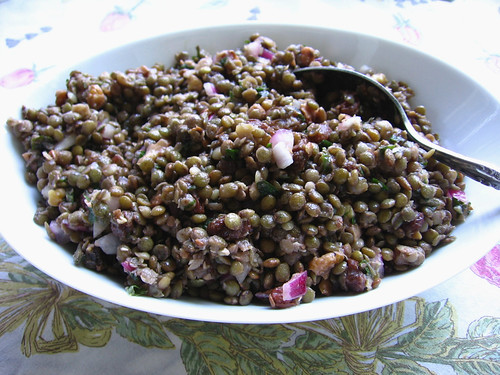
French Lentil Salad with Raisins and Walnuts

french lentil salad

This lentil salad is a perennial summer favorite in our household.  It is a great side dish to have on hand to eat throughout the week or to take to a potluck, and it keeps well in the fridge.  If you aren't familiar with french lentils, they are smaller than regular lentils, and have a more nuanced taste; they also keep their shape better when cooked, and are great in salads.  You may be able to find them in your regular grocery store, but if not they carry them at places like whole foods.  If you can't find them you can always substitute regular lentils (just be careful not to overcook them), but if you can find them they are totally worth adding to your pantry!  The recipe below is double what was called for in the original recipe, but I find it to be a better amount - if you don't want so much salad, feel free to halve the amounts.

French Lentil Salad with Raisins and Walnuts
Adapted from Entertaining for a Veggie Planet
  • 2 cups french green lentils
  • 1/2 cups raisins (or currants if you have them)
  • 1/2 cup lemon juice (2 lemons)
  • 1/4 cup olive oil
  • 1/4 - 1/2 cup finely chopped red onion (to taste)
  • 1/2 cup chopped walnuts, toasted
  • salt and pepper to taste
  • 1/2 cup chopped fresh mint
  • crumbled feta cheese (optional - I don't usually use but it is good)

Combine lentils with 4-6 cups of water in a saucepan.  Bring to a boil then reduce heat and simmer until tender but still somewhat firm, about 20-30 minutes (less if you are using regular lentils).  Drain.

In a bowl, combine all remaining ingredients and mix well.  Refrigerate and serve either chilled or at room temperature.

Tuesday, March 29, 2011

Carribean Sweet Potato Black Bean Gratin


I made this sweet potato gratin last week for the second time, and it again was really delicious.  It's from one of my favorite cookbooks, Moosewood Restaurant New Classics, which I find often has recipes that are interesting and delicious without being needlessly complicated - it's a good, solid everyday cookbook.  This dish actually took me a while to assemble but that also could be because I didn't have canned beans on hand so I cooked some in the pressure cooker, I had to pick the spinach and thyme from the garden, and I was just generally moving at a slow pace.  In any case, it is worth the effort.  I often make black bean and sweet potato dishes with southwestern flavor combinations, which I love, but the flavors in this dish are a welcome departure - sweet from the coconut and lime, but with an earthiness from the spinach and thyme - it really does taste carribean.  I couldn't quite think what to serve it with so we just had a salad but if you had time and wanted to make it more special I think fried plantains would be a great accompaniment!

Pottery note - the plate above is one that I made a few years ago, it has a simple carved design on the flange that I really like and a deep green glaze.  It doesn't match any of the other dishes we have which actually makes me like it even more.

Carribean Sweet Potato Black Bean Gratin
Adapted from Moosewood Restaurant New Classics
  • 1 garlic clove, minced or pressed
  • 1 1/2 teaspoons freshly grated lime zest (about 1 lime)
  • 2 tablespoons fresh lime juice (about 1 lime)
  • 2-3 tablespoons chopped fresh cilantro
  • 1/2 teaspoon dried or chopped fresh thyme
  • 1 1/2 teaspoons salt
  • 1/2 teaspoon ground black pepper
  • 2 1/2 cups light coconut milk (about 1 1/2 cans)
  • 4 cups peeled and thinly sliced sweet potatoes
  • 1 cup cooked brown rice
  • 1 1/2 cups cooked black beans (1 can, drained)
  • 1 1/2 cups fresh spinach, thinly chopped

For the topping:
  • 3/4 cup cornmeal
  • 1 tablespoon vegetable oil
  • 1/2 teaspoon dried or fresh chopped thyme
  • 1/4 teaspoon ground cumin
  • 1/4 teaspoon salt

Combine the garlic, lime zest and juice, herbs, salt and pepper and coconut milk in a measuring cup.  Pour a third of this mixture into a lightly oiled 9 x 13" baking pan.  Put half of the sweet potatoes in a layer on the bottom of the pan, followed by half of the rice, half of the beans, and half of the spinach.  Pour in another third of the coconut milk mixture and repeat the other layers.  Pour all the remaining coconut milk on top. 

Preheat oven to 350.  Mix together all the topping ingredients in a small bowl and distribute evenly over the top of the gratin.  Bake uncovered for about an hour, rotating the pan halfway through.  When topping begins to brown and the sweet potatoes are tender, remove and let cool for 3-5 minutes before serving.


Monday, March 21, 2011

Black Bean Hummus


I'm calling this black bean hummus because the ingredients and proportions were inspired by hummus, but it could just as easily be called "delicious black bean spread" or "semi-spicy black bean dip" so if those sound more appealing to you then feel free to call it one of them, or something else.  In my family we like to adapt ingredients to fit what is on hand so there is a story about the time when a dish was made where all the ingredients had been replaced with something similar... pears for apples, and so forth.  This is a bit like that - I used black beans in place of chick peas, toasted walnuts in place of tahini, lime juice in place of lemon, and added some aleppo pepper flakes for a bit of kick.  It still does have garlic, olive oil, and salt like the original, however.   I have made this before and I'm very glad I kept track of the proportions this time because it was delicious and I will definitely be making it again.


A note on the aleppo pepper: this is one of my favorite seasonings; it has a mild, slightly smoky, rich spiciness to it.  You can use them in place of red pepper flakes or ground chili peppers in cooking, so if you are tempted to get them, don't hesitate, you won't regret having them around.  However, if you don't see the need to add another spice to your cabinet or just want to make this right now without tracking down my favorite obscure spice, you can substitute most milder chili peppers or even chili powder.  If you have ground or canned chipotle peppers I am sure those would work very well too.

Black Bean Hummus
  • 1 can black beans, drained (or 2 cups cooked)
  • 1/2 cup chopped walnuts, toasted
  • 2-3 cloves of garlic, peeled
  • juice of 1 lime (~3-4 tablespoons)
  • 1 1/2 teaspoons aleppo pepper (or other chili pepper to taste)
  • 1 1/2 tablespoons olive oil
  • salt to taste (~1/2 - 1 teaspoon)
  • water
Blend ingredients through salt in food processor or blender.  Add water to get desired consistency.  Serve with crackers, chips, vegetables, or as a spread in sandwiches, or however else you wish!

PS - Don't forget to check out the raffle for handmade baby items to benefit Japan!

Wednesday, February 16, 2011

Valentines Meringues


I haven't blogged in a few days but it is mostly because I have been SO BUSY making stuff!  I spent most of the weekend sewing up baby blankets and tote bags for the craft hope charity project I am doing (originally mentioned here) and will be back to share more with you on that soon (lets just say I may have been a bit overambitious when I decided to make 12 kits...). 


Then I whipped up a really special Valentines day dinner for my sweetie, if I do say so myself (apologies for the crummy photo quality above - this was the best I got).  I adapted the delicious butternut squash and walnut lasagna that I made before into a filling for handmade ravioli and then made the bechamel sauce to go on top.  To adapt the lasagna to make the filling, I basically prepared the squash as described in the recipe, then ground the nuts in the food processor, and then added the squash/onion/garlic/herb mixture, the cheese, and an egg and processed a bit (leaving it somewhat chunky not totally pureed).  I also made braised leeks again for the side, which were yummy and a good complement to this dish - I plan to share that recipe some time too.


For dessert, I made homemade strawberry ice cream and heart shaped meringue nests like the one shown above, as well as a bunch of heart shaped meringue bites.  Somehow making meringues seemed like a totally normal thing to do since my mom always used to make them, but then I realized I had never made them myself and it seemed like it might not be so easy.  So I poked around in a number of my cookbooks and then forged ahead.  I found some recipes that called for more complicated ingredients but ended up going with an ultra-simple approach and it worked well.  I overbaked them a bit which mostly meant that they were still delicious and even more crumbly and delicate, but slightly brownish in color.  I was OK with that although it does make me want to make them again to see if I can hit it spot on. 

Sorry I don't have a picture of the ice cream, it was pretty good but not phenomenal, being made with frozen strawberries rather than fresh, in season ones.  This too I will have to try again [insert noises from husband in background pretending to be disappointed that there will be more of this in his future].  Also no pottery notes - we decided to eat off our nice china since it was a special occasion!  You can see the cute pink and red flowered tablecloth that I recently thrifted in the pic above which served perfectly.

Meringues
  • 3 egg whites, carefully separated to ensure no yolk at all is present
  • 3/4 cup granulated sugar
Preheat oven to 250F and line baking sheets with either silicon baking mats or parchment paper (I used my fave silicon mats and they worked great).

Apparently if any oil gets into your meringues it really messes things up, so for starters make sure that your mixing bowl and mixer are extremely clean, and make sure you don't get any yolk in your egg whites.  I used a stand mixer but I am sure you could do this with a hand mixer and a bit more elbow grease.  With your mixer on the highest speed and using the whipping attachment, beat the egg whites until they form soft peaks.  With the mixer still running at high speed, gradually add in the sugar.  Stop and scrape down the sides if needed, then continue whipping at high speed until the mixture glistens a bit.  I read that in a recipe and didn't think I would be able to tell when to stop but it really does get a bit shiny. 

To form meringues, you can just scoop the raw meringue onto the baking sheets by the spoonful, but you can get more elegant shapes if you pipe them.  I used a regular pastry bag and the largest tip that I had, I think a size 11 or 12, it was about 1/4" across.  You can also use one of the tips that looks like a star at the end, I just used a plain tip so that I could make the cute hearts in the first picture.  To get a thicker shape just hold your tip in one place while you squeeze out the meringue.  To make a nest, pipe a concentric shape (usually a circle, but I did a heart), and then pipe up a few layers at the outer edge to build a kind of wall.  You can play around and see what shapes you like.

Bake for 1.5-2 hours (I baked for 2 hours or maybe a bit longer) - you can check but pulling one out and eating it to see if they are done.  When they are done remove from oven and then remove from the sheet.  Warning, these are addictive!

Monday, February 07, 2011

Healthy Creamy Spinach Dip


This dip is an old favorite which I have made a number of times, most recently yesterday for a superbowl party we went to.  It is always a hit, and people are usually pretty surprised to hear that it really is actually relatively healthy.  It doesn't taste fatty and over-the-top, but it also doesn't taste like it's made with tofu and low-fat dairy products, which it is.  Unlike a greasier spinach dip, this one is still delicious but won't give you that same weighed-down feeling from all the fat... particularly helpful for a party like the super bowl where you end up mindlessly muching away throughout the game.  This dip comes from one of my favorite cookbooks, Entertaining for a Veggie Planet, which has a variety of really great vegetarian dips in addition to other great recipes.


It's healthy enough, in fact, that the picture above is from my lunch today (the recipe makes a pretty large amount... what else am I going to do with all those leftovers?).  I used a smaller bowl that I made last year to hold the dip and then served it on one of my plates.  I actually made this bowl as a glaze test; since the color in glazes is an actual chemical reaction, you won't know how two glazes will interact until you test it out (and it will be different depending which glaze is applied on top).  Rather than just making test tiles to do tests, I made a whole set of smaller bowls and tried out different glaze combinations, some with drips like this one, some with the glazes overlapped.  It was fun to see how they turned out and they were much more useful than a test tile would have been!

What treats did you make or eat for the superbowl?  What are your favorite dip recipes?

Healthy Creamy Spinach Dip


 Ingredients:
  • 10 oz box thawed frozen chopped spinach (or you can use 10 oz chopped fresh spinach)
  • 1 cup finely chopped red onion - about 2/3 of a medium onion
  • 1/2 cup low fat small curd cottage cheese
  • 1-2 garlic cloves, minced
  • 1 1/2 cups firm tofu (about 2/3 of a 16 oz container)
  • 1/4 cup reduced fat sour cream (or regular)
  • 2 tablespoons light mayonnaise (or regular)
  • 2 tablespoons lemon juice (I use the kind from a squeeze bottle, but if you prefer to juice a fresh lemon this is about 1/2 lemon's worth)
  • 1/2 teaspoon table sugar
  • 1/2 teaspoon ground cumin
  • 1 - 1 1/2 teaspoons kosher salt
  • sesame seeds for garnish (optional - I didn't do this)
Fully defrost the frozen spinach (I used the microwave b/c I forgot to defrost in advance, and it turned out fine), then place in a fine colander and press out as much of the liquid as possible with the back of a spoon or a spatula.  In a medium to large bowl, combine the spinach, onion, cottage cheese, and garlic and mix well to combine.

Cut the tofu into slices and lay out on a clean dishtowel, then fold it over (or place another dishtowel on top) and press to remove liquid.  Chop the tofu into cubes and transfer to a food processor or blender.  Add the remaining ingredients and process or blend until smooth.  Add the tofu mixture to the spinach mixture and stir gently to combine.  Taste and adjust salt if needed and add pepper if desired.  Serve chilled or at room temp.  Best if eaten within 2-3 days.

Saturday, February 05, 2011

Simple Hearty Lentil Stew with Potatoes and Spinach


I have been realizing that I tend to post on here about the more complicated (and usually less healthy) recipes that I make, but I don't always put up the day-to-day staples that we eat all the time.  I am a huge proponent of eating solid, healthy meals on a regular basis which don't take hours of prep time, so I am going to make more of an effort to share some of the simpler meals we eat, too.  These recipes aren't necessarily sexy or exciting, but they are simpler to prepare and often create plenty of leftovers that you can eat in a pinch when you just don't feel like cooking at all... I keep a few servings in the fridge but often stash most or all of the leftovers in the freezer to eat more than a few days later.  I hope that these more basic types of recipes won't be totally boring to folks.  These lentils fit solidly in the basics category - the recipe is flexible to what you happen to have on hand, they cook up pretty quickly and with minimal prep and make a big batch which keeps well.  They are hearty and delicious and can stand on their own or are great served with bread, brown rice, or a side of salad or veggies.

On a related note, I realized that I have a lot of gluten-free and vegan recipes up here, not because I purposefully follow either of those diets but I guess just because I love to cook beans and lentils and other things that happen to fit in those two categories.  I have gone back and added gluten-free and vegan tags to past posts, so if you are looking for recipes in those categories feel free to poke around!


A note on the bowl the soup is in - this is a pot that I made after college when I was playing around more with surface decoration.  I have made a number of pots with this kind of line decoration around the middle, made by holding a textured or pointed object on the surface of the pot while turning the wheel.  In this case I used a plastic fork and slowly moved it up and down to give the design some movement - I like how it turned out!  This bowl is a bit on the small side but still a much-used and well-loved one in our house.

Hearty Lentil Stew with Potatoes and Spinach
  • 1 tablespoon olive oil
  • 1 onion, chopped
  • 1 teaspoon dried basil
  • 1/2 teaspoon dried thyme
  • 1/2 teaspoon dried marjoram
  • 1 lb bag lentils, rinsed/looked over to make sure no foreign objects
  • 6-8 cups water
  • 2 medium potatoes, chopped
  • box of frozen spinach, defrosted if possible (or bunch of fresh spinach, rinsed, if you prefer/have on hand - or this works well with Kale as well)
  • salt/pepper to taste
Heat the olive oil in a medium to large pot, add onions and saute for 3-5 minutes on medium-high heat, until onions begin to brown.  Add herbs (note - you could substitute 2 teaspoons of an herb mix such as italian herbs or herbes de provence if you prefer), and saute for another 1 minute.  Add the lentils and water and bring to a boil, then reduce to a simmer.  You can chop the potatoes while the lentils simmer; I left the skins on but you could peel if you prefer.  Add potatoes when chopped and simmer for 25-30 minutes, stirring occasionally.  Add the spinach and raise heat to return to a simmer, then lower heat again and cook until lentils are fully cooked, another 10-15 minutes.  Add salt and pepper to taste and serve.

Note: you could cook this in a slow-cooker if you started the onions/herbs on the stovetop and then transferred to the slow-cooker, but it would take significantly longer to cook.  It would probably turn out well if left to cook all day on low, however (maybe add spinach in the last hour to half hour).


So... what are your favorite kinds of basic everyday meals?  And do you enjoy my little pottery updates or are they distracting from the recipes?

Sunday, January 30, 2011

Sweet Potato Black Bean Chili


I really love black beans (I may have mentioned this), and I think that black beans and sweet potatoes are an amazing flavor combination.  So this chili makes a natural pairing - I am almost surprised that I didn't come up with this a lot sooner than this year.  I had made chili with sweet potato or winter squash in it before, but usually multi-bean chilis with a lot of other stuff going on to distract you.  This version keep the focus on the black beans and the sweet potatoes, and it is earthy with hints of smoky sweetness.  It is moderately spicy, hot enough to be interesting but not so hot that it should make anyone squeamish.  I have made this chili several times this winter and finally remembered to write the recipe down, so I feel like it is already an old favorite and really overdue for posting here (especially considering the number of friends that have asked for the recipe).

I also realized that, since all our everyday plates/bowls/mugs are pretty much pots that I made, I am frequently posting pottery photos along with my recipes but rarely say anything about it.  So I may start highlighting some of the pots, too, and giving a bit of a backstory.   This bowl is one that I made in college, when I was first experimenting with carving on my pots.  I really like the simple basketweave type hatching pattern that I made on this bowl, and how it subtly shows through the matte glaze.  There is actually a small matching plate so I kind of think of this as a soup and salad set.  The earthy beige/brown color of this glaze is a great match for hearty bean and lentil soups like this one.

Sweet Potato Black Bean Chili
Makes 4 quarts
  • 1 large onion, chopped
  • 1 Tablespoon olive oil (or less, if desired)
  • 2 stalks celery, chopped
  • 1 green pepper, chopped
  • 1 Tablespoon chili powder
  • 1/2 teaspoon dried basil
  • 1 teaspoon dried oregano
  • 1/2 teaspoon ground cumin
  • 1 teaspoon ground chipotle chilis (optional)
  • 2-3 garlic cloves, minced
  • 2 medium sweet potatoes, peeled and finely chopped into ~1/2"-1" pieces
  • One 28 oz can of diced tomatoes (or two 14 oz cans)
  • 3 cans black beans, drained and rinsed, or 1 lb bag of dried black beans, cooked (not drained)
  • 1/4 cup tomato paste (optional)
Like most soups, this soup is best if you let it simmer for several hours (or simmer for a while and then refrigerate and serve the next day).  If you have a slow cooker, it is easy to start this soup on the stovetop and then transfer it to the slow cooker to simmer away.  If you don't have a slow cooker, you can also easily make this on the stovetop and just simmer it there.  If you are going to transfer to a slowcooker, start the first step in a large skillet, but if you are planning to cook entirely on the stovetop, you can start in a large stockpot/soup pot.

Heat the olive oil over medium heat and add the onions and saute until soft.  Add the peppers, celery, garlic, herbs and spices, and saute for another 5-10 minutes, until onions are slightly browned and vegetables start to soften.  If cooking in a slow-cooker, transfer this mixture to the slow cooker and add the sweet potatoes, tomatoes, beans, and tomato paste.  If the herbs/spices are stuck to the pan when you transfer the mixture, add some water to the skillet to loosen and add to the slow cooker.  If cooking on the stove, just add the ingredients to the pan and stir to loosen anything that has gotten stuck to the pan.  Add water until it is chili consistency - 6-8 cups if you used drained canned beans, and 2-3 cups if you used cooked dried beans and added their cooking water (or whatever amount seems to get you to the right consistency.  Simmer for at least 1 hour, ideally 2-4 hours or longer (Note - 1 hour may not be sufficient in a slow cooker - 3-4 hours or longer in slow cooker is probably best).

Note on optional ingredients:
  • The chipotle peppers add the slight smoky flavor and are really delicious.  If you don't have them though, you can make this without and just add a bit more chili powder.
  • If you omit the tomato paste, this is more like a black bean soup than a full blown chili, but also very good.  This is actually what I did the last time I made the soup.

Friday, October 29, 2010

Butternut Squash Soup with Ginger Pear Compote, and Artisan Bread in 5 min a day


I was looking through my recipe box the other day and came upon a handwritten recipe from my mother for this soup.  It doesn't say where the recipe was from originally, but it sounded delicious and like just the thing for the start of fall.  I picked up fresh cider, pears and butternut squash at the farmers market and I was all set to try it out.  I have to say that this recipe had a lot of butter in it... my mom's notes indicated she had cut the butter in half, and I cut it in half again, and it still seemed like a lot to me.  I am sure the soup would be delicious with even more butter but it seems excessive to me - I think it would taste good using half butter and half vegetable oil and/or cutting down the amount of butter even further than I did.  In any case, it was a really great flavor combination and we enjoyed it a lot.


Butternut Squash Soup with Pear Ginger Compote

For the soup:

  • 3 tablespoons butter (or less, or sub vegetable oil for part)
  • 2 small chopped onions
  • 2 lb butternut squash, peeled and cut into 1-2" cubes (about 4-5 cups)
  • 3 cups fresh apple cider
In a medium saucepa, melt butter and add onion, cook over medium heat until transparent.  Add squash and cook for 2-3 minutes, then add cider and bring to a simmer.  Lower heat and cover, and cook until squash is tender (about 1/2 hour or more).  Puree either with a hand blender or in a regular blender (being careful not to burn yourself).  Season with salt and pepper.

For the compote:
  • 2-3 ripe pears, chopped with skin on
  • 1 tablespoon butter
  • 2 tablespoons minced ginger
In a medium skillet, melt butter and cook pears gently over low heat for 5 minutes.  Add ginger and continue cooking with lid on until tender (10-15 minutes).  Serve soup topped with a dollop of compote.


The other part of this meal was fresh homemade bread.  A few months ago I bought the Artisan Bread in Five Minutes a Day cookbook, which I had been hearing all about and wanted to check out.  It has a lot of really great-looking recipes and I was excited to try their technique.  The basic idea is that you make a large batch of very wet bread dough and store it in your fridge for up to a couple weeks, and then you are able to take out a loaf's worth and cook it after a relatively short rise.  The wet dough keeps the bread moist and as the dough ages in the fridge it takes on a sourdough type of flavor.  I was tempted to jump right to one of the whole grain loaves, but they advise starting with the "master recipe" for a white bread boule, so I started there.  

Despite making a number of mistakes (like not putting enough flour on the dough when I was shaping it, and forgetting to slash the top before baking), the bread turned out to be really delicious!  The master recipe was published in the NYT a few years ago if you are interested in trying out the technique without buying the book yet...  Now I just have to decide what to do with the remainder of the dough I have saved... I am thinking probably pizza, but I am tempted to try another loaf of bread.


Sunday, October 03, 2010

Easy Roasted Tomato Polenta


As you know if you have ever done it, making polenta the traditional way, which involves near-constant stirring on the stovetop for a half an hour, is a real pain.  So I was very excited last year when I first heard about making polenta in the oven - this is a good general recipe that I have used as a guide.  While this technique is often called "no-stir," that is really a misnomer, since you do stir it a few times, but it is much less labor intensive.  I have made it just plain, and served it with a sauce on top or as a side dish, but I also like stirring in other stuff to make it more interesting.  Earlier this summer we had a bunch of uncooked veggie skewers left over from a party with zucchini, peppers, tomatoes and onions, so I roasted them in the toaster and then later stirred them into the polenta, which was delicious.  This rendition was inspired by the slow roasted tomato bruschetta in the Gourmet cookbook, but really you could stir in any roasted veggies and it would be yummy.  Another good fall/winter option is to add sauteed mushrooms and kale. 


Easy Roasted Tomato Polenta
  • 2 lbs assorted tomatoes, coarsely chopped (halved or quartered depending on size)
  • 4-5 cloves garlic, minced or pressed
  • Olive oil
  • 1 1/2 cups dried polenta/coarse cornmeal
  • 5 cups water
  • 1 1/2 teaspoons salt
Spread the tomatoes on a baking sheet, then mix the garlic with 1/2 cup olive oil and drizzle the garlic/oil mixture over the tomatoes.  For slow roasting, bake at 250 for 4-5 hours or longer (I did this the night before); you could probably roast at 350 and just put them in 20 minutes before the polenta and they would be roasted enough, if you want to make it all in one night.

For polenta, add dried polenta, water, salt, and about a tablespoon of oil to a large baking pan.  Stir to ensure that there are no dry lumps in the polenta - the polenta will settle at the bottom.  Bake at 350 for 40 minutes, at which point the polenta will be mostly cooked but there will be wetter and drier spots.  Take out of the oven, add the roasted tomatoes and stir to combine and to fully mix the polenta.  Bake for another 10 minutes.  Remove from oven, let cool for a few minutes and serve.

Monday, August 02, 2010

Smoky Black Beans


I love black beans.  They are one of my all-time favorite foods.  I may have had a hankering to make black beans for dinner tonight because we went to a crummy suburban Mexican restaurant in Hagerstown for dinner last night, where not only did they serve only bad refried beans with their food, but we strongly suspected that they were using American cheese.  Very sad.  Our dinner tonight was much, much better.


Featuring peppers, basil and oregano from the garden, we ate the beans accompanied by brown rice, feta cheese, and another peach tomato salad (with a drizzle of lime to make it more Mexican side-dish appropriate).  Also visible in the picture at top - fun napkins that I made using Metro Cafe fabric.  I originally thought that we would use these for outdoors to go with our bright red plates, but we have been enjoying their bright summeriness inside too.


Smoky Black Beans
  • 1 lb dried black beans or 3 16 oz cans, drained
  • 2 tablespoons olive oil or canola oil
  • 2 chopped onions
  • 2-3 chopped peppers (more if you are using small ones like my garden has been producing)
  • 1 tablespoon chopped fresh basil (or 1-2 teaspoons dried)
  • 2 teaspoons chopped oregano (or 1 teaspoon dried)
  • 2-3 cloves garlic, minced
  • 1-2 teaspoons ground cumin
  • 1 1/2 teaspoons ground ancho chili peppers
  • 1/2 - 1 teaspoon ground chipotle chili peppers (this is what gives it the smoky flavor)
  • salt to taste
Either pre-soak the beans for 6-8 hours, then drain water and add new water to cover by 1-2", or just cook in a pressure cooker (my preference!), or use canned beans.  While the beans are cooking (if not using canned), chop the vegetables and begin to cook.  Heat the oil in a large stockpot over medium heat, then add the onions and saute for about 5 minutes, stirring occasionally.  Add the peppers, garlic, herbs and spices, and continuing sauteing until the peppers start to soften (or until the beans finish cooking).  Add the beans a a cup or two of the cooking liquid (or water if using canned beans).  Simmer over medium heat, stirring occasionally, for another 15-20 minutes.  Mash the beans or use a hand blender to partially blend (or remove part of the beans to a blender then return to the pot - be careful not to burn yourself).  Add salt to taste, let cool for a few minutes and serve.  Makes about 6-8 servings - plenty for leftovers!

These make great leftovers - the flavor deepens when they have a chance to sit (so be careful not to add too much spice for your taste!).  Also - you can put pretty much any vegetable in these that you please, they are also a great way to use up zucchini.

Monday, July 26, 2010

Indian Food Feast


Last night I made a delicious feast of Indian food for dinner.  The keystone was a dish I have made many times, Sweet Potato Badi from Entertaining for a Veggie Planet.  Since I had the time, I went whole hog and made roasted cauliflower, raita, and flatbread (aka pita) to go along, as well as the usual long grain brown rice.  It was really yummy and well worth the effort - I have lots of leftovers to eat for lunch this week (and some more stashed in the freezer).


 The first thing I got started was the flatbread.  I used the pizza dough recipe from Animal Vegetable Miracle by Barbara Kingsolver, and then just cooked it as a flatbread.  This is my favorite pizza dough, and it made a great bread all by itself.  Following instructions from the Sunlight Cafe, after the dough had risen I punched it down and then cut it into pieces.  I actually put half of it in the fridge to experiment with the idea of letting it sit for a day or two and get a little bit of a sourdough taste (I have been wanting to read Artisan Bread in 5 Minutes a Day but get the basic gist of it from reading articles etc).  The other half I cut into four pieces and smooshed each one out into a disc, then let them rest for five minutes and then rolled them out very thin.  Some of them sat for another five minutes at this stage which I remembered after the fact seems to be what gives pita its pocket - so I basically made pita breads.  I cooked each one for about 8-10 minutes at 400 degrees.


While the Badi was simmering, I chopped up the cauliflower and roasted it in the oven at 350 for about 20 minutes.  I used 2 teaspoons of an Indian spice mix that I had from Penzeys, then drizzled with olive oil and sprinkled with salt.  I stirred it a few times while it was cooking to make sure it cooked evenly.


Finally, while the breads were cooking I pulled together a quick raita - mixing 1 cup each of plain yogurt and shredded cucumbers (from my garden) with about 1/2 teaspoon each of cumin and salt.


Over time, I have made some tweaks to the Badi recipe, so here is my version.


Sweet Potato Badi
Modified from Entertaining for a Veggie Planet
  • 1/4 cup canola oil
  • 1/2 cup red lentils
  • 1 teaspoon chili powder
  • 2 teaspoons ground cumin
  • 1/2 - 1 teaspoon ground turmeric
  • 1 medium potato, peeled and cut into 1/2" cubes
  • 1 large sweet potato (or 2 medium), peeled and cut into 3/4" cubes
  • 2 small zucchini, halved or quartered lengthwise and then cut into 1/4"-1/2" slices
  • 2 plum tomatoes, peeled and seeded and cut into 1/2" cubes (or diced tomatoes from a can)
  • 1/2 cup frozen peas
  • 1/2 cup dried unsweetened coconut
  • 1/2 cup plain yogurt
  • 1-2 small skinny chile peppers (jalepeno or serrano work fine), minced
  • 1 teaspoon kosher salt
In a large pan, heat the canola oil over medium heat.  Saute the lentils 5-10 minutes (adding the spices part way through), stirring frequently, until they begin to brown (or before - they burn pretty easily).  Add the potato/sweet potato and 1 1/2 cups water (or enough water to cover them when you put the pieces in a bowl after you chop).  Bring to a boil then reduce to a simmer and cover almost completely; simmer for about 15 minutes.  Add the zucchini, tomatoes, and peas and bring back to a boil and then reduce to a simmer again.  Cook until the vegetables are fork-tender and the liquid is mostly gone, about another 10-15 minutes.  Add more water while they cook if needed.  Remove from heat.

While the sweet potato mixture is cooking, heat a small frying pan over medium heat without any oil.  Toast the coconut until it is light brown (about 5 minutes), stirring frequently with a fork to mix, or shaking the pan.  Remove from heat before it is entirely done, as it will continue to cook in the pan (or transfer it to a bowl at that point).  Combine the the coconut, yogurt, chiles and salt in a bowl and mix together thoroughly.  Fold the yogurt mixture into the sweet potato mixture, then cover and let sit for a few minutes.  Serve over rice.
Related Posts Plugin for WordPress, Blogger...