Friday, December 03, 2010

Card Wallet Sewing Tutorial


As promised, here is a sewing tutorial to make a cute card wallet with a button and elastic closure.  These are great for when you want to just carry a few cards and maybe some cash with you instead of a big wallet, or you could use them to hold business cards.  Also, in the spirit of the holidays, you could use these as gift card holders that then have a useful life afterwards!  They are very quick and easy to make - I hope you enjoy the tutorial!  If you make a card wallet with this tutorial I would love to see how it turned out - you can share a photo in the Needle and Spatula Flickr group.


TERMS OF USE:  For personal, non-commercial use only.  If you are interested in making these wallets for small-scale commercial sales (eg craft fairs, etsy), please contact me and we can discuss a licensing agreement.

DONATE TO SUPPORT THIS TUTORIAL - this tutorial is provided free of charge, if you would like to show your appreciation and support the free patterns I provide here, you can donate here (or it helps if you click through to any of the amazon links on this site, whether you purchase that particular product or not!).  Thanks for your support!


What you will need:
I used quilting weight cotton fabric, but you could also use home dec weight fabric for the outside and skip the interfacing.  Note that your lining fabric will also peek out at the sides so make sure it is pattern/color/etc that you will be happy with seeing there.  All seams are 1/4" unless noted otherwise.


I actually cut out the interfacing first then fused it to the two front pieces, then cut them out to be the same size, but you could also cut both out first then fuse.

 Find the midpoint of the top 5 1/2" edge of the larger piece of outer fabric, and fold the elastic into a loop and hold it at the midpoint.


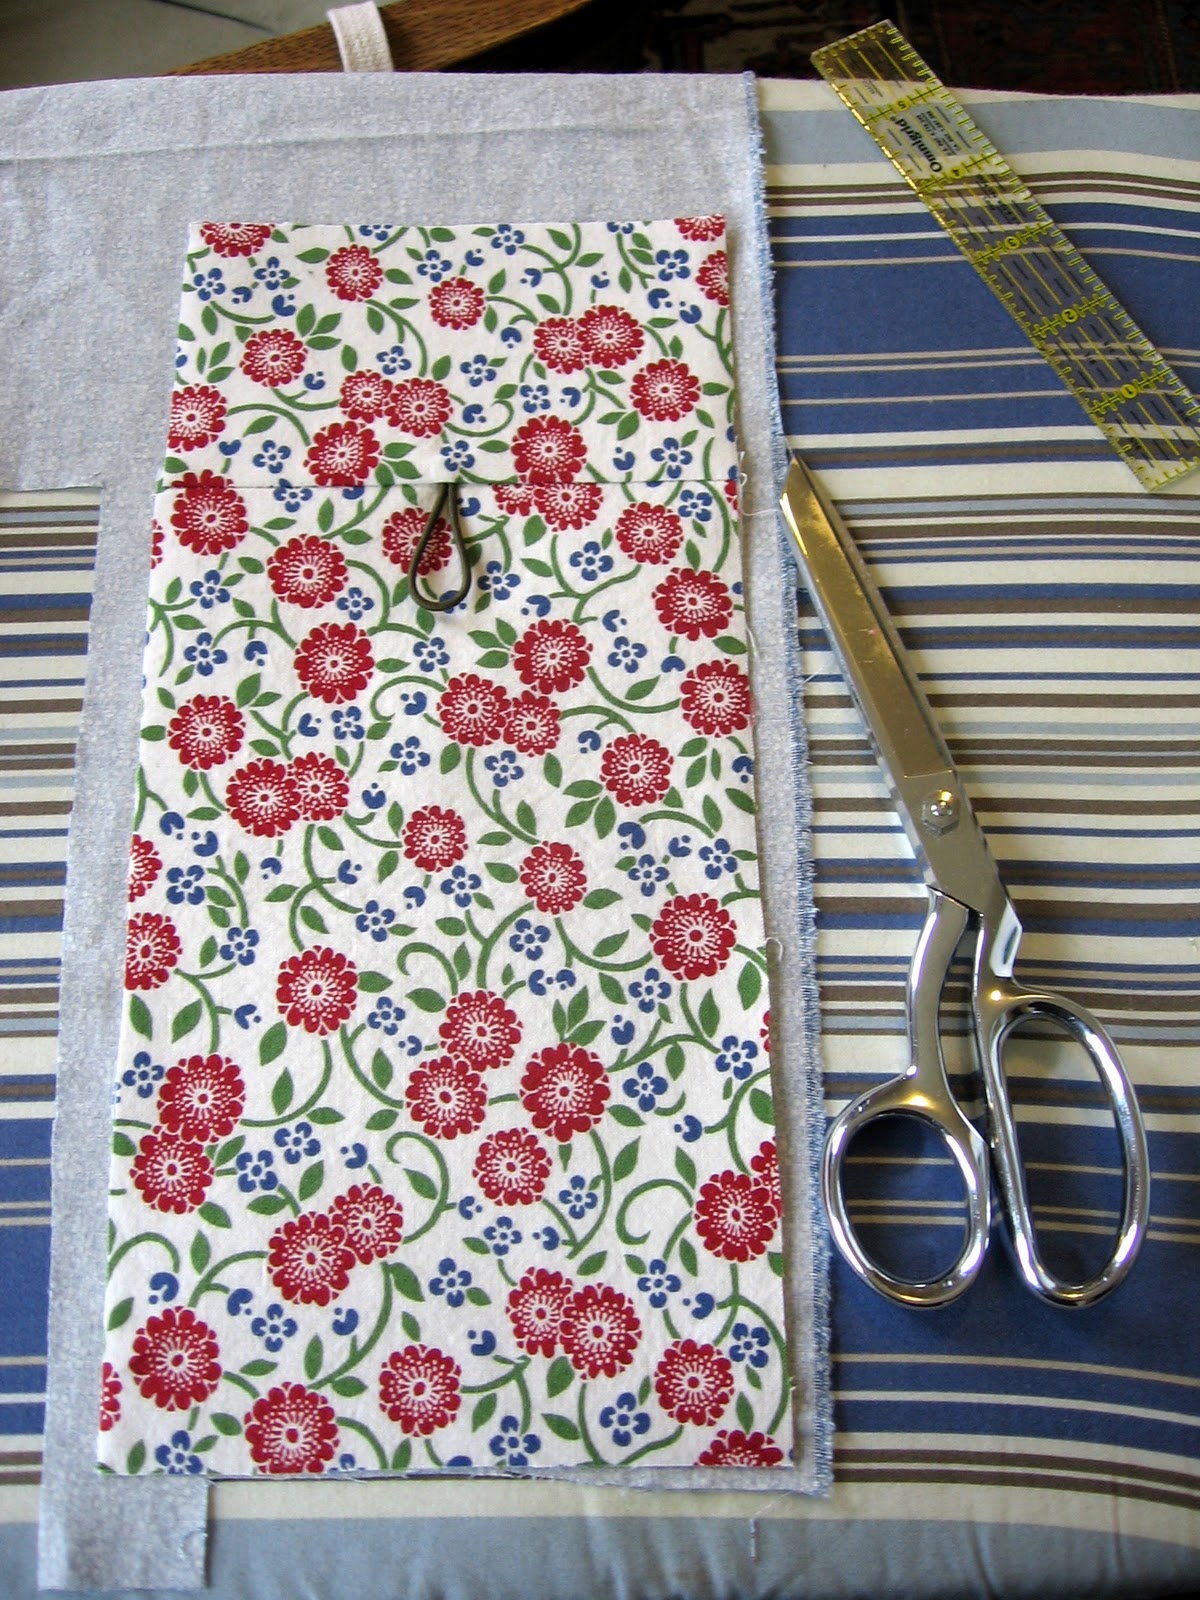
Place the smaller piece of fabric on top (right sides facing) and pin to either side of the top of the elastic to hold in place.  Now the loop of your elastic is sandwiched in between these two layers.  Sew the pinned seam, then after you sew you can trim some of the fabric near the corners above the seam (sorry I didn't get a pic of this trimming, but it helps make the final corners of the wallet less bulky and easier to sew, so hopefully you get the idea).


Fold open and iron flat.  I actually just cut out the second piece of fabric using this front piece as a template, but you could also cut it out at the beginning.


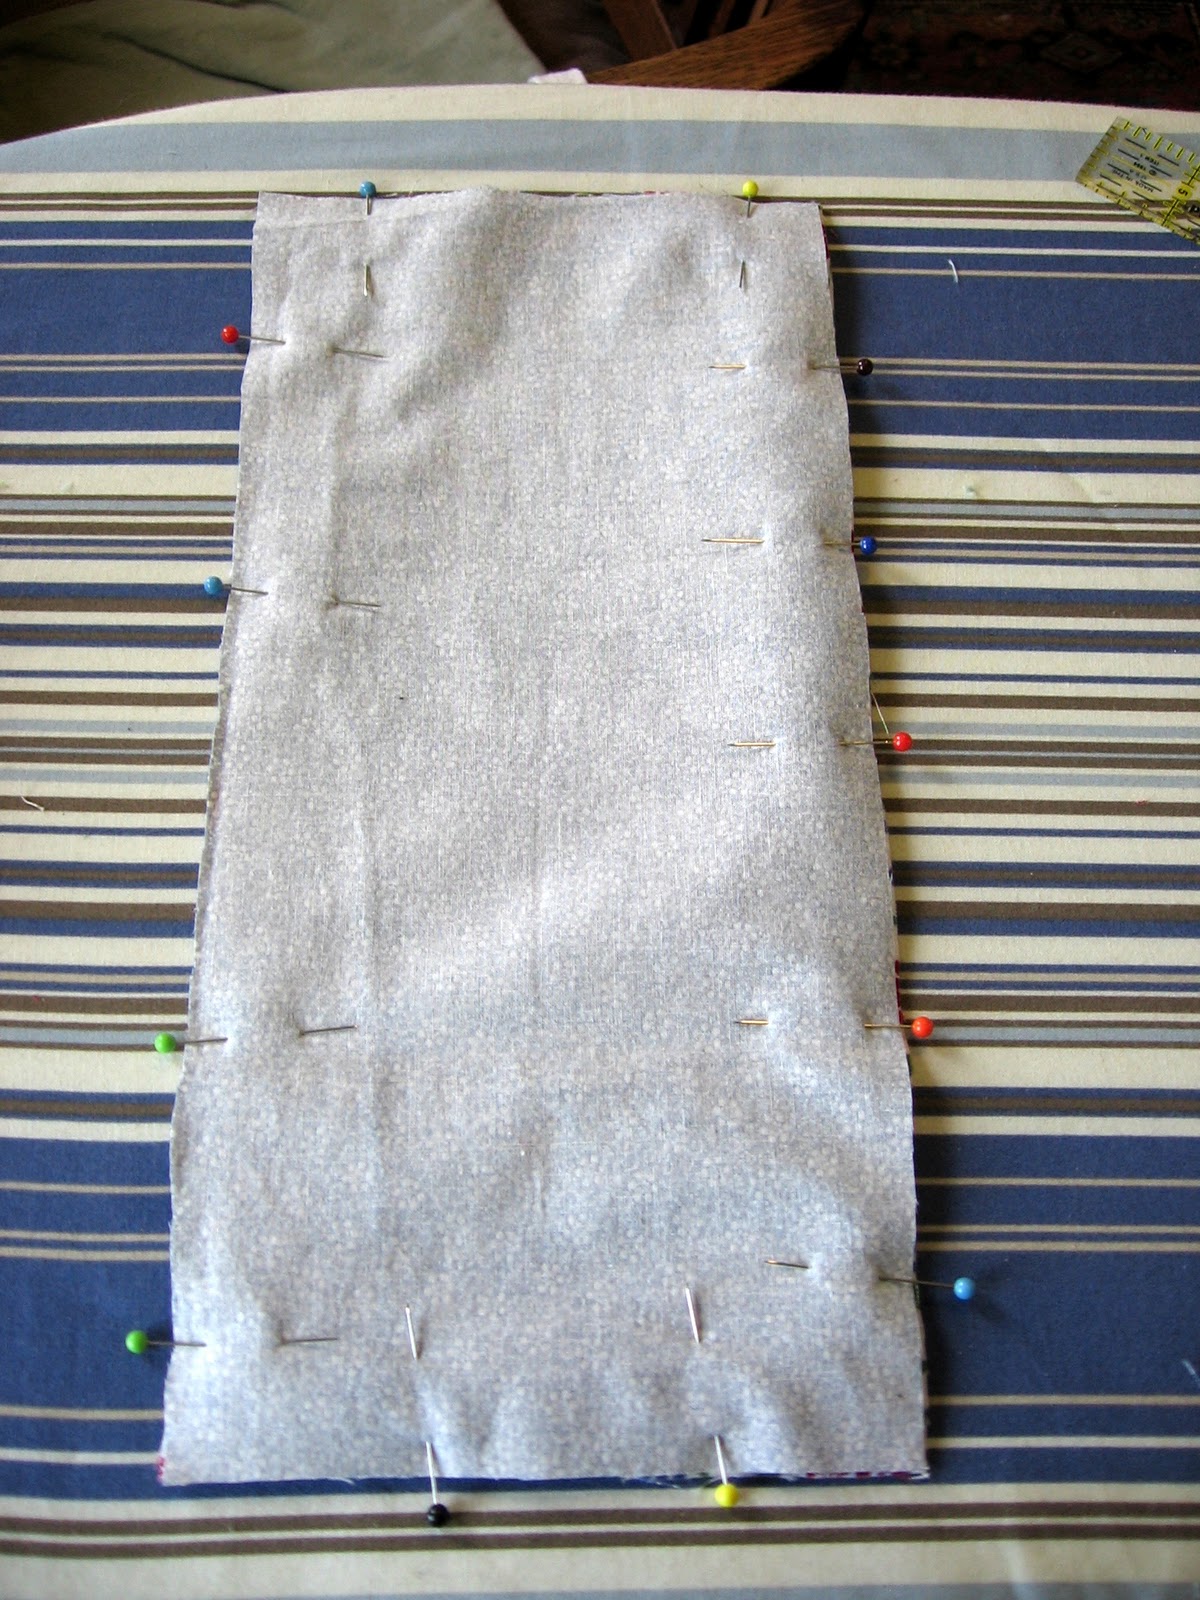
Either way, pin the lining and the outside piece together with right sides facing.  Leave an opening at one end that you will not sew.


Sew around the edges, leaving the unsewn opening as pinned (about 3" or more wide)   Be sure to backtack (sew a few stitches in reverse to secure) at the beginning and end. Trim the corners, making sure not to cut into the stitches.


Turn rightside out using the opening that you left, and push out the corners then iron flat.  Be sure to fold under and line up the edges where you left the opening.  Then topstitch across the two short ends (including the one with the opening), 1/8" from the edge.


Fold the side with the elastic at the point where there is a seam on the outside and iron down in place.  Then, fold the other side by about the same amount, leaving about 1/4"-1/2" gap in between the two sides.  Pin both sides in place and then sew along the edges to secure 1/8" from the edge (eg, along the top and bottom edge as shown below).  Using the length of the elastic as a guide, hand sew a button to the outside of the wallet (as shown in the pictures of the finished wallet).  You are done, enjoy!


I hope you found this tutorial helpful!  I have done a couple of these now, let me know if you have any feedback - I hope I am providing the right level of detail/enough photos and explanation for folks to follow.

Thursday, December 02, 2010

Pleated Pouch Sewing Tutorial


I originally posted this project in August and have been meaning to make it again to do a tutorial ever since.  This bag combines elements from a number of different tutorials and projects out there, I basically mixed and matched elements to come up with what I wanted. 


It has squared off bottom corners which give it a good amount of inside volume and a nice shape.  It can stand up (and would stand up even more if made with home dec weight fabric or using interfacing).  It would be great as a small makeup or jewelry bag, to hold knitting or sewing notions, or for whatever you want!  Also, this is clearly not a grocery bag, but in the spirit of the Green Grocery Bag Challenge, you could make these to use as "wrapping" for small holiday gifts.  See below for the tutorial and for a sneak preview of another project (and tutorial) coming soon!  If you make a pouch with this tutorial I would love to see how it turned out - you can share a photo in the Needle and Spatula Flickr group.


TERMS OF USE:  For personal, non-commercial use only.  If you are interested in making these pouches for small-scale commercial sales (eg craft fairs, etsy), please contact me and we can discuss a licensing agreement. 
 
DONATE TO SUPPORT THIS TUTORIAL - this tutorial is provided free of charge, if you would like to show your appreciation and support the free patterns I provide here, you can donate here (or it helps if you click through to any of the amazon links on this site, whether you purchase that particular product or not!).  Thanks for your support!

What you will need:
  • Two 2"x7" rectangles of fabric for top band on outside of bag
  • Two 5"x9" rectangles of fabric for bottom of outside of bag
  • Two pieces of fabric ~7"x9" for inside of bag
  • 9" or longer zipper in coordinating color
  • Mid- or light-weight fusible interfacing (if a stiffer bag is desired - I did not use)
  • Thread in a color that looks nice with your fabrics 
I used quilting weight cotton fabric, but you could also use home dec weight fabric for the outside, or interfacing on the outside pieces (which you would apply before the first step), to make a bag with a bit more body.  All seams are 1/4" unless noted otherwise.  Also, the bag has pleats on the outside but an unpleated lining - if you want to give the bag more inner volume, you could replace the lining pieces with another set of pleated pieces made the same as the outside.


First, on the bottom outside pieces, mark lightly at the top (long) edge of the rectangle at 3.5", 4.5"(middle), and 5.5" from the edge.  Mark just at the very top of the edge so that the markings will be hidden in the seam (I like to do this as extra insurance even if I use dissappearing ink).


Fold the two outer markings so each comes in to the center point and pin in place as shown below.  You will note that the sides are now flaring up slightly.  To get rid of this flare, lay a ruler on top of this piece at the same level as the center point (which is the lowest point on the top edge).  Mark a straight horizontal line across the top edge as shown below, and then cut off the two resulting triangles (which should be the same size).  Repeat for the other side.


 Pin the front bottom pieces to the top pieces and sew together (sorry these next two pics didn't turn out great - I was trying not to use my flash but they are kind of blurry, I think you can still tell what to do).


Iron open and topstitch along the bottom edge of the top piece, if desired.


Place your outside piece face down on the lining fabric and use it as a template to cut out the lining pieces.


Now you should have two finished outer pieces and two lining pieces.


I do my zippers a bit differently from most other folks... I like to use an extra long zipper (mine is longer than necessary in this pic, this is just the size I had on hand), and then sew with the zipper pull off to the side - this way you don't have to worry about sewing around the zipper pull or accidentally sewing on the metal stop bits.  If you want a neater look for your zipper ends, you could also use tabs like on Noodlehead's gathered clutch although then you would need to put the zipper pull in the middle from the start.

So, with the zipper facing up, sandwich the top edge of the zipper in between the outside and lining pieces for one side of the bag.  The outer fabric should be on top and the lining fabric should be on the bottom, and they should have right sides facing eachother.  Pin in place and sew to the zipper in about the middle of the zipper tape (1/8" to 3/16" from the edge).


Press both the outer and lining pieces to the opposite side.


Now repeat for the other side, making sure that the pieces are lined up centered above the other side.


Iron to the opposite side and unzip the zipper to the mid-point of bag. (Very important!)


Now, fold the outer sides and lining sides of the bag together, right sides facing.  Pin all the way around the bag but leave a 2-3" gap where you will not sew at the center of the bottom of the lining piece.  Fold the zipper pieces to one side or the other (with the top of the zipper facing the lining or facing the outside of the bag) and pin securely at the zippers, particularly the unzipped side.


Sew all the way around, leaving the gap at the bottom.  Be careful in going over the zippers, you are going through a lot of layers so your sewing maching may have issues (you may want to use a larger needle size for this step to make sure it is sturdy enough).  I usually sew back and forth over the zipper ends an extra time to secure them but this may not be necessary.  You can cut off the excess ends of the zippers now or at any point before you turn the bag inside out.


Iron the corners open so that the two seams lay on top of eachother and the corner forms a triangle.  Mark a line perpendicular to the seams that is 1" down from the point (should be 2" across) - as shown below.


Sew just below the marked line (closer to the main bag body) for each corner, then cut off the ends leaving 1/4" or slightly more seam allowance.  Once you cut them off you will see that the ends open up to be little squares.


Turn the bag inside out through the opening left in the bottom, then tuck the open edges inside the bag and press the edge to make it neat.  Pin across the open edge and stitch as close to the edge as you can to close the opening (or you can stitch by hand).


Congrats, you're done!  Enjoy your bag!


Here is a sneak preview of another project that I will post a tutorial for in the next few days - a card purse with a fabric covered button.  I just have to make it again and take photos this time!  But it is a quick project.


Monday, November 29, 2010

Craft update: more socks, baby booties, and a new sewing machine!

I haven't had much time to post but I still have had quite a lot going on on the craft front.  In knitting news, I finished these socks...


and then I quickly made a pair of fetching mitts (to match this hat which I had previously made) - they have been great for fall weather.


And I have started the L'illo sweater for my nephew (who is 2 1/2 months old) - making it in the 12 month size since he is already wearing 6 month size clothes and I want them to get some good use out of it.  I didn't take a pic yet but will at some point. 

Finally, my sad knitting news is that halfway through the second sock, I left the dragonfly socks I was making on the metro :(.  I put in a missing items report and was hoping they would turn up, but it was several months ago and no word, so I am out of luck.  They were my first lace socks, too... I already have the yarn picked out for another lace pair, though.  Oh well.

In sewing news, I made a few pairs of booties for my nephew, in larger sizes since he has mostly outgrown the original ones I made him.  I made them using the same pattern that I used before, but I enlarged it 5% and 10% to make larger booties.  I initially enlarged it more but it turned out to be too much... hopefully these sizes will work well and fit him for a while (the larger ones will probably not fit him for a few months).


I also made some monkey booties to match the monkey bibs I had made earlier, for a gift for friends who are expecting.  I am sad that the scraps from this monkey fabric I got for a baby quilt about 3 years ago are almost all used up... they have been so fun to use!  I have decided this means that I should get other fun kid/baby fabrics that I can have just to play around with.  Anyone have any suggestions?


Finally, my most exciting news is that I got a NEW SEWING MACHINE!  Wahoo!!  I will probably post more about it later, but the short story is that my old sewing machine was given/loaned to me by an old family friend, and it is a 1950's singer featherweight... which is lovely and solid as a rock, but can also be frustrating because it often has issues with tension, and only goes forward and backwards... no zigzag, no buttonholes, no nothing.  I had been thinking I would save up and get a Bernina, but then I saw this Brother machine reviewed on Amazon and it sounded too good to be true... I figured, at this price even if it doesn't last forever, it's worth a shot. 

Brother CS6000I Sew Advance Sew Affordable 60-Stitch Computerized Free-Arm Sewing Machine

Brother CS6000I Sew Advance Sew Affordable 60-Stitch Computerized Free-Arm Sewing Machine

Amazingly it even came with a walking foot and a free-motion quilting foot, in addition to all the normally-included feet.  I am super excited but also a bit overwhelmed... I am used to working out projects within a very constrained universe of sewing options (as I said, forwards and backwards), so all these stitches and feet are giving me so many ideas that I'm not sure where to start.  So far, all I've done is read the instruction manual, but tomorrow I am planning to get set up and give her a try!  Wish me luck!

Thursday, November 18, 2010

Roll-up Shopping Bag Sewing Tutorial


I made this roll-up shopping bag earlier in the fall and had been meaning to make a tutorial for it, so the Sew Mama Sew Green Grocery Bag Challenge was a good excuse to finally get around to it.   This bag is inspired by one my very talented friend Mandy made a year or two ago... I love the roll-up shopping bags that you take with you in your purse, so the idea of making my own was very exciting!


The bag is made with a single layer of quilting weight cotton (unlined).  This helps to keep it lightweight and small enough to roll up easily.  I have gotten a ton of use out of the first one I made (on the right in the photos) so I am excited to have another one!  You can't see it in the top photo but you can sort of see in the photo below, the bag is constructed similarly to the plastic bags you get at the grocery store, with side gussets.  This little bag can hold quite a good bit of stuff!  Since it is only a single layer of fabric, I wouldn't advise using it to carry 2 gallons of milk home, but it has proven to be more sturdy than I expected and can carry quite a bit of weight.   You can use the ties at the top of the bag to tie it closed when it is full to keep it secure.


So here is the tutorial - enjoy!  Oh, and I will be posting more fun sewing tutorials over the next month or so, so be sure to come back and check them out - you can subscribe to or follow my blog using the links in the sidebar if you like.  And if you make a bag with this tutorial I would love to see how it turned out - you can share a photo in the Needle and Spatula Flickr group.

TERMS OF USE:  For personal, non-commercial use only.  If you are interested in making these bags for small-scale commercial sales (eg craft fairs, etsy), please contact me and we can discuss a licensing agreement.

DONATE TO SUPPORT THIS TUTORIAL - this tutorial is provided free of charge, if you would like to show your appreciation and support the free patterns I provide here, you can donate here (or it helps if you click through to any of the amazon links on this site, whether you purchase that particular product or not!).  Thanks for your support!


What you will need:
  • 32"x13" piece of main fabric color (for bottom part of bag body)
  • Two 30"x3" pieces of main fabric color (for straps)
  • 32"x5" piece of contrasting fabric color (for top part of bag body)
  • Two 3/4"x30" pieces of lightweight fusible interfacing
  • Two 10" long pieces of coordinating narrow ribbon or bias tape
  • Thread in a color that looks nice with your fabrics
If you use two colors as above, a half yard of the main color and a quarter yard (regular cut, not fat quarter) of the second color, will be sufficient.  If you prefer to have just a single colored body, you will just need one 32"x17.5" panel for the body, and you will probably need 3/4 of a yard for the whole bag.  You could also have a larger top panel, or have three stripes, etc, if you prefer a different design...

The bag construction uses french seams to keep things neat inside the bag (since it is unlined) and to add strength.  If you have never done french seams before, don't worry, they aren't hard... it can be a bit counter-intuitive at first, but follow the directions and you will be fine!


First, take the fabric for the bottom of the bag and the top of the bag and pin them together along the long edge, wrong sides facing.  If your fabric has a directional pattern, make sure that it is facing up (the top of lower fabric is the pinned edge, and the top of the upper fabric is the unpinned edge).


Sew along the pinned edge with a 3/16" seam.  Snip any frayed edges along the seam and then fold the fabric along the seam so that the right sides face, and iron it flat.  Pin this edge and sew with a 1/4"-5/16" seam (enclosing the first seam within this second seam).


Iron the seam to one side (I ironed mine down), and then top stitch along the edge - this is easier to do from the wrong side where the seam is showing.


Now, fold the bag body wrong sides together - you are taking the long rectangle and folding it in the middle to make the bag shape.  Pin the side of the bag together, taking care to line up the seam you just sewed.  Sew a 3/16" seam along just that one edge, then trim any loose threads or unevenness.  After you sew the seam you will basically have a tube which is open on both the top and the bottom.


Turn this tube inside out so that the right sides face, and iron the side seam you just sewed flat.  Pin and sew a 1/4"-5/16" seam, again enclosing the first seam inside the second seam.


Now, put aside the bag body.  Before the next step you need to make the the handles and ties.  You could also make these first if you prefer.

Iron each long handle strip in half lengthwise (wrong sides facing) to create a crease down the length of the strip.  Open the strip and put interfacing on one side of the crease, then iron to fuse it to the fabric (see top strip in photo below).  Then, iron the fabric edge below the interfacing up and over the interfacing strip (see bottom strip in photo below).


As shown in photo below, fold up on the original crease and iron in place (top strip shown), then fold one more time and iron again.  You will basically have a roll of fabric ironed in place.


Open up the roll (as shown in the bottom strip below) and then tuck the last edge inside the fold (as shown in the top strip below).


Top stitch along both edges of the strips.


To make the ties, either use narrow ribbon, or sew a piece of bias tape shut to make a tie.  Fold the ends under as shown below and sew them in place to make a neat end.


Back to the bag... with the bag still inside out, fold the top edge down 3/4" all the way around and iron in place.


Fold the edge over again (another 3/4") and iron in place.  Measure 3 3/4" in from each side of the bag and mark with a pin.  Turn over and place pins on the other side to match.  Place the ends of your handles just inside these marker pins, tucked under the folded over edge, and pin in place, making sure to keep them perpendicular (at right angles) with the folded edge and making sure that handle is not twisted (see the two photos below).  Pin the tie in place between the handles, and repeat for the other side.  Then pin the rest of the edge in place.


Top stitch the bottom of the folded over edge (closer to the handles etc) all the way around the bag, and remove pins.


Iron the handles and ties to face up and pin them in place on the edging, as shown below, again making sure to keep them at right angles with the edge.


Top stitch the top edge of the bag, securing handles and ties as you sew all around the bag.  I recommend sewing this seam on the right side of the bag as it will be easier to make it look nice that way.


Now, to make the bottom of the bag.  First, you need to fold the fabric to create the gussets.  Iron the bag flat so that you will have a clear crease on the side which doesn't have a seam to indicate where the side is.  Starting on the side with a seam, fold the fabric in towards the middle of the bag until the gusset is 2.5" deep.  Use a ruler to measure as shown below to ensure that you are not including the additional depth of the french seam.  Make sure that the top and bottom folds are even and that the sides are straight, then iron in place.  Repeat with the other side, making sure that the crease you ironed in place is correctly aligned at the back of the gusset.


Now, pin across the bottom edge of your bag, pinning the gussets into place.  Don't worry if your bottom edge is frayed or isn't totally even, we will clean it up in a sec.  Sew a 1/4" seam across the bottom (or more if needed to be sure you are catching all the layers), then trim off any frayed or uneven edges.


Turn the bag inside out.  You will have to turn the gussets to one side or another, but it doesn't matter which, just pick one.  Poke the corners all the way out, then pin in place and sew across the bottom with a 5/16" or greater seam.


Turn the bag rightside out, you are done!!

Here are quick instructions on how to fold the bag:

Lay the bag flat, lining up the edges and making sure the gussets are tucked in, then fold the handles down.


Fold the bag into thirds lengthwise, leaving the ties hanging out loose at the top.


Roll the bag up from the bottom, keeping it as tight as possible.


Wrap the ties around the bag and tie with a knot or a bow to secure!

Related Posts Plugin for WordPress, Blogger...