

OK, I have a confession... I am behind in making my blocks and not ready to assemble them yet! I feel bad about this, but luckily we left lots of time in the schedule for the next two steps so I should be able to catch up by next week. Hopefully this is reassuring if you are running a bit behind too!
Not to make excuses, but just so no one gets turned away from this QAL thinking that it takes forever to sew the curves... really the problem has just been that I have had next to no time to sew in the past few weeks. I had a really bad cold and then last week we finally bought a car after our move. This past weekend I spent a good chunk of time sewing and got most of my curved blocks sewn, but not quite all of them, and I just know that I am going to want to play around with layouts and see how they all look, so I really didn't want to rush this step.
So, OK, I am a delinquent, but the QAL goes on regardless! I took some photos to illustrate this step and it's not too complicated, so hopefully this is enough of an explanation. You can also jump over to Kristie's blog to see her post, which should be more complete than mine :).
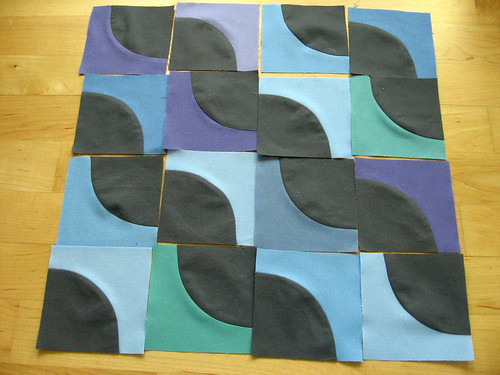
Once you have picked out your layout, you are going to want to assemble your smaller 1/4 square blocks into larger blocks before you assemble those blocks into the quilt top. The number of smaller squares in each of your larger blocks will depend on the layout that you choose, but a good size is a 4x4 block as I have laid out above. If you are lucky enough to have a design wall, you can lay out your whole quilt on the wall and then sew the blocks one by one. If not, depending on your design you can probably lay the blocks out one at a time as you sew them, or lay it all out on the floor and then keep the squares for each block organized using cardstock or paper. Or really whatever works for you!
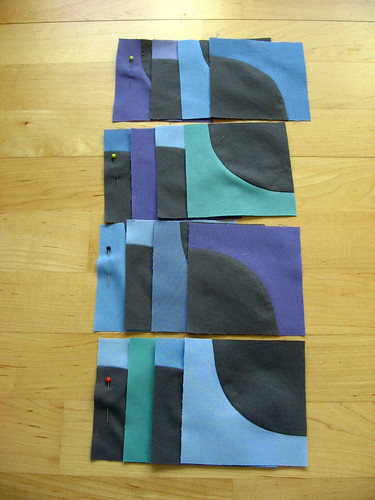
When I sew together blocks like this, I like to make stacks for each of the rows that make up the block so that I can pick up a stack to sew at my machine and keep things in the correct order. Putting a pin on the first (far left) block can help you to keep track of which block is at the end (and which way is up) as you sew across the row. You may or may not have to use pins as you sew these seams depending on whether your layout involves matching any circle edges - if your design has 1/2, 3/4 or full circles, then you will need to pin at least the seam where the quarter circles meet to keep those edges lined up. You can of course pin all your seams if you find it helpful, but if you find it easier for any seams that don't have to match the circles, you can skip pinning them and just place them together.
I keep track of the order of the rows by keeping them laid out in the right order or stacked on top of each other; if you are worried about keeping track of the right order as you move them around, you could also label them with numbered sticky notes. You'll press each row before you sew them together to make the overall quilt block. I like to press my seams open, but many folks prefer to press seams to one side, and then alternate which direction they press for each row so that the seams lock together as they sew their rows together, so go ahead and press whichever way you prefer. When you sew the rows together, you will definitely want to use pins to keep all the corner seams nice and lined up. Go ahead and press the seams again, and you have a completed block.
If you are on a roll and sew all your larger blocks together to make a quilt top, I will understand - but technically that step is next week in the QAL. This should be a relief if you are running a bit behind, like me!
I'd love to hear how the QAL is going for you! It's been fun seeing everyone's photos in the Flickr group - if you have been quilting along but aren't on Flickr (or haven't had any photos to post yet), feel free to leave a comment here and share how it's going.
{This post is part of the Drunkard's Path Quilt-Along that I am hosting with Kristie from OCD. Check out my Drunkard's Path QAL page for the schedule and links to the posts so far, and feel free to join in any time!}
I am still way behind. I have not even pulled fabrics for the QAL...but I do have a hint when laying out any quilt. I take a photo on my iphone and then I can refer to it for the layout incase I get mixed up or have to stop and clean up in the middle of piecing the blocks together. Hopefully I can start it this week.
ReplyDeleteI`m all assembled and my blocks are sewn together although I`m only doing a baby quilt. Loving this QAL and your tips to sew the curves were brilliant. They went together very nicely!
ReplyDeleteOoh, how exciting to have just bought a car! Did you name it? :)
ReplyDeleteI haven't started cutting yet. I've been finishing up some other things first and am hoping to start over the weekend.
ReplyDeleteI can't wait to see this in solids!
These curves ARE driving me drink!
ReplyDeleteI was really intimidated with curve sewing and kept telling myself "they aren't going to be perfect, just have fun." But with each one I do, the easier they get! Now I want to drink to celebrate success. Horray!
have you seen the crossover technique? http://www.youtube.com/watch?v=WjCJYGm8TWs
ReplyDeleteI use this technique and love it.