Sunday, December 08, 2013
New Pattern Prices and Discount Until New Year
I have been thinking for a while that the $6 price for the patterns did not reflect the complexity of the patterns, or the current market for these types of patterns. I am proud of these patterns and put a ton of work into writing them, and I would hate for anyone to think that the low price was a reflection of a lower quality product. So I have decided to raise my prices to $8 per pattern, which I think is still a great deal!
For one last chance to buy the patterns at the old price, use the coupon code "NEWYEAR" on Etsy for 25% off (bringing the price for each pattern back down to $6). This coupon code is only good until December 31st, so if you have been thinking of buying one of my patterns now is a great time to do so!
Sunday, December 11, 2011
Giveaway Day!
I've had so much fun participating in Sew Mama Sew's giveaway day in the past, both as a giver-away and as a winner, so I'm excited to participate again this time!
I'll be giving away a copy of one of my PDF sewing patterns (also for sale in my meylah shop and my etsy shop) - the winner can choose:
Either the yoga mat bag sewing pattern -
(check out how it has a zipper up the front AND a zippered pocket for your essentials... sweet!)
OR a copy of my free-motion applique messenger bag pattern
(Two fun applique designs included, and the bag has lots of handy pockets)
To enter, all you have to do is leave me a comment telling me - what kind of handmade ornaments have you made or would you like to make? (This is actually for a purpose - my coworker told me she wanted to make handmade ornaments and was looking for ideas - I had a bunch but would love to pass on yours as well! Links to tutorials are welcome).
The winner will be picked at random, and the giveaway is open to both U.S. and international entries. The giveaway will close at 5 pm pacific on Friday December 16th and I will contact the winner via email - so make sure you have an email address in your blogger profile, or include it in your comment!
Thanks and good luck!
--GIVEAWAY CLOSED!-- Thanks to all who entered! Winner's posted here.
Sunday, October 02, 2011
Store/Patterns Update
I'm reopening the Etsy shop now, but will keep the patterns on sale in the Meylah shop until Wednesday, so if you have been thinking about getting one, now is your chance before the price goes back up to the regular $6! Also, at least for the near term, I will only be selling patterns in my Etsy shop and not handmade items - I don't have much time now to make and list things, or to go to the post office, but I may decide to go back to doing so in the future.
Thanks everyone! And sorry for the photo-less post :)
Friday, September 30, 2011
Drunkard's Path Block Tutorial
While it's not the usual order to start a quilt-along with the block tutorial before the fabric requirements and other design info, since Kristie and I are each using a different block construction approach, we thought it made sense to show you the choices before you committed to one way or the other by buying fabric. I also know that some folks are intimidated by sewing curves so I wanted to be sure that you had a chance to try it out and see that it isn't that hard!
Kristie is using the Go! Baby cutter to cut her drunkard's path pieces, and I am using templates that I designed. The technique with my templates is actually pretty similar to how I made my wonky drunkard's path blocks - you don't have to worry as much about cutting and sewing the pieces perfectly exactly, and then you trim them to the correct size. If you'd like to use another approach such as more precise templates, wonky blocks, or anything else, you are free to go for that too!
I am also psyched that the templates I made use 5" squares - that's right, this means you can easily use charm squares and avoid a whole bunch of fabric cutting if you want! Maybe you have some charms you have been looking to put to use? You can also cut your own 5" squares for some or all of the blocks, of course.
Download the template HERE - I suggest saving it to your computer, then when you print be sure to set page scaling to none. There is a 1" box on there for you to check the scale - make sure it measures 1" and you are good to go. I'll go into this more in a later post, but if you are making a design where you will have equal numbers of the inner and outer curve pieces from each pattern, you will only need to use the inner curve template piece - just ignore the outer curve template piece. (This is what I did for my central park drunkard's path).
Here's how to make the blocks:
Start with 2 contrasting 5" fabric squares. Put the inner curve template piece down on the squares, with the corners aligned.
Cut around the curve of the template. Note: when I made my quilt, I cut the first using the template and then used one of the cut out inner curve fabric pieces as the guide to cut the rest. You can also mark with a fabric pen and cut along the line, or you can use a rotary cutter (and possibly use template plastic to make the template more durable). I found that I could cut 4-5 pieces of fabric at once and so it went pretty quickly!
After you have cut the inner curve piece, trim the 3/8" off the ends of the outer curve pieces as shown above (I usually just eyeballed it and used my scissors, but you could measure and/or use a rotary cutter if you prefer).
Put the inner curve piece facing up with the corner facing to the upper left, and then place the outer curve piece facing down on top, with the corner facing to the lower left, as shown above. Align pieces so that your needle is 1/4" in from the curved edge.
You can basically sew straight for the first 1/4"-1/2", until the pieces start to curve away from each other.
After the first bit, you will need to pull the top (outer curve) piece to the left so that it stays lined up on top of the lower (inner curve) piece as you sew around the edge. I just pull the top piece into place gently, and don't pull the bottom piece at all - the goal is the keep the edges lined up and avoid any puckers in your seam, without stretching the fabric too much. Continue sewing with a 1/4" seam, adjusting as you go - it doesn't take too long once you get into the hang of it.
As you get towards the end, continue to pull the pieces into place so the edges are aligned - you should basically be able to sew straight for the last little bit too.
This is what it should look like after you sew the seam.
Press the seam flat in whichever direction you feel like. If you wanted to you could clip the curve inside the seam allowance before you press but I didn't have any problems getting it to lay flat without clipping and it seems like it will be more durable if you don't clip it.
Now, to trim the block, place the block with the inner curve facing to the lower left corner as shown above. Take a square ruler and line up the 1" lines with the edges of the curve on both the left and lower sides (red arrows above), then trim off the edges. The final trimmed size of the block will be 4.25" so you may want to check that the block isn't going to be too small by making sure the fabric goes past the 4.25" lines (green arrows above); you may have to rotate the ruler slightly to get it to fit. (note: I slightly modified the template after I took these photos - so you will have more to trim in this step and less to trim below, ie, the amount you trim in each step will be about equal).
After you trim the first two sides, flip the block around so that the inner curve faces towards the upper right corner, and line up the just-trimmed edges with the 4.25" lines (green arrows), then trim the other two edges.
And then check it out - since you lined up the circles with the 1" line when you trimmed, your blocks line up perfectly!! And I promise, the trimming part gets quick as you do it, too.
Let me know how your blocks turn out if you try this, or if you have any questions!
DONATE TO SUPPORT THIS TUTORIAL - this tutorial is provided free of
charge, if you would like to show your appreciation and support the free
patterns I provide here, you can donate here
(or it helps if you click through to any of the amazon links on this site,
whether you purchase that particular product or not!). Thanks for your
support!
{This post is part of the Drunkard's Path Quilt-Along that I am hosting with Kristie from OCD. Check out my Drunkard's Path QAL page for the schedule and links to the posts so far, and feel free to join in any time!}
Thursday, August 04, 2011
New Storefront and Moving Sale!
I'm putting my Etsy shop in vacation mode until mid-September after we are finished moving, but the patterns in the new shop will be on sale for only $5 until then, compared to the regular $6, so if you have been considering getting one, now would be a great time!
The patterns for sale are:
Monday, July 18, 2011
Table Runner Roundup
In case you are looking for inspiration, I wanted to share a roundup of fun table runner techniques and ideas. I have actually never made a table runner, since our current dining table is too narrow to fit a runner and leave any room to actually eat. Looking at all these great tutorials made me really want to make one, though! I'm thinking maybe I should just go ahead and make one, I can always use it on a coffee table or a side board in the future if we continue to have too small a table after we move.
![]() |
Photo from The Long Thread |
The simplest way to make a table runner is to sew two rectangles together with right sides facing, leaving a gap for turning the runner right side out, and then either hand stitch the opening closed or top stitch all the way around, closing the opening in the process. The beautiful simple runner above from The Long Thread is an example of this technique, showing how with even minimal piecing you can get a very pleasing result.
![]() |
Photo from Poppyprint |
You can also use this technique with a more complicated top, such as the lovely crop circles pattern from Poppyprint above, or the beautiful log cabin runner that Amanda Soule made. With this technique you can use batting in the middle and quilt as much as desired, or you can just use the two pieces of fabric.
Photo from A Sewing Journal |
Another simple technique for a non-quilted runner is to simply use a single rectangle of fabric and turn the edges under and finish them, similar to how you would when making a napkin. You can of course embellish the fabric with applique, contrasting fabric bands, stenciling/stamping or other decorations, just as you can with napkins. The linen and lace runner above from A Sewing Journal is a sweet example using this technique.
![]() |
Photo from Prudent Baby |
You can also make a quilted table runner with binding, which is essentially a mini-quilt. If you use extra layers of batting or insulated batting, this has the added benefit of protecting your table from hot dishes. At the most simple, you can pick two favorite fabrics, quilt them together and sew on a binding, as in this tutorial from Prudent Baby shown above.
Photo from Diary of a Quilter |
You can also make a striped table runner using this technique pretty easily, such as the quilt as you go table runner from Diary of a Quilter shown above. Similarly, the Polka Dot Chair has a tutorial for a skinny table runner made from squares.
![]() |
Photo from Spool Sewing |
You can also use this technique to make a runner with many kinds of more complicated quilt designs, such as the disappearing nine patch design from Spool Sewing shown above. Other tutorials to check out include:
- Small patchwork square and rectangle designs from Sew Sweetness and Julie Geiger for Moda Bakeshop
- Rail Fence design from Angela Davy for Moda Bakeshop
- Turning Corners design by John Adams for Moda Bakeshop
- Star blocks design from Pleasant Home
- Half Square Triangle design from Moda Bakeshop
![]() |
Photo from Martha Stewart Crafts |
And your table runner doesn't have to be a rectangle! I love this pattern for a leafy runner made of bias-tape edged leaf shapes from Martha Stewart Crafts. Or there's a cute pattern on Moda Bake shop for a runner made of layered circles.
What is your favorite table runner pattern or technique?
Tuesday, June 28, 2011
Knit Peasant Dress Tutorial
I have been wearing my blue knit peasant dress at least once a week since I made it, so I knew I wanted to make another one, and I thought it would be fun to write up a tutorial to share with you, too. This dress is really easy and fast to make - this one only took me a few hours to sew up. I know a lot of people are intimidated about sewing with knits, but it really isn't that hard, and this would be a great first project - the gathers at the neckline and armholes can hide any stitching issues you may be having.
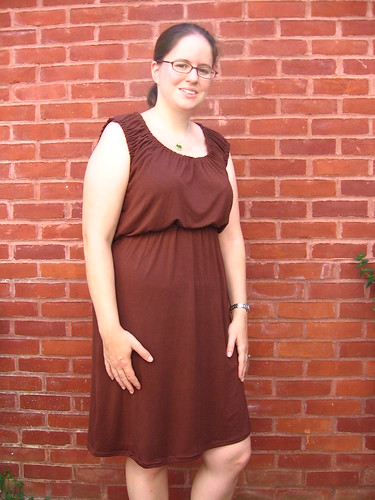
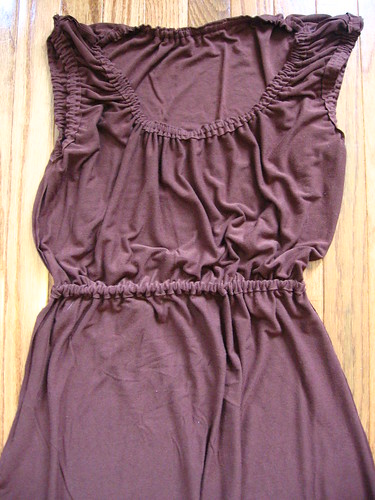
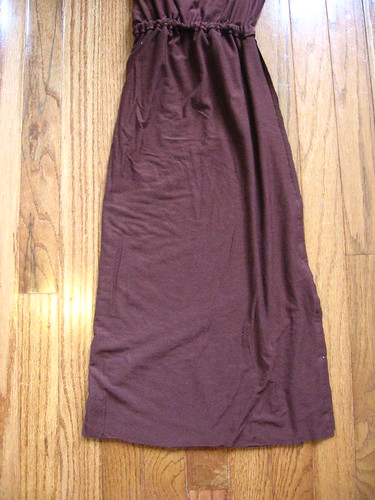
I like the fact that you can change the style of this dress so much based on where you put the waist. The 
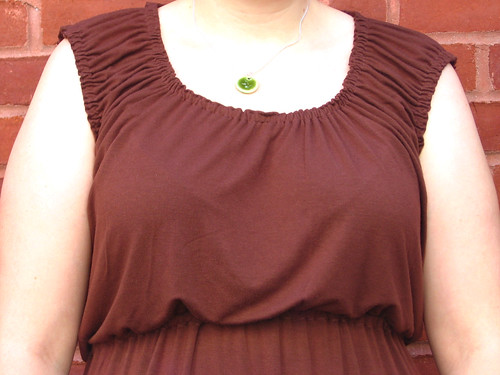
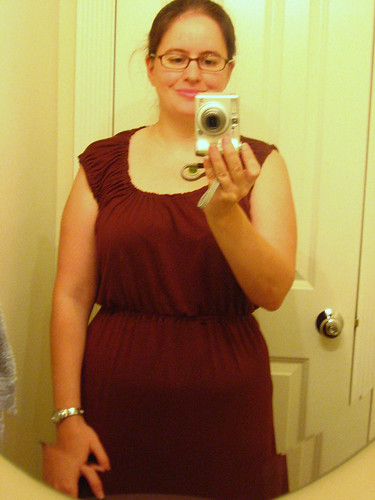
first one (which was less loosely cut) I made with an empire waist, which is generally a good option for my body type, and I loved how it turned out. I didn't want to have two nearly identical dresses though, so for this one I put the waist closer to my natural waist. You can either wear it bloused up as shown below, or really at the waist as shown below (apologies for the crappy bathroom photo - I forgot that I wanted to take a picture of the alternate way to wear it when my ever-helpful husband was taking photos before going to work). I think this would look great with a lower waist, too, or even with no waist - it would make a great loose beach coverup, or you could wear it with a belt. Since the original inspiration for this dress was a tank top, you could also make it shorter for a tank (or a tunic)... or you could make it longer for a maxi dress. So many fun options!
This dress is perfect for the hot summer in DC - comfortable, lightweight and cute. I hope you like it as much as I do! If you make a dress (or a tank top) with this tutorial, I'd love to see how it turned out - you can share a photo in the Needle and Spatula Flickr group.
TERMS OF USE: For personal, non-commercial use only. If you are interested in making this dress for small-scale commercial sales (eg craft fairs, etsy), please contact me to discuss a licensing agreement.
DONATE TO SUPPORT THIS TUTORIAL - this tutorial is provided free of charge, if you would like to show your appreciation and support the free patterns I provide here, you can donate here (or it helps if you click through to any of the amazon links below or elsewhere on this site, whether you purchase that particular product or not!). Thanks for your support!
What you will need:
- Approximately 1.5 yards of light to mid-weight stretch jersey knit fabric (mine was a stretch rayon from Joann's)
- 1/4" elastic
- Thread in coordinating color
- Size 12 ballpoint needle (or universal needle if you don't have ballpoint), and double needle for sewing hem (optional)
- Semi-fitted t shirt to use as template (or an actual t-shirt pattern)
The fabric amounts above are for a knee-length skirt, so adjust accordingly if you are planning to make a tank, tunic, or maxi dress instead. Also, this will be enough fabric to make a dress up to about size 12 or maybe a 14 - for larger sizes, you will need to double the yardage.
Here are the step by step instructions:
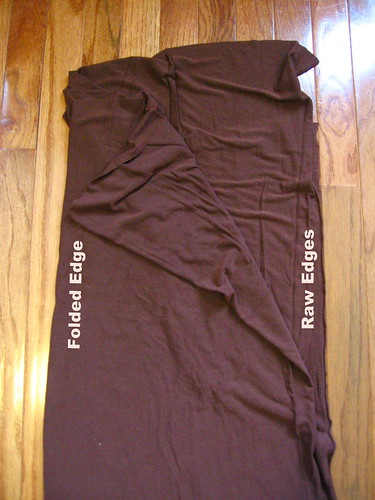
Start by folding your fabric in half (so that selvages are stacked on top of eachother), and then fold it in half again. Try your best to get the fabric to lay flat and to get out any big wrinkles, but don't worry if it's not perfect. I found that it helped to hold the fabric up when making the first fold, you may have to shift the alignment of the selvages to get it to hang straight, then lay it down on a surface and make the second fold.
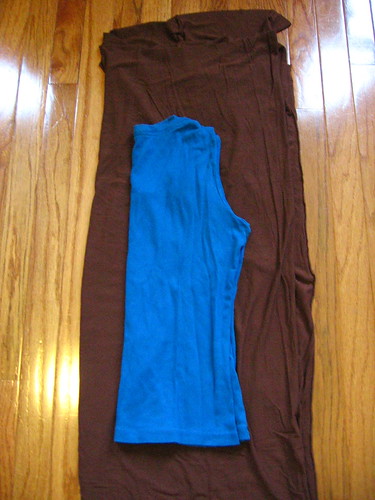
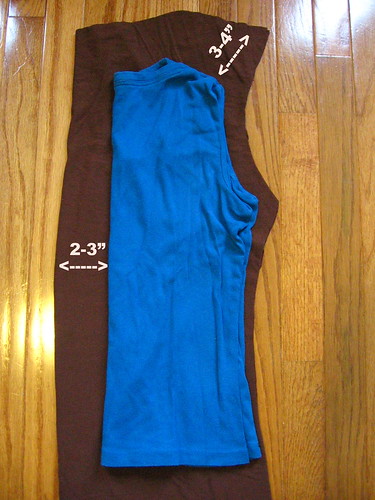
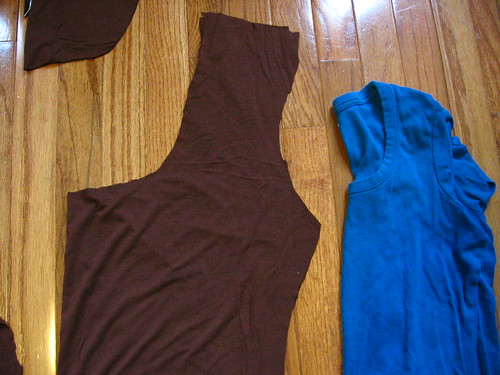
Take your t-shirt and fold the sleeves inside the t-shirt and then fold it in half as shown above. Place the t-shirt on the fabric with the folded edges on the same side. The folded edge of the t-shirt should be 2-3 inches in from the folded edge of the fabric and the top of the t-shirt 4-5 inches below the top edges of the fabric.
To cut out your bodice shape, you want to imagine that the t-shirt is stretched about 1 and a half from the armpit up. You want to basically echo the top shape of the t-shirt (back neckline and shoulder) but move the line up about 3-4 inches. I just cut this freehand but you can mark it on the fabric first, or cut a paper pattern, if that would make you more comfortable. For the armhole, you want to connect the top of the shoulder that you cut with the bottom of the original armhole, adding about an inch of seam allowance. From there, you can just follow the line of the t-shirt (or add more ease for an even looser fit).
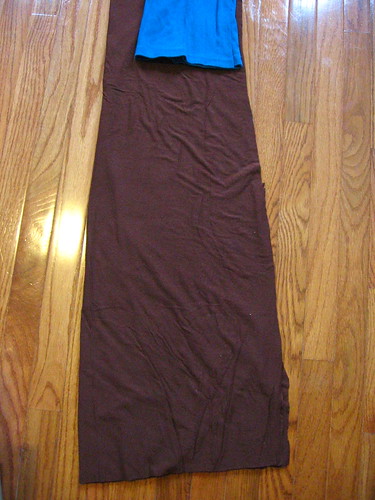
From the bottom of the t-shirt, you want to cut a gradually sloping line out to the selvage edge. (note: my skirt originally had a lot of excess fabric, yours may not be this long).
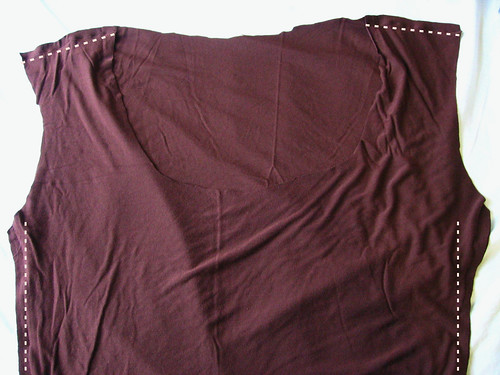
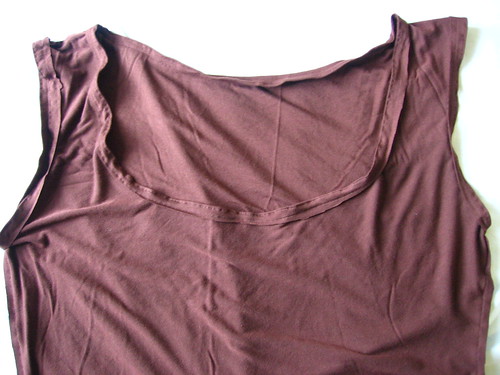
You should now have two dress pieces cut out - remove one and set it aside, then refold the other so that the armholes and side edges align. Starting at the top of the shoulder edges, cut a scoopneck out of the fabric - again about one and a half times as deep as you want it to ultimately be. Mine is a bit deep, you probably want the bottom of your scoopneck to line up an inch or two above the bottom of the armhole.
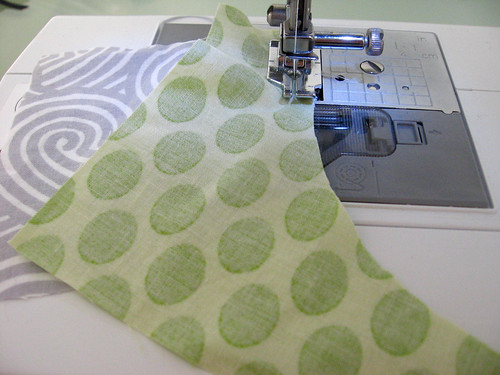
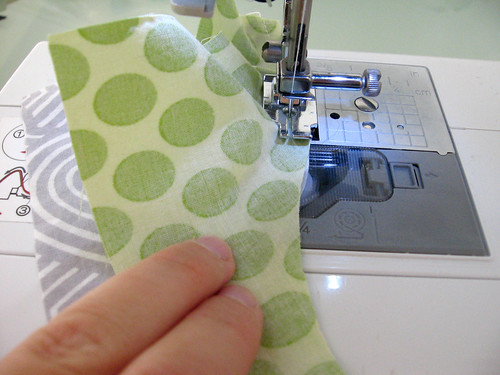
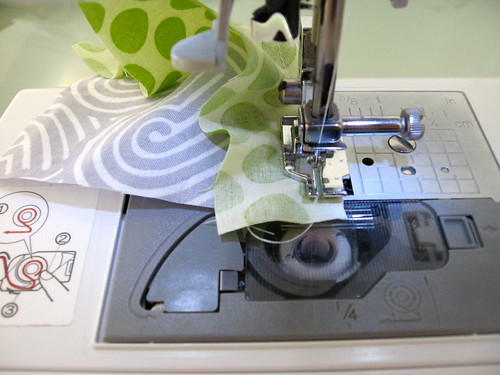
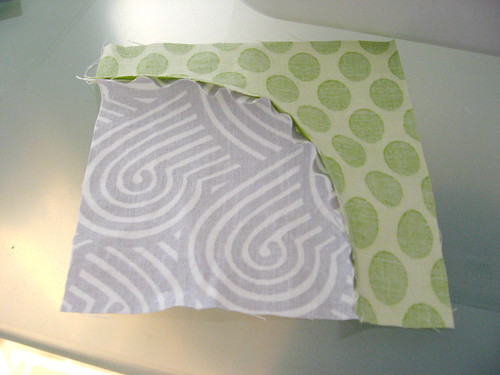
Unfold both of your fabric pieces and place them together with right sides facing and shoulders and side edges aligned. Using a stretch stitch (I like to use the zigzag that looks like a lightning bolt), sew the top edges of the shoulders and the sides all the way down to the bottom of the dress. I used about a 1/2" seam allowance and then trimmed it to 1/4" after sewing - since knits don't fray, you don't need to finish the seam. If you have a serger by all means use it for these seams!
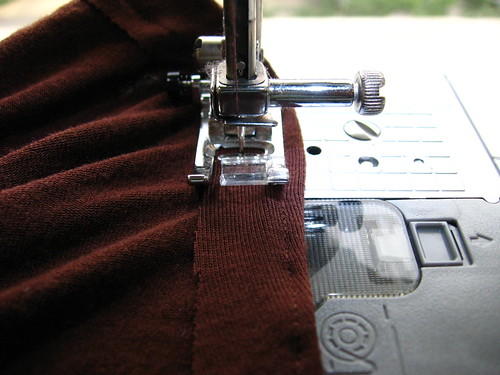
At the armhole, fold the seam allowance in about 3/4" toward the wrong side and pin in place.
Using a regular, straight stitch, sew 1/8" in from the edge all the way around the armhole, starting and ending at the bottom/armpit (since the armholes and neck are gathered and will never be stretched all the way out, you don't need to worry about using a stretch stitch).
Starting in the bottom of the armhole again, sew another seam 1/4" inside the first, ending 1" before you get back to the place you started to leave a gap to insert the elastic.
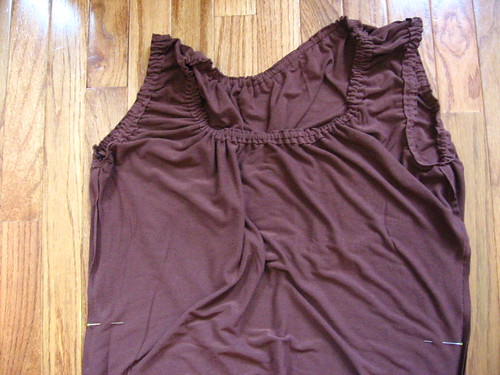
This is what the armhole should look like at this point. Repeat for the second armhole and then for the neckline (starting at the center of the back for the neckline).
This is what your bodice should look like now.
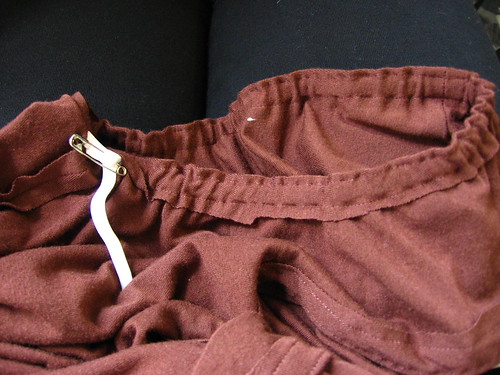
Cut a piece of elastic for your armhole. You can estimate the size you will need by wrapping the elasic around your arm/over your shoulder - I ended up needing a piece about 17" long (although I started with it longer). Thread the elastic through the channel you created around the armhole using a safety pin, then pin it to itself. Repeat for the other armhole and for the neckline (I used about 30" of elastic for the neckline to start). Try the dress on and adjust the pinning of the elastic until you are happy with how it looks (and the sleeves are even).
Pulling the elastic out far enough that you can maneuver it, sew the two ends together where you had pinned them, then trim off the excess elastic. Tug the gathers to draw the elastic back into the channel, and then sew the opening shut. Repeat for the other armhole and the neckline.
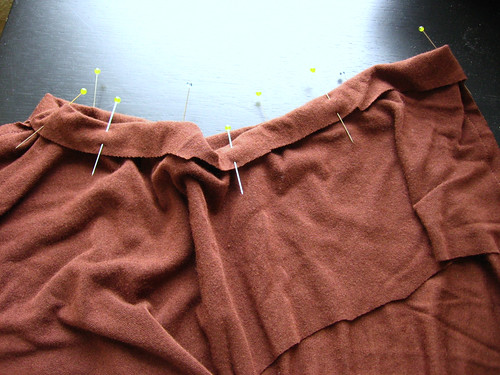
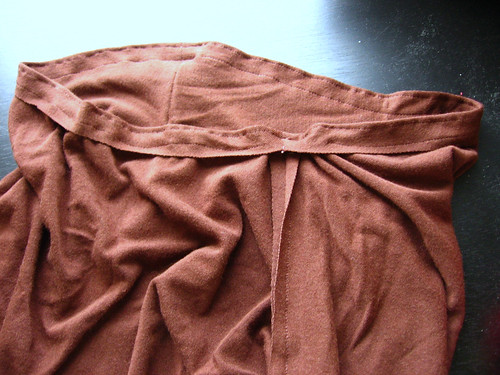
Try the dress on and decide where you want your waist to be placed. Mark the spot with a safety pin in the seam, then take the dress off and, with the dress inside out, replace the safety pin with a straight pin and mark the same location on the opposite side (check that it is the same distance from the bottom of the armhole).
Tuck the bodice inside the main body of the dress such that the fold aligns with the pins you had marked for the waist. Pin around the waist to hold in place.
Using a stretch stitch again, sew 1/2" in from the folded edge, starting at one side seam and sewing all the way around the waist. Fold this little flap down and sew it down flat to the dress body, starting at the side seam again but stopping 1" before the starting point to leave a gap to insert the elastic.
Using your waist as a guide, cut a piece of elastic and thread it through the casing you created then safety pin in place. Try on the dress and adjust the elastic length/pin as needed, bearing in mind that you will want it to be pretty snug (especially if you are planning on wearing it bloused out or as an empire waist). Sew the elastic at the point that you pinned it, then pull it back in and sew the opening closed.
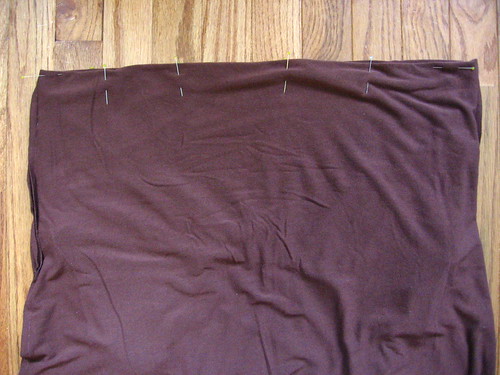
Try the dress on and decide where you want the hem to fall - mark this point with a pin or safety pin. Take off the dress and lay it on a surface, and fold it in half again (as it was when you cut out the pieces). Cut the hem about 1" below the point you marked, cutting a slightly curved line as shown above.
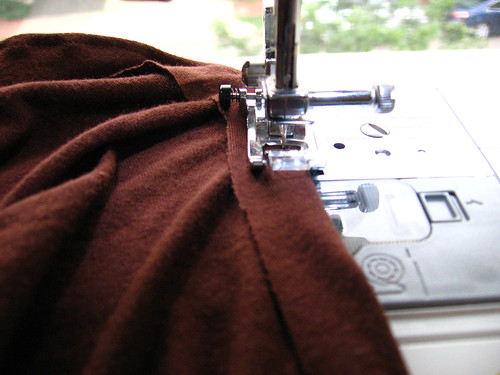
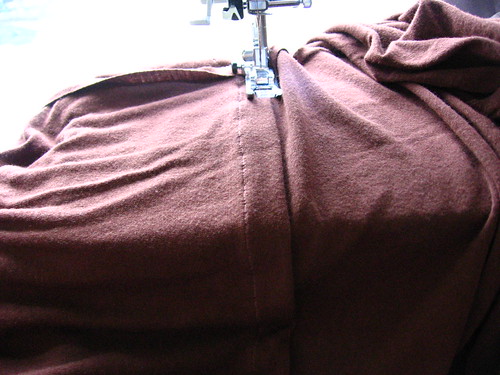
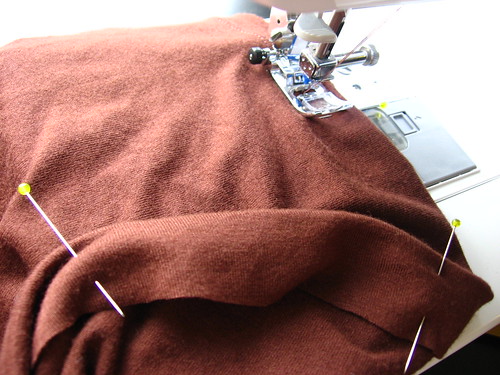
Fold the hem 1" toward the wrong side and pin in place. Using the double needle if you have one (here is a tutorial on how to sew with the double needle), or a stretch stitch if you don't, sew on the right side about 3/4" up from the edge. I went back and trimmed the back so that there wasn't a lot of extra fabric outside the stitching, but you don't have to.
Enjoy your new dress!