Showing posts with label baby gifts. Show all posts

Wednesday, October 01, 2014

Improv I-spy Baby Quilt

Well, I just looked up and realized that after a summer full of lots of fun with a very active and mobile toddler Esther, and plenty of time crafting, I didn't manage to blog at all. Oops! Other bloggers, does that happen to you where you want to spend every spare minute squeezing in the actual crafts and so you don't make time to blog about it?

Improv I-spy 1

Now that it is really starting to feel like fall I am planning to get back in a regular habit of blogging. So I wanted to share this improv i-spy quilt that I recently finished for a friend's baby (after it sat on my design wall most of the summer - hopefully they still get some good use out of it even though he's probably crawling around more than laying on blankets now!)  I started out cutting different size i-spy squares and framing them with different widths of solid colors, making great use of jellyroll fabrics.  I originally had thought about making them into wonky stars but I decided to keep it simpler and have the i-spy squares scattered on an improv pieced background.  I used my design wall to lay it out and pulled together a bunch of different grey fabrics for the background.  It turned out a bit darker than I anticipated but I think it's a fun modern take on an i-spy quilt!

improv i-spy 3

I did a quick free motion meander quilting on it, and made an effort to avoid falling into my normal trap of tiny quilting - I couldn't believe how fast it went with big meanders, it probably only took an hour to quilt!  It was good to get some more FMQ practice, I think I should be brave and try a non-meander design pretty soon.

improv i-spy 2

I backed it with a perfect-sized australian animals fabric that I had in my stash and bound in a solid teal.  I accidentally trimmed too close to the orange block when I was squaring up the quilt - originally it was intended to be floating in the middle like the rest of the blocks - but I actually like how it turned out that that one block is against the binding.

I have been doing tons of sewing clothes for Esther (more on that soon), so I'm having a hard time focusing on my quilting projects... I always think I'll get back to them after I just sew her one more shirt, haha.  But I have another baby quilt half pieced and a bunch of similar i-spy squares started for another i-spy variation for us to keep, so I should really get back to it soon!

Tuesday, March 11, 2014

Mod Mosaic Baby Quilt

mod mosaic baby quilt

I realized that I never shared this baby quilt which I made over a year ago - before she was born for a baby who is now walking!  I used Elizabeth Hartman's Mod Mosaic design although I think I pieced it somewhat differently than in her original floor pillow tutorial - I pieced small sections together randomly and then laid it out rather than laying out all the pieces first.

mod mosaic quilt detail

I mostly used the green/yellow/orange/pink colorway of Thomas Knauer's Savanna Bop fabric line, with coordinating fabrics from my stash, since the parents had shared a similar color scheme fabric with giraffes that they were using for curtains.  I quilted it with looping free motion meander design.  I didn't want to put a border on the quilt but I also wanted to echo the white strips in the quilt, so I used a flanged binding to have a border of white next to the green binding.

mod mosaic binding

It seems like our friends are having another baby boom this spring so I am hoping to make a number more baby gifts for all these new cuties soon!

Tuesday, January 22, 2013

A few baby sweaters

I have always had the problem when I keep a journal that I compulsively feel the need to "catch up" by writing about what has happened in order before getting to the current events... Anyone else have that problem? In any case, I seem to be falling into that same trap here. Despite my lack of energy for blogging all summer and fall, I really did do quite a bit of crafting, and I do want to share all those projects! I may need to work on loosening up and sharing some more recent stuff too, though, before I forget all the interesting details.

I made both of these baby sweaters over the summer and they were both gifts for new babies that came this summer, and both made with knit picks comfy yarn (the first in worsted weight and the second in sport weight) - this is a great yarn for baby items, very soft and easy to work with and I love the range of colors it comes in.

Green stripe sweater

This cute sweater for my nephew was made from the little coffee bean pattern and I just love the stripes - it's really fun to browse through the other ones folks have made on ravelry and see all the color combinations. I'm definitely hoping to make one of these for our peanut at some point (maybe in one of the larger, toddler sizes that the designer sells a pattern for).


Yellow baby sweater 1

I made this yellow sweater for our friends' baby from the seamless yoked baby sweater pattern.  I loved how simple this sweater was to knit, but that it still had the nice detail of the slip stitch design on the yoke.  There are links on the ravelry page for this pattern to a number of other similar seamless baby sweater patterns from this designer and I'll definitely be tempted to try some of them (or make this one again).

Yellow baby sweater 2

Love these cute vintage buttons that I used on the sweater too!

I have three different sweaters that I've made for our baby that are all nearly but not quite finished... two just need to be blocked and have buttons sewn on and the last one I need to do some (annoying and somewhat tricky) seaming and pick up and knit a button band... I've been indulging myself with fun little new projects instead of just finishing them all up, but hopefully I'll motivate to get them all finished soon.

Sunday, February 26, 2012

Bento Bikes Baby Quilt

Bento Bikes Quilt 1

Good friends of ours are having a baby at any moment, and I had been holding on to this fabric to make them a baby quilt for a while, and got it done just in time.  Now that they have recieved the quilt I can share it with you!

Bento Bikes Quilt 2

Here's a photo of the whole quilt, post washing.  They are both avid bicyclists, so when the Avalon fabric line from Birch fabrics came out, I knew it would be perfect for them!  I used a number of fabrics from the line and then supplemented with other grey, green, and teal fabrics from my stash.

bento squares before

To make this bento box design, I made nine log cabin/square within square blocks and then cut them into quarters.  Each of the larger blocks was 13.5" square before I cut them up, which was kind of a pain of a size to make, but was the right size to get the final quilt size I wanted (since I had a yard and 1/4 of backing fabric - so my final quilt was something like 39" square).   I used different size center squares to start and different width strips, so that the blocks would each be different.  I tried to keep in mind how the blocks would look when cut into quarters as I pieced them, so that each quarter would look good on its own.  I almost chickened out and left them as whole squares, but I went ahead and cut them up.

bento alternate arrangement

I also considered this layout which I like too, but I ended up deciding that I liked a regular bento box layout better.

Bento Bikes Quilt 3

I couldn't find the little quilting table extension thing for my machine when I went to free-motion quilt this, so the quilting was a bit frustrating (and far from perfect) but it all looked fine after a good wash and dry.  And the soon to be parents loved it, which is the most important thing!

I'll be linking up to Sew Modern Monday on Canoe Ridge Creations - click over to check out other modern sewing finishes!

{Sew} Modern Monday at Canoe Ridge Creations

Tuesday, July 12, 2011

Decorated Kids' T-shirts

Stacked t-shirts

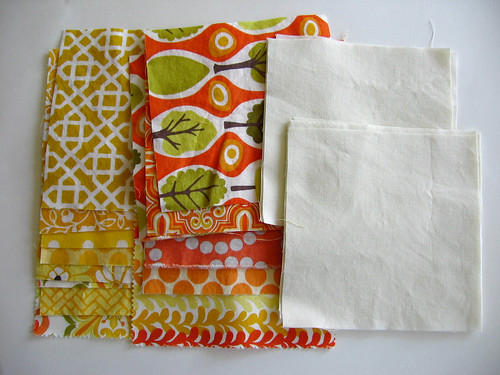
Since Wednesday, when I 
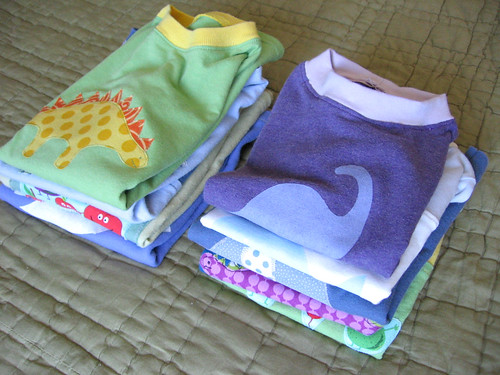
showed off a few t-shirts that I had sewed, I have made several more t-shirts and then decorated them all.  I was having so much fun making them that I went to the thrift store and bought some more t-shirts and jersey pillowcases to repurpose so that I could make more of them!  I ended up making 5 small (18 month size) t-shirts for my nephew (who is about to turn 1 - but I think he is on the big side and I wasn't sure how the sizing would work so I erred on the side of larger), and 4 larger (4 year old size) t-shirts for project first day.  It's a good thing I didn't get more supplies at the thrift store or I would still be making these, they are so fun to make and to decorate!

freezer paper stenciled t-shirts

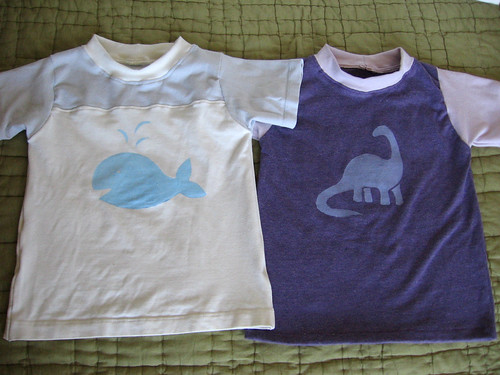
My original plan had been to do freezer paper stencils on all of them, similar to the onesies we decorated as a baby shower activity.  I did do a few this way and am really happy with how they turned out - I especially love the purple dino on the right above.  These two are both in the little size...

freezer paper stencil whale t-shirt

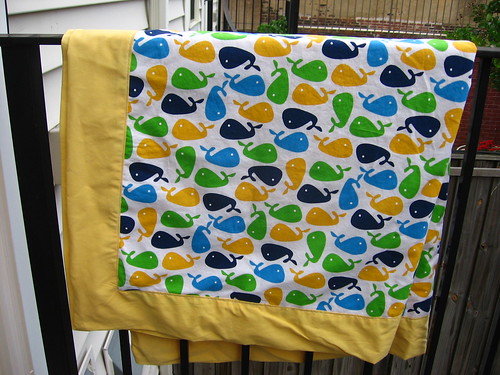
And I also decorated this bigger sized one with a whale.  I was a little concerned that the blue might look too lavender colored to be for a boy, so hopefully the whale helps keep it boy-appropriate.

veggie and dino t-shirts

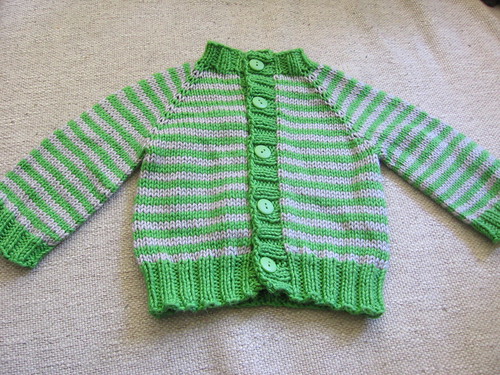
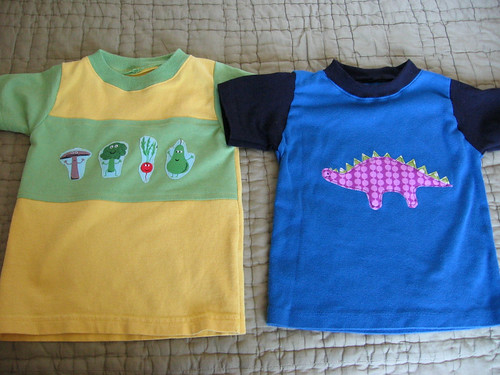
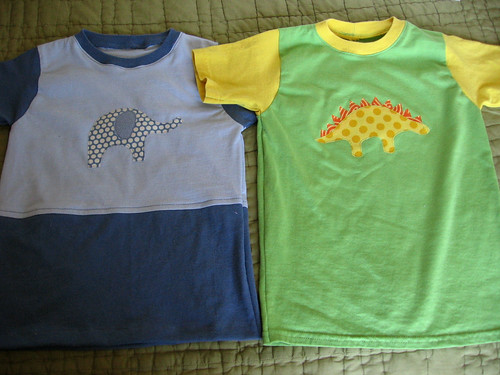
I ended up decorating most of them with fabric appliques, though, which I think turned out really cute!  These are both the little size.  I colorblocked the green and yellow t-shirt (and a number of others you will see), mostly because the fabric wasn't big enough otherwise.  The pattern (charlie tee from Fishsticks Designs) has pattern piece options for colorblocking but I just winged it, sewing the fabrics together first and then cutting the pattern piece out of the colorblocked piece.

veggie detail

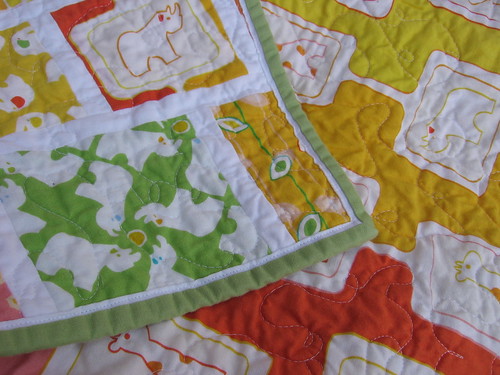
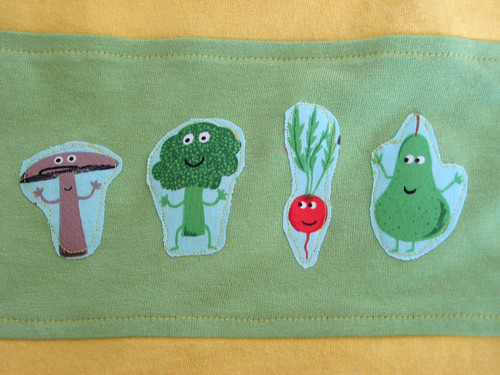
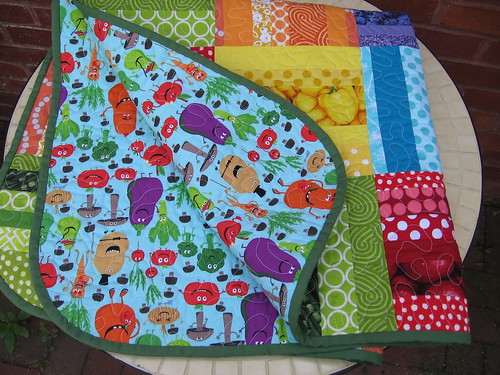
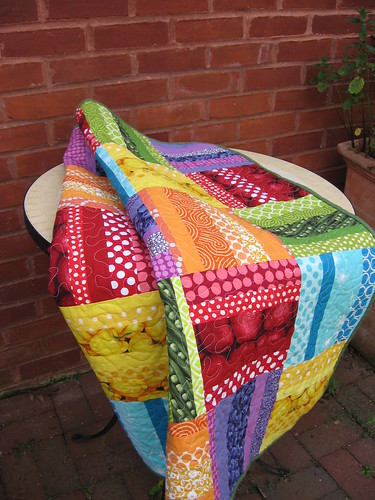
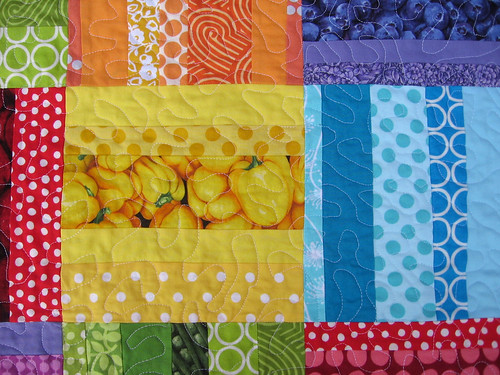
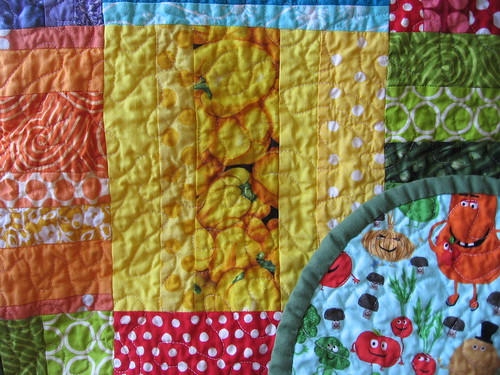
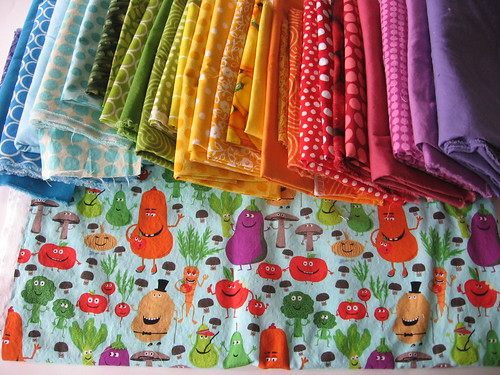
I used some of my leftover edgy veggie fabric from backing the 
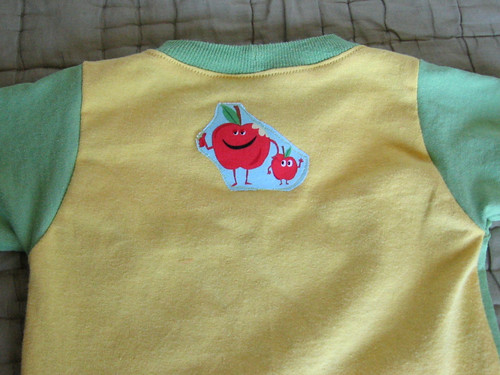
rainbow rail quilt to applique a few cute veggie guys on the front band of this shirt.  I used the stretch stitch (that looks like a lightning bolt) to do all the seaming on these t-shirts, usually with my walking foot, and as you can see it looks mostly like a straight stitch and works fine even for top-stitching.

back detail

And I put a cute pair of apples on the back, too.

dino and elephant applique tees

These two are the bigger size.  On a lot of these tees I was able to reuse the existing hem from the t-shirt and on the sleeves (adjusting the pattern to remove the hem allowance), and on both of these (and a few others) I was able to reuse the neck ribbing too - it was kind of a pain to rip out of the original t-shirt, but the necklines definitely turned out the best for these so I'm glad I did it!  You may also be noticing that I really liked the look of using one color for the body of the tee and another for the sleeves and neckline - it works out well because you can basically combine two existing tees to make two new ones.

dino detail 2

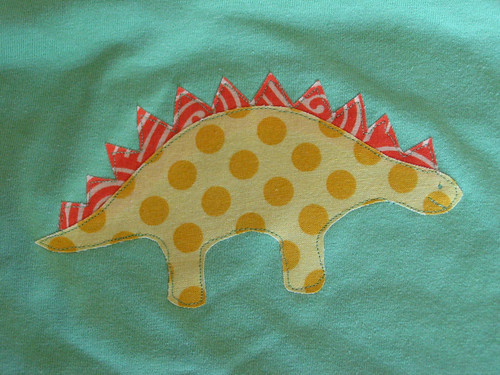
I love the cute dinos on this t-shirt and on the blue t-shirt!  I especially like the little face I was able to make since I did free-motion applique to sew it down.

elephant applique 2

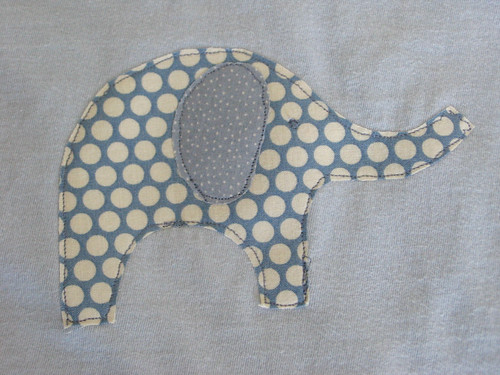
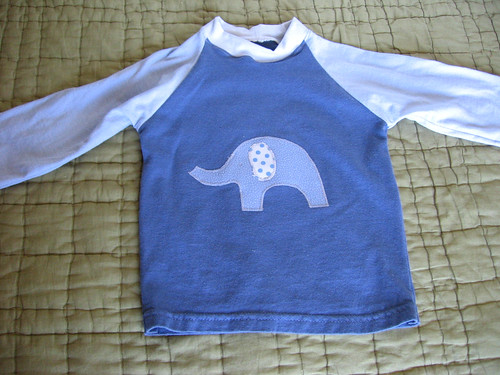
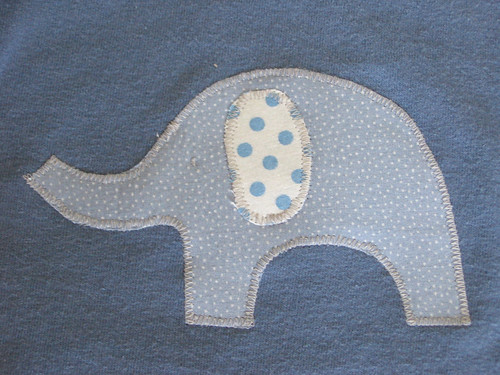
I love the elephant too.

long sleeve elephant raglan tee

I also made a long-sleeve raglan t-shirt in the little size with an elephant on it.

elephant applique 1

This was the first applique that I did of the set and I sewed it down with a zigzag, which I think looks cute too.   I ended up doing the rest with free-motion applique because I found it a bit easier and I like the loose drawing-like quality of the line.

fusible web and stabilizer

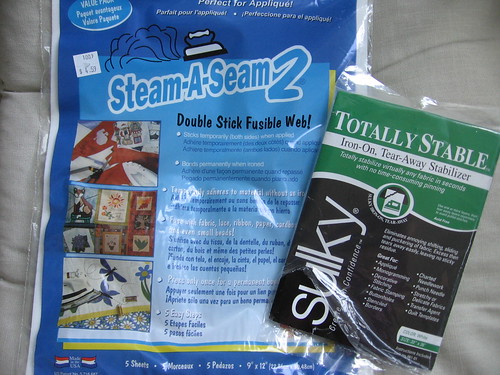
At first I used both fusible web and iron-on tear-away stabilizer when I was doing the appliques, but towards the end I realized that the fusible web alone really stabilized it enough and I skipped using the stabilizer.  For most of the t-shirts, I did the applique after I cut out the pattern pieces but before I assembled the t-shirt, so that the fabric was easy to keep nice and flat.  I did sew the purple dino on the blue shirt after it was already assembled, though, and it worked fine too - I just had to go slow and adjust it a few times.

veggie patch applique t-shirt

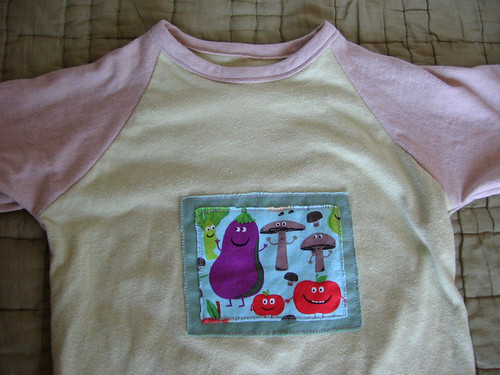
Finally, I also made a raglan tee in the bigger size (using the fishsticks Rockin Raglan pattern) with an edgy veggie fabric patch on front.  For this patch, I wanted to edges to be frayed so I didn't use the fusible web and so I did need to use the stabilizer.  I used a few dabs of glue to keep the two layered fabric patches in place sewed both down with a straight stitch, going around twice to make sure they were well-secured since they weren't fused in place.  Then I used my fingernail to loosen the stray threads and fray the edges a bit.

I also did a different neck on this t-shirt because I didn't have any matching ribbing, interlock, or extra-stretchy jersey.  I just used regular jersey and sewed it on in a single layer, than folded it around to the back and top-stitched it down - it makes a cute, thinner neckline.  I know those directions probably don't explain it well enough, I am hoping to do another project soon that uses this and I'll be sure to take pictures to explain it better if I do.

Sorry for the super long post, I just had so much fun making these that I wanted to show them all to you!

Monday, June 20, 2011

Baby Hat with Self-Striping Yarn

Self-striping baby hat 1


When I finished my self-striping socks last week, I didn't have another project on hand so I started a baby hat with the (substantial amount of) leftover yarn.  I didn't have a particular plan but figured 100 stitches would make a good size baby hat... and it just happened that it was a perfect fit for my adorable nephew who we were seeing this weekend!  Hopefully it will still fit him OK when it gets cold enough for him to need a hat again.

self-striping baby hat 2


The self-striping yarn makes a super cute hat, especially with the decreases at the top of the hat.  He was kind enough to submit to a quick photo shoot even though it wasn't anywhere close to hat weather.  But I wanted to share a hatless photo too - don't you love his red hair??

IMG_0666

Wednesday, June 08, 2011

New Drunkard's Path Quilt - WIP Wednesday

Rainbow Rail Folded with Backing

I was excited to finish my Rainbow Rail quilt last week, and couldn't wait to jump into my next quilting project - a drunkard's path baby quilt.  I had so much fun making my wonky drunkard's path block tutorial, and sketching out the many design possibilities, that I decided I just had to make a whole quilt in this pattern. 

Green Drunkard's Path Block

I decided to use my stash of green, yellow, and orange Central Park fabric (with quite a few other fabrics from my stash mixed in).  While I had fun making the wonky blocks, I decided to adapt the technique to a less wonky style, and drew up some templates to make these blocks using charm squares (5" fabric squares) - each block uses 8 colored squares and 8 white squares (I am using Kona Bone), and will measure 15" finished.  I am planning to make a 3 x 3 block size quilt, so it will measure 45" square finished.

Yellow and Orange Fabrics for Drunkard's Path

Since I had bought a charm pack of Central Park to make my other Central Park quilt, I had saved the yellow/orange/green charms for this project, and then I cut the rest from fat quarters/yardage.  If I had thought more ahead I would have bought precut charms of a white/offwhite fabric to use in this quilt, but instead I cut up some yardage I had bought... then discovered I didn't have enough and ordered more, which hopefully will be arriving soon.  I had originally hoped to finish this quilt by this weekend when we'll be visiting with the family this quilt is going to, but seeing as I have only made one square so far (and am waiting on fabric), it doesn't seem super likely... but who knows?

Possible Kaleidoscope QAL fabrics

I realized that my WIP Wednesday posts are usually pretty single-project oriented, since I tend to finish one project before I start the next (having too many WIPs makes me antsy, as I have mentioned in the knitting context)... mostly I think this is because I usually have WIPs going in a lot of different crafts, so if I let myself have multiple WIPs in each type of craft it would get really overwhelming.  Trying to finish one project before starting the next helps give me some discipline and something to look forward to - otherwise I worry I would end up abandoning a lot of unfinished projects.  So I usually have stacks of fabric around waiting for me to finish my project and start the next one... this week I started making stacks for Elizabeth at Don't Call Me Betsy's new Kaleidoscope Quilt Along which I am excited to say I am getting off the fence and will be joining!  Many of the fabrics (above) were from a bundle from fabricworm that I got as a lovely birthday gift from my in-laws, but I have definitely added/changed some of the selections, so it feels more like my own.  I am thinking that I will use either Kona Ash (on the left above) or Medium Grey (on the right) as the neutral/solid in my quilt - which do you think looks better?  I am thinking this will make a cute baby boy quilt!

SUTK Fabric Option - 2

I also have been making fabric stacks for the Spicing Up the Kitchen Swap (round 2), which I am excited to be participating in.  I am planning to make quilted linen placemats with patchwork accents for my partner (which will be my project this month for the bloggers' dinner party that I am hosting).  I think my first fabric selection may not have been up my partner's alley... so this is a second set of possibilities that I am hoping she likes!  I am planning to make these and my June bee blocks for do.good stitches (fun hexagons for Lee!) in a week or two... lots of fun sewing to look forward to!

I'm linking up again to WIP Wednesday over at Freshly Pieced - head over to see everyone's fun projects!

WIP Wednesday at Freshly Pieced

Friday, June 03, 2011

Rainbow Rail Quilt Finished

Rainbow Rail Quilt Finished

I finished up my "rainbow rail" quilt last night and am very happy with how it turned out! (earlier posts about this quilt are here and here.)  I love how my friend Mandy usually rounds the corners of her quilts (like these), and I thought it would provide good balance to all the straight lines and blocks in this quilt, so I went for it.  I like it this way, especially since it's a baby quilt, but I also think I would have liked it with square corners.

Rainbow Rail Draped

This was my first attempt at free-motion quilting a whole quilt - I had been practicing on some smaller projects, and I decided this was a good time to take the leap, especially since I wasn't sure how I could straight line quilt this in a way that complemented the design well.   It definitely isn't perfect - my stitch length is a bit variable and there are just some out and out mistakes - but for a first try I think it is not bad at all!  I used white thread to quilt it which stands out more than I'd like in some places, but seemed like the best choice given the rainbow of colors in the quilt.

I also used spray basting for the first time, which I figured would be easier than taking out pins as I quilted, and it worked really well.  I got Sulky because they had it at my fabric store (I later saw it at Joann's too, so if I buy more I may get it there with a coupon), but I also liked that it said it was non-toxic and safe to spray indoors.  It seemed to work well but since I have never used another brand I can't make any comparisons - I'd be interested to hear what brands other folks use and how you like them.

Rainbow Rail Quilting Detail

While I had originally thought about binding the quilt with a solid brown, I decided that was too dark and went with a forest green color from my stash (pretty sure it is Kona but I don't know which shade unfortunately).  I feel like I could have probably come up with a more perfect fabric to complement the front of the quilt - maybe rainbow polka dots or a stripe? although maybe rainbow would have been overkill - but I think this works fine.  And I love how it looks with the cute veggie backing fabric!

Rainbow Rail Folded with Backing

I went out of my way to make bias binding for the quilt to go around the curves, but I wasn't paying attention and I am embarrassed to admit that I messed it up and didn't actually cut it on the bias!  I was basically following this technique (although I didn't make it into double fold tape, I just ironed it in half to make the binding), but after made the parallelogram shape I accidentally drew my cutting lines parallel to the grain rather than along the bias cut edge... OOPS.  I didn't figure it out until I had sewn around two of the rounded corners on the back, and it just didn't seem to be acting like bias-cut binding should.  In retrospect, I am actually impressed that it went around the corners as well as it did!

Rainbow Rail Crinkled Up

I also tried a new stitch to attach the binding to the back of the quilt, and was really happy with how it turned out.  In the past I have done a blind hem stitch, but inspired by this post, I tried a ladder stitch (which I have done before, but not on binding), and I agree that it makes the binding more even; I also suspect that it will be more durable, which is good since I am hoping this baby blanket will get a lot of use and love!  The photo above shows the quilt after washing, all crinkled up.

I'm posting a bit early, but I'll be linking up to Sew Modern Monday on Canoe Ridge Creations on Monday - check it out to see others' modern sewing projects!

{Sew} Modern Monday at Canoe Ridge Creations

Saturday, May 21, 2011

Stamped Greeting Cards and a Baby Blanket

Birthday stamped cards

A while ago I made up a few stamped birthday cards, and I had really enjoyed using them and was almost out so I got out my stamping supplies and made some more.  I have really been loving the clear stamps that you use with the acrylic stamp mounts - it is so fun to be able to get a variety of stamps without breaking the bank, plus they are easier to store.

Gold Embossed Stamped Birthday Card


I embossed a few of the cards which I think makes them look classy, especially for this gold - it looks way better than just gold stamp ink would.

In addition to restocking my birthday card supply, I decided to make some congratulations/baby cards to go with all the baby gifts I have been making for my rapidly reproducing friends.

Train stamped card

I have always wanted a cute little set of alphabet stamps and I lucked out the last time I was at Michaels, they had some tiny ones that were only a dollar or two for the whole set!  I also found these cute trains either at Michaels or Joann's in the $1 mini acrylic mount stamp bin.  I love how this card turned out!

Elephant stamped cards

Love all these animal stamps.

Animal Stamped Cards

I have already used a few of the cards sending off baby gifts, including this whale blanket that I made using Anne Kelle Urban Zoologie for a friend who just had a baby boy.  It is backed with a thrifted sheet so it is nice and lightweight for summer.  I made the mitered corners similarly to how I made the blue and white striped blanket here.

Whale Baby Blanket

Do you like to make stamped cards or other projects?

Wednesday, May 18, 2011

WIP Wednesday - New Baby Quilt

Veggie Rainbow Fabrics

I got started on a new baby quilt this week, inspired by the Michael Miller "Edgy Veggie" fabric above (which will be the backing).   My original plan for this quilt was to make a stacked coins quilt, although I wasn't sure if I wanted it to have sashing in between the stacks or have them right next to eachother.  I started pulling fabrics that coordinated with the backing and I ended up with so many colors that I decided to go for the full rainbow.  I am also using the realistic fruit/veggie fabrics that I used recently in some baby clothes again, so that will be a good tie-in with the backing.  I got excited and went ahead and cut out a bunch of 8" long strips in varying widths and then played around with arranging them.

Stacked Coins Layout - Random

My original thought had been to have the colors randomly mixed together, and while I actually somewhat like this (and like it more with white sashing), it does seem like it is too busy.  I also tried arranging them in rainbow order and that looked nice but I am not sure the folks that I am giving this to would like it.

Color Block Arrangements

I thought it would work better if I arranged them more by color without having it feel totally like a rainbow, so I played around with having blocks in different colors in a kind of rail fence pattern.  I like how this looks much better, but it makes me a bit bummed because I was really hoping to make a sliced coins design.

Stacked Coins Layout - by color

I showed them to a friend and in talking it through with her it occurred to me that they might look better as sliced coins if I alternated cool colors in one stack with warm colors in another (although I couldn't figure out where to put the purples - they looked a bit off with the warm colors).  I like how this layout looks quite a bit... Although I like the rail fence design too, so I am not totally decided.  I have a few fabrics coming in the mail that I think will be good additions to this quilt so I will probably wait to make a final decision until they come - in the meantime, I would love to hear which design other folks like better.

I am hoping to sew up my blocks for the do.Good stitches bee in the next week and maybe work on a few garment sewing projects too... now that it is really warming up I am itching to try my hand at it a bit more and make some cute summer clothes!

I'm linking up again with WIP Wednesday over at Freshly Pieced - head on over to see the other fun projects that folks are up to:

WIP Wednesday at Freshly Pieced
Related Posts Plugin for WordPress, Blogger...