Showing posts with label dessert. Show all posts

Saturday, August 04, 2012

Creampuff Recipe (mini-eclairs)

dessert tray


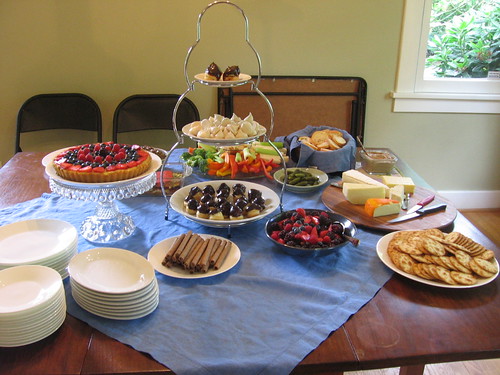
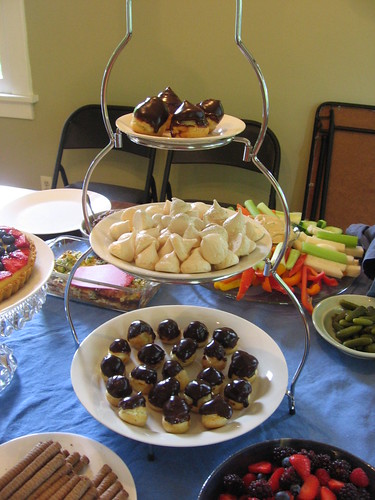
As I mentioned in my last post, about our bastille day themed housewarming party, I made creampuffs (eg, mini-eclairs) for the party and they were a big hit! I tried (arguably unsuccessfully) not to go too overboard with the baking, but I really wanted to try my hand at making an authentic french pastry - when I have visited france, the amazing range of delicious treats at the corner patisserie were one of my favorite things. Plus, it was a great excuse to get to use a new cookbook, Flour: Spectacular Recipes from Boston's Flour Bakery + Cafe, which I have been wanting to try out ever since I got it as a gift for the holidays.  While I visit Boston pretty regularly, I have never been to this bakery, but I had heard great things about the cookbook, and just from reading through it I could tell that a lot of thought and testing had gone into the recipes.  She has a lot of great tips in a techniques section, like just what temperature butter should be to best cream with sugar, how best to fold two ingredients together, and so forth - it's hard to absorb and remember in one reading but I'm sure I'll refer back to it over time to improve my baking.

So, I had pretty high expectations for the cookbook going in, and this recipe did not disappoint.  I have never made creampuffs before, but a guest mentioned that she had had trouble when she tried making them in the past and they didn't rise well - I can only think that they turned out well because of the excellent instructions, or possibly just dumb luck.  Hopefully if I make them again I can get it all to work as well!  I'm pretty tempted to try some of the other delicious recipes in this cookbook before I repeat these, however.  I had a lot of fun making them, but I'm not going to lie, as you can see from the extensive directions below, they were quite a bit of work - luckily, I knew what I was getting into and I did as much of the work the day before as I could and then basically just assembled them on the day of the party.


Chocolate-covered Creampuffs
Adapted from Flour

For the pate a choux (creampuff shells):
  • 1/2 cup (1 stick) unsalted butter
  • 1 tablespoon sugar
  • 1/4 teaspoon kosher salt
  • 1 cup water
  • 1 cup all purpose flour
  • 4 eggs, lightly whisked together
For the cream filling:
  • 1 cup milk
  • 1 teaspoon vanilla extract
  • 1/2 cup sugar
  • 3 tablespoons cake flour
  • pinch of salt
  • 1 egg
  • 1 egg yolk
  • 1/2 cup heavy cream
For the ganache (chocolate topping):
  • 2/3 cup semisweet or bittersweet chocolate chips (or 4 ounces chopped semisweet or bittersweet chocolate)
  • 1/2 cup heavy cream 

To make the creampuff shells:
Preheat oven to 400 degrees, and line two baking sheets with parchment (or butter them).  In a medium saucepan over medium heat (or I did this in a double-boiler to be sure I didn't overheat or scorch it), heat the butter, sugar, salt and water until the butter is melted.  Do not boil - you don't want any of the liquid to cook off.  Add the flour and stir until fully incorporated, using a wooden spoon.  The recipe directs to keep stirring over medium heat until the mixture starts to get thicker and looks like a loose dough more than a stiff batter, and leaves a thin film on the bottom of the pan; she says this will take 3-4 minutes but mine seemed to get there very quickly, I'd say less than a minute, so I just stopped then.

pate a choux batter

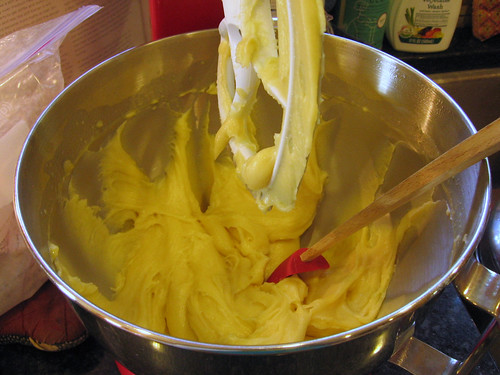
Transfer the dough to the bowl of a stand mixer, with the paddle mixer attached (I used the paddle attachment with built in scraper and it worked well).  Mix on medium-low for 1 minute - you will notice steam coming off. (The recipe notes, if you prefer to work by hand you can mix in a bowl with a wooden spoon for 2-3 minutes).  On medium-low speed (or beating quickly by hand), add the eggs gradually.  Once the eggs have been added, increase the speed to medium and beat for about 20 seconds, until the dough looks shiny.

creampuffs baking

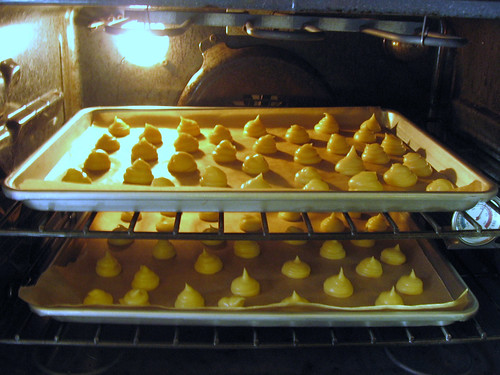
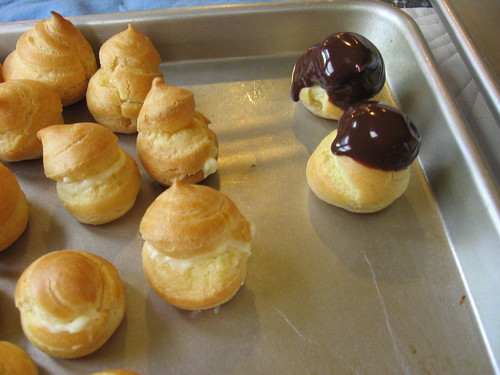
Using a pastry bag and the biggest tip you've got (the recipe calls for a 1 inch tip but I only had one that was probably 1/4", but it worked - or you could just use a plastic bag and snip off the corner), pipe out balls about 1.5" across onto the baking sheet.  As you can see in the photo above, I didn't space mine too far apart and it was fine, but you don't want them closer than an inch or so apart.  Bake at 400 for about 15 minutes, at which point the pastries should have puffed up and will be starting to brown.  Turn the heat down to 325 and bake for another 1/2 hour, until they are fully browned.  Place the pans on wire racks (or I just put them on empty burners on my stove) and let cool.  If you are making in advance, you can store in an airtight container - they can be frozen for up to 2 weeks, or stored at room temperature for up to 2 days.  To refresh, put them back on a baking sheet (straight from the freezer if frozen) and heat in a 325 oven - for 6-8 minutes if frozen, 2-3 minutes if not.  Again, let cool completely before filling.  (I made mine the day before and refreshed as the recipe directed and they didn't taste stale at all).

To make the cream filling:
The recipe uses a cream filling that is a mixture of a custard and whipped cream, which she calls "Tropez Cream" - it's a bit time intensive but I thought it was really delicious.

Scald the milk over medium high heat (heat until almost boiling, when bubbles begin to form around the edges, but do not boil) - the recipe suggests using a medium saucepan again, but I used the double boiler (probably not necessary for the scalding but I do think it makes the later steps harder to mess up - I pretty much always use a double boiler when I make custard for that reason).  While the milk heats, mix together the sugar, flour, and salt in a small bowl, and whisk together the egg and egg yolk in a medium bowl.  Slowly whisk the flour mixture into the egg mixture - it will be pasty and thick.

When the milk is heated, remove from the heat and slowly add it to the sugar/flour/egg mixture, whisking thoroughly as you go.  Once all the milk is whisked in, scrape the mixture back into the saucepan and put over medium heat.  Whisk continuously and strongly for 4-6 minutes (I found that it helped to hold the whisk in an oven mitt so my hand didn't overheat, but that may have also been from the steam from the doubleboiler).  Initially the mixture will be very liquid and foamy but it will start to thicken and the bubbles will go away.  When it thickens, you can stop whisking periodically and see if it is at a boil - when it bubbles, whisk again for 10 more seconds then remove from heat.

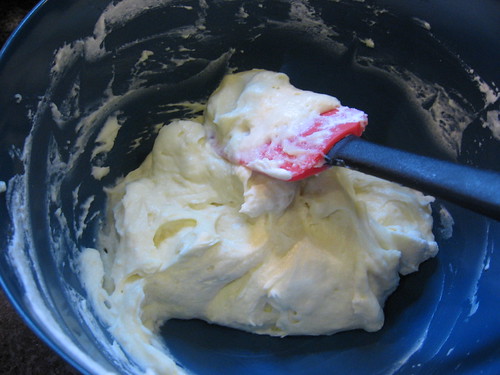
Pour the custard through a fine sieve into a heat-safe medium bowl, and stir in the vanilla extract.  Cover with plastic wrap placed directly on the surface and refrigerate for at least 4 hours, until cold.  Or you can refrigerate in an airtight container for up to 3 days (this is what I did, as I made the day before).  Just before assembling the creampuffs, whip the heavy cream until it has soft peaks.  Whisk the cold custard and then fold the whipped cream and the custard together using a rubber spatula.  Refrigerate if not using immediately.

creampuff filling

To make chocolate ganache:
I was relieved to find that this step was much simpler than making the other two parts.  Like the creampuff shells and the custard, I made the ganache a day in advance and refrigerated it, but then I ended up having to microwave it to get it back to liquid (mostly because I hadn't given it long enough to come to room temperature).  Since it was so easy to make, if I were making these again I would just wait and make it on the day of.

Put the chocolate in a small heat-proof bowl.  Scald the cream over medium-high heat, and pour the hot cream over the chocolate.  After it sits for 30 seconds to a minute, slowly mix it together until the chocolate is all melted and the mixture is smooth, then let cool to room temperature.  (It can be stored in a container in the fridge for up to a week, and then brought back to room temperature to use).

To assemble the creampuffs:
Fill a pastry bag with the cream filling, using a medium sized tip.  Use the pastry tip, a knife, or just your fingers to open each puff enough to fill with the cream.  I opened them from the side, which wasn't as pretty, and just noticed in writing this up that the recipe actually says to poke a hole in the bottom - maybe that would have worked better, although it seems like the cream might seep out then.  There's a surprising amount of space in there for cream and I was impressed that the recipe made just about exactly the right amounts of cream filling and ganache for the cream puffs.  Turn the puffs upside down and dip the tops in the ganache, and then let rest for a few minutes to let the chocolate set.  (Maybe because I had microwaved it to get it softened up, mine never really set up so the chocolate was a bit runny - but still delicious - when I served them).  Serve that day, ideally within 4 hours.

creampuff assembly

Tuesday, July 31, 2012

Bastille Day Housewarming Party

Lawson and I really like to entertain, so since we moved into our house in May, Lawson and I have been looking forward to having a housewarming party and breaking in our new house.  Since the weekend of July 14th was the best time for us, we decided to have a Bastille day themed party - which turned out to be a great excuse to come up with a french-themed menu.

Housewarming party

I may have gone a little overboard... we had a cheese plate and a veggie tray, and I cooked a number of favorite items such as french lentil salad and meringues.  I made Smitten Kitchen's Zucchini and Ricotta Galette, which I had made once before and was just as yummy this time as the first time (although I didn't get a picture, so you'll have to take my word that it really does turn out as great as she says).  I also made a lemon curd fruit tart that I had made before but which I hadn't made in years, and which was a great way to use fresh berries from the farmer's market, and I made a broccoli quiche which I had made before (although I wasn't as thrilled with how it turned out).

I tried out a few new recipes - a mushroom walnut pate, and creampuffs (mini-eclairs) which were a big hit, especially with the kids at the party.  I'll be back to share recipes soon!

The party went really well and all the food was all a hit, although we were pretty wiped out afterwards.  We are looking forward to entertaining more in our house now that we are getting to be mostly settled in!

Sunday, November 06, 2011

Sweet Confections - Book Review and Giveaway!

Sweet Confections Cover

I was so excited to receive this candy cookbook, Sweet Confections, in the mail from Lark Crafts to review.  I have a big sweet tooth, but I have never really made candy before, so I was pretty sure I was going to love it.  I was super impressed with the beautiful photographs, excellent how-to section and wide range of recipes.

Candy Temp Chart

The beginning getting started section has clear instructions and lots of step by step photos on everything you need to know, from candy temperatures (above), how to cook sugar and how to carmelize sugar, how to temper chocolate, how to hand dip and hand roll chocolates, and also a helpful overview of ingredients and tools.

Orange Walnut Choc Nougat

Each of the recipes in the book has a big mouthwatering photo...

Choc Nougat 2

And then a full page of ingredients and instructions and often more photos.  Being able to see a photo of every single recipe is so great, and the extra photos showing a cut open view and the like are super useful too.

Candied Citrus Peel

There's also a section at the back with recipes for some of the ingredients that you could make yourself - like this candied citrus peel that is used in the recipe above.

Mixed Nut Choc Truffles

One of the things that I was most impressed by was the range of recipes included in the book - it really covers the gamut of candy-making, from fancy stuff like chocolate truffles...

Peanut Brittle

To peanut brittle, toffee, candied nuts and the like...

Jelly Candies

To chewy candies like these jellies...

Vanilla Marshmallows

And even marshmallows, yum!  I also loved the fact that it included both basic recipes (like many of the ones shown above) and more interesting, unique combinations - like vanilla cheesecake fudge, pear hazelnut truffles, and pecan pie truffles.  While I am totally new to making candy and found this book a great introduction, I am sure that even an experienced sweet-maker would find something delicious and new to try.

Vanilla Caramels-1

When I got the book, I couldn't wait to try my hand at making one of these yummy treats, and while I was tempted by many of the recipes I had no trouble deciding to go ahead with these vanilla caramels.  Soft caramels are one of my favorite candies and also were something that I had never thought to try to make before, so I was super excited to learn how!

Caramel ingredients

One thing about making your own candy is that you can no longer play dumb about how bad it is for you... with this set of ingredients, no wonder caramels are so yummy!

For the most part, the recipe was clear and easy to follow.  The instructions on how to caramelize sugar (in the starting up section) were super helpful and showed exactly what to do.  After you caramelize the sugar, you add the remaining ingredients (which have been warmed and mixed together), and it kind of bubbles all over the place as you cook it until it reaches the specified temperature.  I was a bit worried that I might be doing that part wrong, but in the end the caramels had great taste and texture, so it all worked out.

The only real pitfall that I had was that the recipe instructed you to pour the cooked caramel mixture into a pan lined with plastic wrap... and maybe I was supposed to let it cool for a minute first, or maybe I have cheap plastic wrap or something, but it started to melt when I poured the hot caramel in!  I freaked out a bit and pulled out the plastic wrap and threw it out (which sadly meant I lost some of the caramel with it).  Then when the caramel cooled I just scraped it out of the pan, which wasn't actually as hard as I had feared - and the caramels were totally delicious, so I was still very happy with the result.  I will definitely make this recipe again, but next time I will probably just use parchment to line the pan.

Vanilla Caramels

I wrapped up the finished caramels in waxed paper as suggested and they looked totally professional!  I brought them in to my office for halloween and everyone was very impressed.  I am planning to make the pumpkin caramel recipe in the book next, for thanksgiving.  Yum!

Not only did the generous folks at Lark send me a copy to review, they also sent me a second copy to giveaway to one of you!  To enter the giveaway, simply leave a comment below - I'd love to hear if you have ever tried making candy before and how it went.

Since I am paying for the shipping, the giveaway is open to U.S. residents only.  The winner will be picked by random number, and I'll keep the giveaway open through next Sunday, November 13 at 9 pm PST.  I will contact the winner by email so make sure you have an email address in your blogger profile, or leave on in your comment!

GIVEAWAY CLOSED!


Disclosure: This book was provided to me as a free review copy by Lark Crafts, but all opinions expressed are my own.

Thursday, May 26, 2011

Mixed Berry Ice Cream

Mixed Berry Ice Cream

I don't know about where you live, but here in D.C. it has been feeling decidedly like summer.  Today it was over 90 degrees out!  I have been wearing skirts and dresses non-stop, and the other day I got the urge to make some ice cream.  I like to keep bags of frozen berries in the fridge as they are great for whipping up a last minute cobbler, pie, or sorbet, and I had been wanting to try making a berry ice cream.  Most of the times I have made ice cream I have gone all-out and made a custard but this time I kept it simple and made it "Philadelphia Style" which just means I used cream (or half-and-half, in this case) straight, with no custard.  As a result, this lands somewhere in between a rich ice cream and a light sherbet - deliciously fruity with a hint of creaminess.  This recipe is pretty low fuss, the only somewhat time consuming part is straining out the seeds, but it makes the texture of the ice cream much nicer so it is definitely worth it.

Straining Puree


Mixed Berry Ice Cream - Philadelphia Style
Inspired by a few recipes in The Ultimate Ice Cream Book
  • 2 cups half and half (or if you wanted it to be more like sherbet, you could probably use milk)
  • 3/4 cup sugar
  • 1 pound frozen mixed berries - I used a mixture of blackberries, blueberries, raspberries and strawberries, but really any berry mix should be fine
Take the berries out of the freezer and put them in blender to begin to defrost.  Put the half and half and sugar in a saucepan over medium heat and stir until sugar is mostly dissolved, not letting the half and half boil (it should be warm but not too hot at this point).  Pour the warm half and half over the berries in the blender and puree thoroughly.  Strain the puree through a fine strainer to get out the seeds.  The mixture should still be somewhat cool, but if it is not, refrigerate until cool, then freeze in your ice cream maker according to the instructions.  Enjoy!

Sunday, April 10, 2011

Tea Party and Lemon Squares


I had the tea party this weekend that I made invitations for earlier and it was lovely!  I didn't get any good photos of the setup for the party but since I kind of collect teapots (since I keep making them and don't give them all away), it worked out really well.  I wanted the party to feel like spring so I made more spring flower and animal themed sugar cookies (using my regular icing recipe this time), and we had blueberry muffins, fruit salad, cucumber tea sandwiches and hummus tea sandwiches, and lemon squares.


The lemon squares are, like the sugar cookies, from my family recipe, and they were really yummy as usual.  I actually cooked them a bit less than usual accidentally and they were less fully set but still light and delicious with a fresh lemon taste.


Lemon Squares

For shortbread crust:
  • 1 cup butter (2 sticks)
  • 1/2 cup confectioner's sugar
  • 2 cups flour
For lemon layer:
  • 4 eggs
  • 2 cups sugar
  • 5 tablespoons flour (1/4 cup + 1 tablespoon)
  • Juice of 2 lemons (5-6 tablespoons)
  • confectioner's sugar to sprinkle on top
Preheat oven to 350 and grease a 9x13 pan.  Mix together ingredients for shortbread crust until combined and dump mixture into the greased pan and pat into an even layer.  Bake 20 minutes.

Mix together ingredients for lemon layer and pour over crust.  Bake for another 25 minutes or slightly more, until edges are brown and top is beginning to slightly brown.  Remove from oven and lightly sprinkle confectioner's sugar on top (I use a sieve to evenly distribute it).  Let cool, cut into squares and serve.

Tuesday, April 05, 2011

Baby Shower Desserts - Woodland Sugar Cookies and Meringue Mushrooms


As I mentioned yesterday, we co-hosted an owl-themed baby shower for friends over the weekend.  Other folks brought lots of yummy food to share too, these desserts were my contribution.  As far as the desserts were concerned, I broadened the theme to be woodland more broadly, with owl, deer, squirrel and leaf sugar cookies and mushroom shaped meringues.


I used my family sugar cookie dough recipe but I tried royal icing for the first time, using the recipe from Prudent Baby.  I only made white piping because I couldn't really handle making three colors of piping icing and three colors of flood icing.  But I actually like how it looks that the colored cookies are all outlined in white so I think it was OK.  I made the flood icing a little thick at first and then tried to thin it down when it was already in the bottles, which I don't think was the best idea and made some of the cookies come out a little funny.  I made it with some lemon juice as they suggested and it really did taste quite good... but I love my family's traditional cookies, including the icing, so I will probably make them my old way in the future.  Although I really should give royal icing another shot since I didn't totally do it right.  Or I may try to come up with a hybrid icing that works well for the pipe and flood technique but tastes more like what I am used to.


I also made these little cutie mushroom meringues, inspired by the ones that decorate a traditional buche de noel (yule log).  I used the same meringue recipe as I used for the valentines hearts, but didn't overbake them this time - they only took an hour and 20 minutes to bake since they were so small.


The meringue mushrooms actually weren't very hard to make.  I used a pastry bag with a size 11 tip (about 1/4" wide circular opening) and piped some stem shapes and cap shapes, making the stems wider at the bottom for stability.  I also tried to make a bit of the swirl on the top of the cap so that they wouldn't have a point sticking up.  I baked them on my favorite silicon baking mats again, which worked great.


After baking them, I took them off the cookie sheet and then I broke the tip off each stem to give it a flat top, then I put a dab of the piping consistency royal icing on the end and just squished it into the mushroom cap.  I found that lowering the mushroom cap onto the stem was actually best if I wanted to get them to stand upright.  I didn't have too much trouble breaking the pointy ends of the stems off but I did break a few so you probably want to make more stems than caps if you are doing this yourself.

This is going to be baby shower week on the blog, I guess - I'll be back next with a post about the fun craft activity that we did during the shower!

Wednesday, February 16, 2011

Valentines Meringues


I haven't blogged in a few days but it is mostly because I have been SO BUSY making stuff!  I spent most of the weekend sewing up baby blankets and tote bags for the craft hope charity project I am doing (originally mentioned here) and will be back to share more with you on that soon (lets just say I may have been a bit overambitious when I decided to make 12 kits...). 


Then I whipped up a really special Valentines day dinner for my sweetie, if I do say so myself (apologies for the crummy photo quality above - this was the best I got).  I adapted the delicious butternut squash and walnut lasagna that I made before into a filling for handmade ravioli and then made the bechamel sauce to go on top.  To adapt the lasagna to make the filling, I basically prepared the squash as described in the recipe, then ground the nuts in the food processor, and then added the squash/onion/garlic/herb mixture, the cheese, and an egg and processed a bit (leaving it somewhat chunky not totally pureed).  I also made braised leeks again for the side, which were yummy and a good complement to this dish - I plan to share that recipe some time too.


For dessert, I made homemade strawberry ice cream and heart shaped meringue nests like the one shown above, as well as a bunch of heart shaped meringue bites.  Somehow making meringues seemed like a totally normal thing to do since my mom always used to make them, but then I realized I had never made them myself and it seemed like it might not be so easy.  So I poked around in a number of my cookbooks and then forged ahead.  I found some recipes that called for more complicated ingredients but ended up going with an ultra-simple approach and it worked well.  I overbaked them a bit which mostly meant that they were still delicious and even more crumbly and delicate, but slightly brownish in color.  I was OK with that although it does make me want to make them again to see if I can hit it spot on. 

Sorry I don't have a picture of the ice cream, it was pretty good but not phenomenal, being made with frozen strawberries rather than fresh, in season ones.  This too I will have to try again [insert noises from husband in background pretending to be disappointed that there will be more of this in his future].  Also no pottery notes - we decided to eat off our nice china since it was a special occasion!  You can see the cute pink and red flowered tablecloth that I recently thrifted in the pic above which served perfectly.

Meringues
  • 3 egg whites, carefully separated to ensure no yolk at all is present
  • 3/4 cup granulated sugar
Preheat oven to 250F and line baking sheets with either silicon baking mats or parchment paper (I used my fave silicon mats and they worked great).

Apparently if any oil gets into your meringues it really messes things up, so for starters make sure that your mixing bowl and mixer are extremely clean, and make sure you don't get any yolk in your egg whites.  I used a stand mixer but I am sure you could do this with a hand mixer and a bit more elbow grease.  With your mixer on the highest speed and using the whipping attachment, beat the egg whites until they form soft peaks.  With the mixer still running at high speed, gradually add in the sugar.  Stop and scrape down the sides if needed, then continue whipping at high speed until the mixture glistens a bit.  I read that in a recipe and didn't think I would be able to tell when to stop but it really does get a bit shiny. 

To form meringues, you can just scoop the raw meringue onto the baking sheets by the spoonful, but you can get more elegant shapes if you pipe them.  I used a regular pastry bag and the largest tip that I had, I think a size 11 or 12, it was about 1/4" across.  You can also use one of the tips that looks like a star at the end, I just used a plain tip so that I could make the cute hearts in the first picture.  To get a thicker shape just hold your tip in one place while you squeeze out the meringue.  To make a nest, pipe a concentric shape (usually a circle, but I did a heart), and then pipe up a few layers at the outer edge to build a kind of wall.  You can play around and see what shapes you like.

Bake for 1.5-2 hours (I baked for 2 hours or maybe a bit longer) - you can check but pulling one out and eating it to see if they are done.  When they are done remove from oven and then remove from the sheet.  Warning, these are addictive!

Friday, February 11, 2011

Valentine Heart Sugar Cookies - Part 3


OK, I'm back with the third and final post about my valentines sugar cookies - if you missed them, Part 1 was the recipe and instructions for making the cookies, Part 2 was about icing basics and piped designs, and Part 3 (today) will be about how to make these cool marbled/swirly types of cookies.  I forget where I originally saw about making these types of cookies, but I have tried them before and really liked how they turned out.  A lot of the ideas for valentines cookies with this technique came from this post - and there are a lot more ideas there that I didn't try, so check it out if you like this kind of decoration.


I tried making three different basic designs with this technique - an overall marbled design, scattered hearts, and a heart border.  I had a hard time getting the scattered hearts to turn out well, I think because my icing was a bit too far on the runny side, but the other two sides turned out well.  For all of these designs, you basically just pipe the wet flood icing in a design - either dots or lines for the ones I did - on top of the still wet cookie icing, and then draw a toothpick through it to create the marbled/feathered look.


In addition to have the right consistency icing, I found that it helps a lot of there is enough contrast between the base icing color and the piped color.  The designs were harder to see on some of the light pink on white cookies that I made.


These heart border ones look really cute and aren't hard to make at all!  You just pipe evenly spaced dots around the border and then draw the toothpick through the middles all the way around the border.

Thanks for reading!  I am still planning to try out royal icing to compare to my normal icing recipe so I will report back on how that goes.  Are you making any special treats for valentines day?

Wednesday, February 09, 2011

Valentine Heart Sugar Cookies - Part 2


I'm back with part 2 of my valentines cookie-decorating posts - yesterday I shared my family recipe for sugar cookie dough and the steps to bake them.  Today I'm going to share decorating tips, although as I started writing this post I realized that it would really be too long for a single post, so I am going to cover most of it today and then wrap up tomorrow.  Today I'll focus on the basic icing technique and piped designs, and tomorrow will be about the cookies with the fun swirly/marbled designs.


The way we have usually iced cookies in my family is to make icing that is not too runny and spread it on with a small knife.  If you get it the right consistency, you can spread it so the edges look nice and it stays on the cookie without running all over the place, but it kind of smooths out and doesn't look like you just spread it on.  Then we usually make somewhat thicker icing in just white for piping.  This system works pretty well, but it doesn't allow you to do some of the fun designs that I made for these valentines cookies, especially the swirly designs.  So for these cookies I used the more complicated technique of piping an outline and then flooding it with runny icing from squeeze bottles to fill in the center.  Prudent Baby has a good overview of this technique here.


Unlike that tutorial, though, I didn't use royal icing - I used basically the same recipe I posted here, but about doubled so I would have enough to make 3 colors of icing, each in a thicker consistency for piping and a thinner consistency for flooding.  I actually have never made royal icing but my sense is that it is kind of like fondant - great looking but not so great tasting.  This icing isn't as fabulous for decorating (and I think I made my flood icing a bit too thin - aim to have it about the consistency of yogurt I think), but it is really quite tasty.  It also gets a kind of grainy look sometimes, especially when you use a lot of food coloring or thin it out a lot, it seems (you can see it in the top pictures showing the darker cookies).  In any case, I am a firm believer in the idea that sugar cookies should taste as good as they look so I will forgive this icing its faults.  In the interest of a fair comparison, however, I bought meringue powder today so that I can try out royal icing when I make the second half of this batch of cookies, so I will report back on how that goes.


The first step is to pipe the outlines of where you want to ice.  For most of the cookies, I just wanted to lay down a base layer of icing over the whole cookie in a single color, so I piped an outline close to the edge.  I also made some cookies where I wanted a solid heart in the center surrounded by uniced cookie, so I piped a smaller heart in those.  Then I also made some cookies (shown on the bottom left) where I piped an outer edge and an inner heart, so that I could flood with two different colors of icing.


The flooding is pretty simply, and you don't have to wait until the piping is totally dry, just until it has set up a bit and isn't likely to give way and let the icing out.   To flood the center, I covered about 1/2 to 2/3 of the area and then used the tip of the squeeze bottle to push it into all the uncovered spots.  If you wanted thicker icing you could certainly use more.


This shows how I made the cookies with two different flood colors.  It is pretty much the same technique but you do want to let the first flood layer dry a bit before you go back and add the second one, otherwise they could run into eachother (which mine did a bit, I didn't wait long enough).


I really liked how the lefthand cookie above looked so I left it as is, but you could go back once it sets up a bit and pipe a design on top.  The righthand cookie above was one with a heart in the center where I went back and piped on top once it had dried.


Most of the cookies that had a heart in the center I used to make these cookies that were intended to look like lace or doilies, with an intricate decorative border around them.  I only used white piping (this is with a #2 tip) but these would also be fun using a contrasting color for the piping.  You can see I tried out a couple different types of borders and I am sure you can think of more!  I like the polka dot heart center and I also tried crosshatching across the heart, which I thought looked a little too busy (not shown) but that is worth a try too.


These are some cookies that I left bare and then piped designs straight on the cookie.  This is another option if you want to do a fancy looking cookie but are offput by the idea of putting down a base layer of icing and then also piping a design - this would certainly be faster.  I think all of these designs would also look nice on an iced background too, and probably nicer.  FYI the red piping was done with a #4 tip which I think is larger than ideal but I couldn't find the second #3 tip I could have sworn I bought.


I had a lot of fun making the conversation hearts, I wish I had made more colors but the logistics of making two thicknesses of each color made that hard to do.  If you just want to make conversation hearts I would skip the pipe and flood method and just make one thickness of each color to spread on, so that you could do more colors.  I looked up conversation heart sayings online (see here and here) but ended up deciding to stick to some of the more traditional messages rather than getting into "text me" or any of that.

Don't forget to come back tomorrow if you want to learn how to make the swirly/marbled designs!

How about you - how do you ice your cookies - pipe and flood, spread it on, or another way?  And do you use royal icing or another recipe?

Tuesday, February 08, 2011

Valentine Heart Sugar Cookies - Part 1


While I seem to have been making a lot more gingerbread cookies lately (as seen here and here), iced sugar cookies are a long-time favorite in my family, both because of their delicious taste and because of the endless creative possibilities with the decorations.  My mom and I usually dedicate at least a day over the holidays to decorating cookies which is a nice way to get in the holiday spirit and chat while making treasures we will bring out for all the special occasions to ooh and aah over and then munch right up.  We spent the holidays with my in-laws this year so there were no sugar cookies at Christmas, so I decided to make a whole batch up for valentines day.  The decorating possibilities are nearly limitless, as you can see from the sneak peak above of the different cookies I made.


But you'll have to come back tomorrow to see more of the decorated cookies and get tips on how to make the different designs!  Today I am going to share all the steps to make the cookies, including mixing the cookie dough and cutting out and baking the cookies.  If you already have a favorite sugar cookie recipe you can of course use that, but while I may be biased, I really think that our family cookie recipe is the best.  The cookies are crispy, rich and flavorful, and they don't have any of that fluffy blandness you find in some sugar cookies.  I am not sure what the secret is, but I think it has something to do with making the cookies really thin... oh, and butter.  Lots of butter.


Sugar Cookies
  • 1/2 cup butter
  • 1/4 cup vegetable shortening
  • 1 cup sugar
  • 2 eggs
  • 1 teaspoon vanilla
  • 2 cups flour
  • 1 teaspoon baking powder
  • 1/2 teaspoon salt
In a medium/large bowl, cream together butter, shortening and sugar with a mixer or pastry blender.  Add eggs and vanilla and mix until fully combined.  In a separate smaller bowl, mix together remaining (dry) ingredients, then add to the wet ingredients a bit at a time, mixing as you add.  The dough should be fairly sticky but should come together.  Scraping out bowl to get all the dough, wrap in plastic wrap (or put in a zip-top bag) and refrigerate at least 2 hours and ideally longer.

Preheat oven to 375F, and either grease cookie sheets lightly with butter or use a silicone baking mat (as I mentioned, I love our new silpat mats!).  Take the dough out of the fridge and break off about 1/3 to 1/4, then return the rest to the fridge.  Use a clean countertop area to roll out the dough, liberally sprinkling flour under the dough, on top of the dough and brushing the surface of the rolling pin with flour.  With gentle but firm and even strokes, carefully roll out the dough, adding more flour if it seems to be sticking to the countertop or the rolling pin.  I generally roll these out to be 1/16" to 1/8" thick, but just try to get them as thin as you can.  Cut out cookies using cookie cutters of your choice and gently lift onto cookie sheet using a spatula, making sure to space cookies 1/2" apart.


Bake the cookies for 6-10 minutes - exact time will depend on your oven and how thin the cookies are rolled out.  They should be just starting to brown slightly at the edges when they are done.  Take out of the oven and promptly remove from the cookie sheet to a counter or cooling rack to cool.  I have found on the silpat mat that they come off with no problem, if you are using a greased cookie sheet you may have to use the spatula a bit more to get them loose, and there is a risk that they make break especially if you have made cookies with delicate shapes, so try to be as gentle and careful as possible.  Let cool and then store in an airtight container.


Don't forget to come back tomorrow for the icing recipe and decorating tips!

What are your favorite valentines desserts?  Do you make sugar cookies in your family?
Related Posts Plugin for WordPress, Blogger...