Showing posts with label paper. Show all posts

Wednesday, December 04, 2013

Picking Holiday Cards

This is the first year that Lawson and I are getting photo cards for our holiday cards - with our cutie-pie to show off, how could we resist?  We took photos this past weekend on a beautiful hike (just before the temperatures dropped this week, good timing), so we thought we'd use those photos for our card.  I think the family photo turned out pretty well since we were relying on the kindness (and photography skills) of strangers, but it isn't the best photo of Esther ever, although it does reflect her inquisitive side (she really could not stop staring at the waterfalls).  Luckily we'll be able to include some additional cute photos of her on the back of the card.  Also, I kind of love that everyone in our family is wearing something I knitted in the photo.

I have always admired the cards at TinyPrints, both ogling their options online and seeing the nice baby announcements and holiday cards that we've gotten from friends.  I'm super excited to be partnering with them for our cards this year and I had fun playing around on the site mocking up some cards.  There are tons of cute options, but I narrowed our choices down to this selection.  What do you think?

joyful holly card front

This joyful holly card is my favorite, I think - love the square shape and the cute motifs.  Plus, pure joy pretty much captures our sentiment this year I think.  They have an option for a cute patterned back, but since we'll be putting photos on the back I think it looks less cluttered with the solid red background.

joyful holly card back

I also love this cozy feeling card - another square option.  The back would look pretty much the same as the last one except with a solid blue (or there's a red or green option for the card and back, too).

cozy feeling card front

I think this card (delightfully dotted) may be more traditional than we are going for but the dots are fun!  Plus you can see more of the waterfall in the photo.  Speaking of which, I really appreciated how easy it was to zoom/crop your photos on the TinyPrints site - it makes it really easy to customize each card, particularly when you are trying different photo orientations and also want to customize what looks best with each card.

delightfully dotted card front

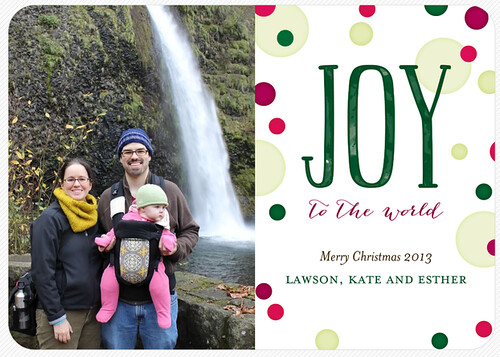
I actually think the patterned background on this one looks good with the photos!

delightfully dotted card back

Speaking of playing around with photo placement to see what looks best with the card... I was bummed out that our photo just really didn't work well with this joyous heart card.  This card was one of my favorites but the waterfall is definitely not compatible with the name placement.  I'd be more disappointed if I didn't like the other options so much, though.

joyous heart card front

So what do you think?  Which card is your favorite, and what are you doing for your cards this year?

You may have seen that TinyPrints has been having some great black friday week deals - if you aren't going to get your cards picked out this week, though, you can still get 20% off and free shipping using the promo code TPH85Z - the code expires 1/31/14, so there's still plenty of time to get your cards for the holidays.  Just paste the code in the "promo code" box at checkout and you're good to go!

Disclosure: I am excited to be partnering with TinyPrints on this post and they will be providing me with some of our cards.  All opinions expressed are my own.

Sunday, December 18, 2011

Giveaway Winner and Ornament Ideas


Thanks so much to everyone who entered my giveaway! I had so much fun reading about handmade ornaments you have made or ideas you would like to make - definitely got me inspired. I actually got inspired and made some ornaments myself (even though I should have been sewing holiday gifts...) - more on that below. First, the winner!


Congratulations, JuneBug!  I've emailed you to find out which pattern you would like.

If you didn't win but wanted to get a pattern, they are available in my meylah shop (with instant downloads!) and in my etsy shop :).

So, here are some photos of the quick ornaments I made:

paper ornament 2


paper ornament 1


paper ornament 4

To make these, I glued together two sheets of lightweight scrapbook paper to get a heavier weight paper with patterns on both sides, then cut strips and made them into various shapes.  The middle ornament was inspired by a felt ornament in fa la la la felt, and I think the top one (and other similar sphere ones I made) was subconciously inspired by this ornament that I had seen probably last year.   The glueing together two sheets of scrapbook paper wasn't ideal, really, and the paper puckered a bit on some of the ornaments I made but overall I was happy with most of the ones I made.  I used perle cotton to sew knots and hold them together, and to make the hanging loops.  I actually think these would be even better if you used fusible web to fuse together two pieces of fabric and then cut strips of that to work with, I may try to do that at some point.

Since you all were so nice to share your inspiration, I thought that I would share the ornament ideas that I have been feeling inspired by lately:

Paper flower ornament
Spiky paper starburst ornament
Paper ball ornament made from circles
Felt snow ball ornaments
Another felt ball ornament
String ball ornament
Water marbled glass ornament

And here are some great lists/roundups/sources for more ideas:

How About Orange (you may have noticed I love her ornaments!)
Martha Stewart Crafts
Craftzine
Pink Chalk Studios round-up
Stumbles and Stitches Christmas in July (includes several free patterns from Fa la la la felt)

Hope you all have a great holidays!!  I may be back before then with a blog post, but I may be too busy finishing up making the last of my gifts (and possibly getting distracted making more fun ornaments).

Saturday, May 21, 2011

Stamped Greeting Cards and a Baby Blanket

Birthday stamped cards

A while ago I made up a few stamped birthday cards, and I had really enjoyed using them and was almost out so I got out my stamping supplies and made some more.  I have really been loving the clear stamps that you use with the acrylic stamp mounts - it is so fun to be able to get a variety of stamps without breaking the bank, plus they are easier to store.

Gold Embossed Stamped Birthday Card


I embossed a few of the cards which I think makes them look classy, especially for this gold - it looks way better than just gold stamp ink would.

In addition to restocking my birthday card supply, I decided to make some congratulations/baby cards to go with all the baby gifts I have been making for my rapidly reproducing friends.

Train stamped card

I have always wanted a cute little set of alphabet stamps and I lucked out the last time I was at Michaels, they had some tiny ones that were only a dollar or two for the whole set!  I also found these cute trains either at Michaels or Joann's in the $1 mini acrylic mount stamp bin.  I love how this card turned out!

Elephant stamped cards

Love all these animal stamps.

Animal Stamped Cards

I have already used a few of the cards sending off baby gifts, including this whale blanket that I made using Anne Kelle Urban Zoologie for a friend who just had a baby boy.  It is backed with a thrifted sheet so it is nice and lightweight for summer.  I made the mitered corners similarly to how I made the blue and white striped blanket here.

Whale Baby Blanket

Do you like to make stamped cards or other projects?

Monday, April 04, 2011

Owl Themed Baby Shower Decorations with Scrapbook Paper Owl Garland


Yesterday we co-hosted with another friend a baby shower for good friends of ours who are having a baby this summer.  They decided not to find out the sex of their baby, so we wanted to have a gender neutral theme for the shower.  I had noticed that the mom-to-be had favorited many owl-related baby and nursery items on Etsy so that seemed like it would be the perfect theme!


In thinking about decorations, I found this fabric bunting online, and thought it would be super fun to make.  I decided to make something similar out of scrap book paper rather than fabric, which was more affordable and easier to work with.  I got a big pack of scrapbook paper and it was fun to have so many patterns and color options to work with, without worrying about eating up my fabric scraps.  I also came up with a different owl shape that I liked better for this project.  My friend and I made it together - we pretty much just cut out the shapes from the scrapbook paper and glued them together, then taped them all to a string to make the garland.  Here is the template we came up with if you want to make your own - as usual, this pattern is for personal use only, so please don't sell the pattern or items that you make from it.


In addition to the owl garland, we also made a congratulations bunting, also out of scrapbook paper...


And a smaller triangle/pennant bunting to hang over the mantle.


For both of these I just folded the top edge over and taped it down, enclosing the string.


We had fun making these decorations and they definitely gave the party a festive feeling!  I will be posting about the fun desserts that I made and the craft project that we did at the shower later this week, so stay tuned for more shower updates.

Saturday, March 12, 2011

Spot of tea?


I may have mentioned that lots of folks we know are having babies... which means I get to do lots of baby gift crafting, very fun.  I am also hosting a tea party (of the non-political variety, phew) for a few friends who are having their second babies this summer.  I have been wanting to do more stamping and printing so I thought this would be a great opportunity to carve some fun stamps and use them to make the invitation.


Although I ended up using linoleum blocks to carve because that was what I had on hand.  I actually did a lot of printmaking as a kid, and have done a little in the past few years, but it was very fun to get back into it more and play around with figuring out how to get the prints to turn out how I wanted.  Also I recently got a great printmaking book, Print Workshop, so looking through that had me feeling very inspired!


I had a lot of fun designing this because I have spent a lot of time thinking about teapot and teacup shapes and sketching them, as part of the design process for making pots.  Teapots are one of my favorite things to make, I actually did a post earlier about how teapots are constructed.  For this design, I did a pretty traditional shape for a teapot but I have all kinds of ideas of other ones that would be fun to print... I am hoping to make a series and maybe make sets of prints out of them or print them all on a single sheet.  I am also hoping to try out some blockprinting/stamping on fabric so I will report back on how that goes.  I have done screenprinting before (like these tote bags I made for my wedding) but haven't tried these other techniques on fabric, so I am looking forward to it!


So, as usual, I am overrun by ideas of what I want to make next, but I am also trying to just enjoy how this turned out.  Whatever future life this idea takes, it makes a very nice tea party invite for now, I think.

Have you ever done printmaking on paper or fabric?  Do you make homemade cards?

Tuesday, January 25, 2011

Handpainted Watercolor Valentines Cards - How To


I mentioned these cards in my post about opening my Etsy shop yesterday, but I wanted to come back and tell you a bit more about them.  There's not many steps to making them so this isn't a tutorial per se, but I will give you a quick overview of what I did and some of the designs I came up with.  One of my favorite things about these cards is that they are a great way to take advantage of the delicate nature of watercolor, but you don't have to be a watercolor expert (by any means) to make them.   These would even be a fun project for kids to make smaller valentines to give out at school (you could just paste them on a piece of cardstock, rather than a card).


The materials I used are pretty simple - 4 bar size cards from Paper Source,  watercolor paper, watercolor paints, a paint-mixing tray (optional), and glue (I used scrapbooking glue but regular craft glue should work too).  I cut the watercolor paper into rectangles about 1/4"-1/2" smaller than the top of the cards before I painted them, but then I trimmed them as needed to make the design centered etc after I had painted them.  I used the palette tray to mix up a range of hues of pink, purple and red, and different saturation levels.  I got my nice dark reds by adding a bit of green to the bright red/pink color that I got using the paint straight, and I added blue to the purple to get more of a lavender color (apologies if the color-mixing info is too basic, but thought I would include in case you have trouble with that part).  Another tip - if your hearts are turning out too dark, you can also rinse and squeeze out your brush and then go back (while it is still wet) and kind of suck up/lift off some of the paint with your brush.  After the watercolors had dried, I glued them to the cards and let the glue dry... Some of my edges curled up so I pressed them under books while they dried to make sure everything was nice and flat.


I think this card was my favorite.  I had fun coming up with a whole range of colors to include and finding places to tuck each heart.  For the larger hearts, I painted the outline first and then filled in... a nice thing about watercolor is that if it looks somewhat uneven, you can adjust while it is still wet to make one side a little bigger, and it won't show in the end.  If you are worried about painting hearts freehand a freeform card like this might be good to practice making lots of hearts and getting comfortable with it.


I also really like how this grid card turned out... kind of reminds me of those Mrs. Grossman's tiny heart stickers I used to get as a kid.  I like how the one red heart stands out among all the purple ones and how the orderly arrangement contrasts with the handpainted imperfect nature of the hearts.  For these little ones I didn't really outline first, I just painted one side and then the other and adjusted if necessary.  I did the grid design freehand, painting row by row starting at the top (and leaving a gap for the red heart), but if you would find it easier to have a guide you could cut a piece of scrap paper the same width as your watercolor paper, use a ruler to measure out markings (for both the even and odd rows), and then hold it just above or below the row of hearts as you paint.


These overlapping hearts were fun too (OK they were all fun! I really enjoyed making these)... For the overlapping hearts, I painted the left heart first (because I am right-handed, this was easier for me).  I let it dry and then I made an outline of the right heart and lightly painted over the overlap area, then waited for that to dry before painting in the rest of the heart so that the overlap didn't bleed into the second heart.  Or sometimes I painted it all at once but just tried to paint right up to the edge of the overlap area but not really connect them until it was mostly dry, if that makes sense.


I made a few different designs of individual hearts, this one is pretty simple - I just painted to large heart and let it dry, then painted the outline on top.  I also made one (don't have a photo yet) which has a kind of scalloped edge around it which is fun too.

I am sure you can think of lots of other design ideas here too - both with just hearts or what about a heart as a little flower with a leaf and stem or a heart as a balloon?  Have fun!  And if you love these but don't have time to make them, you can always pick some up in my Etsy shop :).

Have a great day!

Linking up to some linky parties:

Today's Creative BlogTute yourself tuesday red and white


Monday, January 24, 2011

Big news! I opened an Etsy shop!!


I am super excited to let you all know that I have opened an Etsy shop!  I have felt a bit like I was keeping a secret, as I was crafting away making a bunch of stuff to post in my shop and not blogging about any of it.  But now that my shop is up, I can tell you all about what I have been making!  Here is a quick rundown of some of the stuff that I have put up or will be soon... 

I made a number of pouches from my pleated pouch tutorial, some of which are shown above.


I also made some really fun patchwork clutches, similar in size/construction to Noodlehead's gathered clutch but with a fun patchwork stripe on the front instead of the gathered piece.

I got excited about valentines day and made some valentines gifts and cards...


More patchwork clutches in a fun pink color with some of my favorite pink and red fabrics in the patchwork stripe.


And I had so much fun making these cute little watercolor valentines!  I make homemade valentines for a few special folks in my life each year and these are a reprise of a past favorite.


I am also listing some pottery that I have made.  Most of the pots I am going to put up will be celadon-glazed porcelain vases, including the ones above, very similar to the pots that I had at my wedding.  I haven't blogged too much about my pottery I realize, so it is fun to get to show some more to you.

Finally, I think I am most excited about this messenger bag!


I loved doing free-motion embroidery/applique on my needlebook and was excited about the leafy vine design, so I made a similar design on the flap of this purse.  The purse incorporates some of my favorite design features including an organizer pocket under the flap and a zip pocket inside.  Check out all the details here.  I definitely plan to make more of these purses and hope to even write up a pattern to sell in my shop!


I'm so excited about having the shop up (did I mention yet that I am excited?), especially because now I can share all my projects as I make them!  As you can tell from the initial set of items I listed, I am planning to sell items that run the gamut of my crafty interests.  I am not sure this is the best business plan as a lot of successful etsy shops seem to specialize in certain types of products, but I like making so many different types of things I just can't really imagine limiting myself to making just one type of thing.  Check out my shop and let me know if you have any thoughts or advice for me!

Sunday, December 19, 2010

Wrapping Paper Gift Bows

We are out staying with my inlaws for the holidays, and I was wrapping gifts up yesterday while everyone was out of the house.  As excited as I was about the green grocery bag challenge this year, I didn't have time to make reuseable bags for all my gifts, and I really do love wrapping gifts the traditional way.  My mom and I have always put a lot of effort into carefully wrapping gifts with coordinated ribbon and gift tags.  This year, I had fun playing around with making some gift bows out of strips of wrapping paper - a great way to use up those strangely shaped scraps!


Both of these bows are made with equal length strips of paper.  The bow on the left has 4 strips that are taped into loops around eachother and then taped together on the bottom; you could also secure this at the middle with a brad or by punching holes and it would make a nice shape - I was just keeping it simple.  The bow on the right has 6 strips that are each taped together at the end into a teardrop type shape and then all taped together.  I really like how both of these look with the double-sided wrapping paper.


For this bow, I made the central double-bow with one long strip of paper looped around over itself and secured with tape, and then I taped on the "tails".  You could also make the central bow as a triple (or more bow) and could just as easily make it with separate strips of paper of different lengths rather than with a single long strip.

What are your wrapping traditions or what fun wrapping ideas are you trying out this year?  Hopefully these instructions make sense, let me know if you have any questions.  This certainly isn't rocket science but I thought it was fun!

Wednesday, July 28, 2010

Wedding Paper Crafts - Part II

Photo courtesy of Joe Shymanski

In keeping with the stationery I made for our wedding that I described here, we also made coordinated paper items for the wedding ceremony and reception.  It wasn't too much work and was a good, affordable way for us to carry our wedding themes throughout the day, with lots of soft green colors and leaf accents.  As I mentioned before, and you can see throughout this post, I found paper source to be a great resource!

For the wedding programs, we laid them out in Word (using two columns on a landscape oriented sheet and then just playing around with the spacing until we liked how it looked), then we had them printed on two shades of green cardstock and folded.  Then I stamped them all on the front with one of our leaf stamps and also on the back with a smaller matching stamp (in between two paragraphs of text).  We were really happy with how they turned out!

Photo courtesy of Suzanne Thurston
In keeping with our garden theme, we used seed packets as escort cards - we printed the names and table numbers on green paper source labels and then stuck them at the top of seed packets for a variety of flower seed types from Renee's Garden (which I think have particularly pretty packages).  People seemed to really get a kick out of them!  Also visible in this picture is the lovely guestbook we got from CreativelyKept - I don't have a picture of the outside cover, but we really love how it turned out.

I printed and stamped matching menus for the lunch buffet table and bar, although I don't have photos of those.  Finally, we made fun labels for the yummy beer our friend Carl brewed for the reception! (And Carl was kind enough to put all the labels on in addition to making the beer).

Photo courtesy of Joe Shymanski

I will write more about the pottery I made for the wedding in a later post, but for now I will show the flower pots which I made for centerpieces - I made table numbers to stick in each pot using the 5 1/2" round cards from paper source and then the 4" round labels.

Photo courtesy of Joe Shymanski
Related Posts Plugin for WordPress, Blogger...