Showing posts with label wedding. Show all posts

Friday, May 06, 2011

Screenprinted Tote Bag Tutorial

Screenprinted Tote Bag

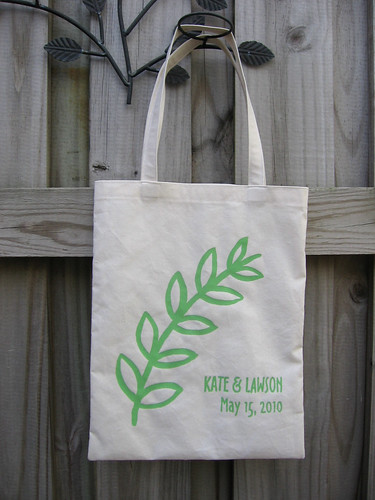
Have you seen the Handmayde series on the Long Thread this month?  Ellen is featuring a different theme of homemade items each week in May, and kicked it off with weddings this week.  I am excited to be sharing the tutorial for the screenprinted tote bags which I made for my wedding last year. 

Screenprinted Tote Bags

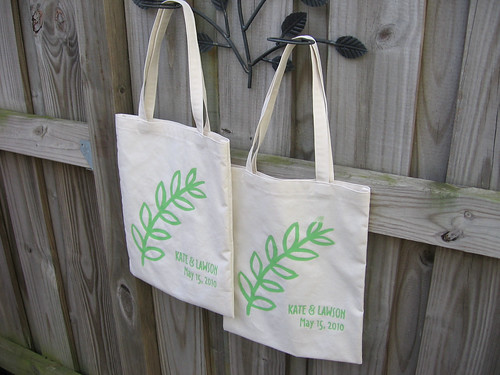
We gave the bags as welcome bags to guests staying at the hotel, with a packet of information about the wedding and some snacks and a bottle of water (and we made some extras for friends who didn't stay at the hotel, too).  It was a great way to give our wedding a homemade feel from the moment guests arrived, and we were happy to be giving them a reusable bag rather than using something disposable.  These would also make great gifts for a bridal party if you wanted to do something smaller scale.  You can see some of the other DIY projects that I did for our wedding here if you are interested.

Screenprinted Tote Bag - Detail


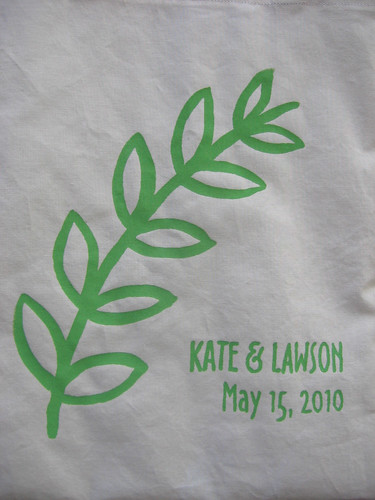
I made the screen using drawing fluid as a resist to paint the design on the screen before blocking out the non-printed area with screen filler.  I like how this technique lets you create a more painterly design, although you could also use it for a more precise drawing.  Alternatively, you can create a screen from a design printed on a transparency using the photo emulsion technique.

DONATE TO SUPPORT THIS TUTORIAL - this tutorial is provided free of charge, if you would like to show your appreciation and support the free patterns I provide here, you can donate here (or it helps if you click through to any of the amazon links below or elsewhere on this site, whether you purchase that particular product or not!).  Thanks for your support!
Materials:

I recommend getting a basic fabric screenprinting kit to start, but you can also buy/assemble the materials separately (Dick Blick art supplies is a good source to buy, or your local art supply store):

You will also need:
  • Black india ink and sketch paper for drawing design
  • Computer and printer
  • Pencil
  • Plastic tape or masking tape to tape screen
  • Plastic spoons
  • Blank bags for printing - make sure you have at least 2-3 extra (for the wedding, I purchased bags similar to these; for the smaller number that I made this time, I just used my easy tote bag tutorial)
  • Cardstock or thin cardboard to place inside the bags while printing
  • A friend to help you print, especially if you are using a screen without a hinge and base
To Make the Screen:

You can either tape the edges of the screen before you transfer the design or after - in the photos before, I taped the screen first.  Also, you will notice that I made a different screen design below for the purposes of this tutorial, but then reprinted the original screen from my wedding to make the actual bags.


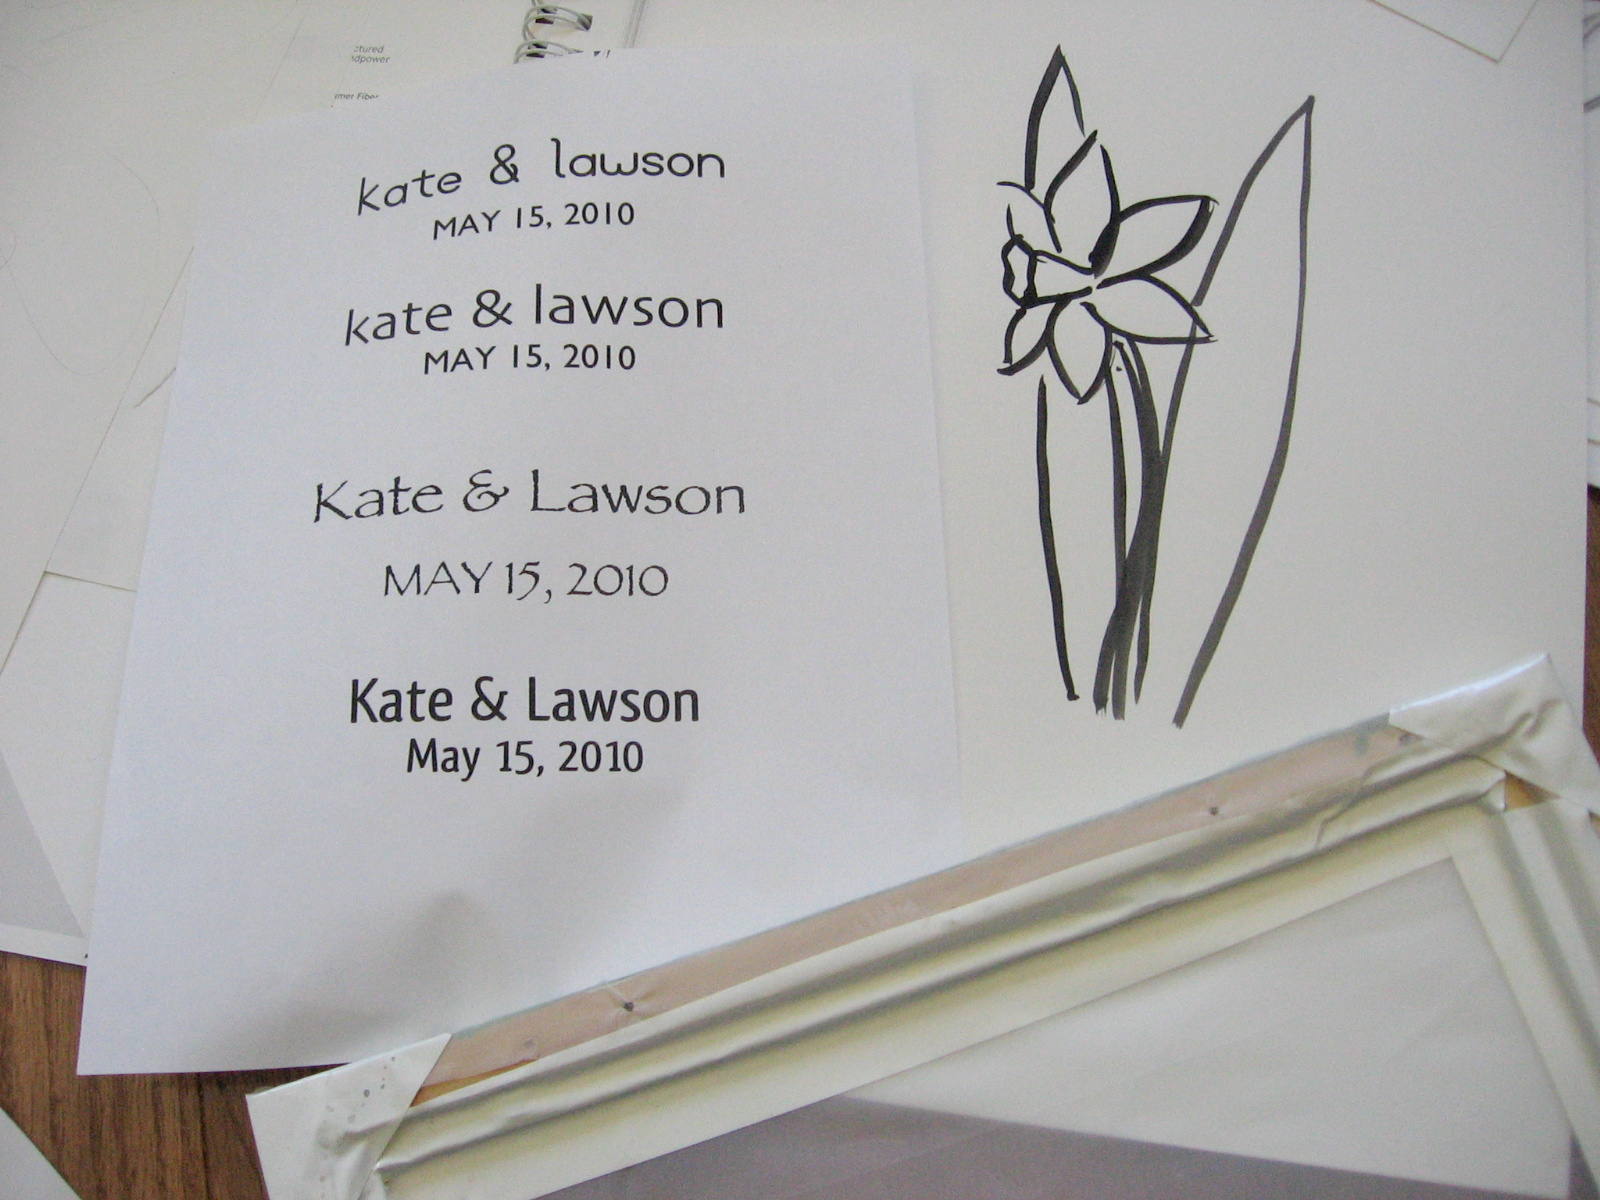
Start by sketching design ideas on paper using the paintbrush and india ink.  If you want to have text on the screen such as your names and the date of the wedding, play around with different fonts on your computer and print out a few options to see what looks best with your design.


Arrange your chosen design and font as desired and then lay the screen on top, flat side down.  Trace the design lightly onto the screen using pencil, tracing the entire outline of the letters but just the main lines of the sketched design.  Note - if you are using a screen with a hinges and a base, you will want the hinges to be at the bottom of your design.


Turn the screen over so that the flat side faces up and paint the design using drawing fluid, following the traced lines.  Let the drawing fluid dry, which should take 3-4 hours (if there are areas that are particularly thick, they may still be sticky, which is fine).


With the flat side of the screen facing up, pour the screen filler along one edge of the screen (I used too much, you will not need this much).  Also, I forgot to do this but it helps if you raise the screen by resting the sides on pieces of wood, bricks or other stable supports - otherwise when you spread the screen filler with the squeegee it can touch the surface underneath.


Spread the screen filler across the screen using the squeegee, trying to evenly coat the screen in 1 or 2 passes.  If you go over the screen multiple times the drawing fluid may start to be washed away - don't worry if you miss some spots or it isn't perfect, you can always touch it up later by brush with more screen filler.  Wipe off any excess screen filler from the edge of the screen and let dry completely (overnight is best).


With cold water and a spray attachment if possible, rinse the drawing fluid out of the screen.  It may take a while to completely rinse out and you may have to gently scrub it with your fingers or a nail brush to get it all off.  Let dry completely.

To Print Screen:

Place 1 or 2 pieces of cardstock or 1 piece of light cardboard inside each bag to prevent the ink from bleeding through to the other side.  Make sure that the cardstock or cardboard covers the entire area to be printed and that the bag is even and smooth.


With the screen lifted open (if you are using a screen with a hinge), position the tote bag under the screen such that the design will print as desired.  If you are not using a screen with a hinge, you may wish to make tape markings where the screen should be aligned.


You can use the screenprinting ink straight from the jar or you can mix your own colors - bear in mind that the ink will dry slightly darker, so you may want to test it on a swatch to make sure you like the final color.  Spoon 2-3 spoonfuls of ink onto the base of the screen and gently spread it over the screen with the screen lifted to "flood" the screen with ink.


If you are using a screen without a hinge, you will need to have a friend hold the screen in place while you do this step.  Lower the screen and pull the squeegee back and forth at a 45 degree angle, pushing down to force the ink through the screen.  The biggest problem I had with printing these bags was incomplete printing where I hadn't gotten enough ink through, so make sure you are thorough in this step - you may want to go back over areas of detail, such as the text, a few additional times.  Practice and see what works well for you - this is why it is important to have a few extra bags, because it may take you a few tries to get the hang of it.  Once you are done printing, again gently spread the ink over the screen to flood it - this prevents the ink on the screen from drying too quickly in between prints.


Carefully lift the screen off the printed bag, and continue on to the next print.  If you are stopping for more than a few seconds, or if you have printed 20-30 bags, you should stop and wash off the screen to make sure that ink doesn't dry on it and block it up (the screen will dry off relatively quickly if lightly patted dry with a towel and then left to dry completely).  Lay the printed bags out to dry (a wooden clothes drying rack is handy for this) and remember to set the ink according to the manufacturers instructions (usually ironing on high for 3-5 minutes with a pressing cloth).

Enjoy your bags!

Monday, October 18, 2010

Wedding Pottery

Photo Courtesy of Joe Shymanski
I had mentioned in a few other posts that I had made pottery for our wedding, but hadn't gotten around to doing a post on it yet.  In addition to the flower pots that I made as centerpieces for each table, (shown here), I also made lots of little 3-6" tall vases for the mantelpieces.  There were two fireplaces with big mantels in the ballroom, and another one in the room where the buffet was set up, so as you can imagine it was a lot of vases!  I had so much fun making them though.  For one thing, I was throwing in porcelain and I had a lot of trouble getting the flowerpots to turn out how I wanted (eg, round), whereas the vases were easier to keep from getting distorted.  Plus, I just had a ton of fun experimenting with different shapes and trying to think of ways to make each one unique.  At the reception, we had enough pottery in between the centerpieces and the vases for each person/couple/family to take a pot home.  People seemed to have a great time picking out a piece and appreciated getting to take home a special homemade item.  I didn't really think of them as "favors" but I guess that's what they were, in a sense. 

My mom got and arranged all the flowers in the vases which I thought looked great!

Photo Courtesy of Suzanne Thurston

Photo Courtesy of Suzanne Thurston

Photo Courtesy of Suzanne Thurston

Monday, August 16, 2010

Screenprinted tote bags


We are out in Washington State visiting Lawson's family, who threw us a wonderful west coast party to celebrate our wedding (which was just over 3 months ago - time flies!), so we have been reminiscing about our wedding.  So here is another craft project from the wedding - screenprinted tote bags which we gave to all the out of town guests, with some snacks and a packet of information.  I thought it was nice to make the guest bag into something reusable and a reminder of the wedding - people seemed to really enjoy them.

The wedding was a great excuse to try out some new crafts that I hadn't done before or don't get to do too much, and screenprinting was the biggest new thing I learned.  My friend Mandy was a big help both the first time we tried screenprinting (non-wedding-related) and then again printing all the bags for the wedding.


I made the screen design using drawing fluid to paint the screen (after I had drawn a sketch on the screen in pencil laying it out) and then using screen filler to block the open areas.  As you can see, in the process of making all the bags, we pretty much covered every surface in our living/dining room area.  I love how there is one hanging off the spout of the teapot.  Also visible in the top photo (under the bags) are some of the vases that I made for the wedding... which will be the subject of a future post.


The true hero of this craft-venture (in addition to Mandy) was Lawson, who ironed each bag for 3 minutes to set the ink.  That was a lot of ironing!  Luckily he was able to watch hockey at the same time.

Wednesday, July 28, 2010

Wedding Paper Crafts - Part II

Photo courtesy of Joe Shymanski

In keeping with the stationery I made for our wedding that I described here, we also made coordinated paper items for the wedding ceremony and reception.  It wasn't too much work and was a good, affordable way for us to carry our wedding themes throughout the day, with lots of soft green colors and leaf accents.  As I mentioned before, and you can see throughout this post, I found paper source to be a great resource!

For the wedding programs, we laid them out in Word (using two columns on a landscape oriented sheet and then just playing around with the spacing until we liked how it looked), then we had them printed on two shades of green cardstock and folded.  Then I stamped them all on the front with one of our leaf stamps and also on the back with a smaller matching stamp (in between two paragraphs of text).  We were really happy with how they turned out!

Photo courtesy of Suzanne Thurston
In keeping with our garden theme, we used seed packets as escort cards - we printed the names and table numbers on green paper source labels and then stuck them at the top of seed packets for a variety of flower seed types from Renee's Garden (which I think have particularly pretty packages).  People seemed to really get a kick out of them!  Also visible in this picture is the lovely guestbook we got from CreativelyKept - I don't have a picture of the outside cover, but we really love how it turned out.

I printed and stamped matching menus for the lunch buffet table and bar, although I don't have photos of those.  Finally, we made fun labels for the yummy beer our friend Carl brewed for the reception! (And Carl was kind enough to put all the labels on in addition to making the beer).

Photo courtesy of Joe Shymanski

I will write more about the pottery I made for the wedding in a later post, but for now I will show the flower pots which I made for centerpieces - I made table numbers to stick in each pot using the 5 1/2" round cards from paper source and then the 4" round labels.

Photo courtesy of Joe Shymanski

Saturday, July 24, 2010

Wedding Paper Crafts - Part I


One of my favorite parts of planning our wedding was picking all the various paper products - most of which we made ourselves.  Our wedding had a garden/leafy theme, and was pretty low key (no wedding party) so having a consistent feel to all the stationery and paper products I thought really helped to establish the feeling for the wedding.  We ended up buying the wedding invites and response cards themselves from Wedding Paper Divas - we got the Merry Branch design (in Bark), which fit perfectly with our theme.  Pretty much everything else I made myself though - I used a variety of rubber stamps, and papers and cards from paper source, mostly in the colors leaf and sage.


For the save the dates, we printed the text right onto the paper source cards in our laser printer.  It was a kind of a pain because if you printed a few in a row, the ink would start to flake; I had originally thought we would have kinkos print them, only to find out they will only print on full sheets of card stock and then cut them down to size.  Then I stamped each card with a leaf in green ink and embossed with clear embossing powder.  We got a custom-printed return address stamp which got a lot of use.  I found that the colorbox ink pads were great for using with embossing powder, and the vivid ink pads were great for anything I didn't want to emboss, as they dry super quickly.


I also made all our thank you notes; some were folded note cards and some were flat cards with a design printed at the top.  I got a great set of acrylic thank you stamps online (I found I gravitated to a few of them that I liked the best and seemed appropriately formal).  It was fun getting to see all the designs again as we wrote the notes!  This is just a sampling of some of the ones I made... I kept meaning to take photos of them but there were a lot that never got photographed.

Coming soon... Part II with some of the paper crafts I made for the ceremony and reception.

Disclosure: I received compensation in the form of a promotional credit for adding links to Wedding Paper Divas to this post.  All opinions are my own.
Related Posts Plugin for WordPress, Blogger...