Tuesday, May 31, 2011

Needle Felting

I was super excited when I won the Felt Week giveaway on Stumbles and Stitches a few weeks ago, since the prize from A Child's Dream Come True included a large bundle of beautiful sheets of wool felt, and a needle-felting kit.  I knew I would get lots of good use out of the sheets of felt but I was possibly even more excited about the kit, since I have been wanting to learn how to needle felt (especially after reading more about it in the posts during Felt Week!).

needle felted snowman

I was really impressed with how fast their shipping was - the needle felting kit came just a few days after I found out I won the giveaway!  I was so excited that I started playing with it right away, and found it easier and more intuitive than I expected.  After making a few basic shapes, I jumped in and made the snowman above.  I figured I may not have much use for needle-felted items in my everyday decor, but they would make great holiday decorations - I'm not sure if this guy will be left as is or turned into a tree ornament (although I do plan to make several more buddies for him).

blue needle felted bird

I am thinking this bird will be a Christmas tree ornament too, especially since we have a bit of a bird theme in our ornaments (especially after I made several last year out of wool felt).

The other thing I immediately thought to make was little toys for some of the kiddos in my life.  I always love the way the tiny knitted or crocheted amigurimi monsters and animals look, but I don't have the patience to make something so small and deal with all the shaping on tiny needles.  So I figured needle felting would be a good way to make some similar little monster guys.

blue needle felted monster


I wanted to start out simple so I made this blue monster guy... he is a bit funny looking and kind of shaped like a chicken nugget, but still pretty cute I think.

needle felted dinosaur toy

I also made this little dino guy although he maybe could be confused for a fish. 

I found that getting basic shapes was pretty easy but making smaller parts was a bit trickier for me - I should probably actually read some tutorials online to get more tips on how to make more complicated items.  Have you ever tried needle felting and do you have any tips to share?

Sunday, May 29, 2011

Sewing with Knits

Black Yoga Skirt

I have been wanting both to sew more clothes and to try to learn how to sew with knits, so I jumped right in and sewed up some jersey knit clothes!  First I made the black yoga skirt above, to replace one that I had given to a friend to wear for maternity purposes, and then I made the peasant-style dress below.  The yoga skirt was based off of one I owned (I wear these all the time in the summer, so I have them in several colors), and I made it first to get my feet wet with this whole sewing with knits things.  As you can see above I did get a bit of puckering at the seam but it generally looks fine, fits and is super comfy, so I am very happy with it!

Blue Peasant Dress

The dress is inspired by a similar tee/tank top that I got recently at Ann Taylor Loft and just loved.  Looking it over I had one of those "I could make this" moments, and so I used the shirt and a knit dress together as a basis for figuring out how to cut the fabric.  The shirt didn't have a waist but I thought it would be nice to add one to the dress to give it a bit more structure - although I think it would look cute without one, too.  The ruffles at the neck and arms are totally easier to make than they look.

Blue Peasant Dress Bodice

I found that sewing with knits was tricky in some ways (like that hem puckering issue) but really easy in others (like fit is super forgiving).  I have a few ideas of how I would improve this dress design next time and I am hoping to make another one with a tutorial sometime in the next few weeks, so stay tuned!  Overall I love how this dress turned out - it really is my style and can easily be dressed up or dressed down.  I think I will get a lot of use out of it this summer!

Now that I have started learning to sew with knits I am seeing folks wearing cute knit tops and dresses everywhere and feeling so inspired so hopefully there will be more other knit projects coming up too.  I will share any tips and tricks that I figure out as I go - if you have sewed with knits before what tips do you have to share?

Thursday, May 26, 2011

Mixed Berry Ice Cream

Mixed Berry Ice Cream

I don't know about where you live, but here in D.C. it has been feeling decidedly like summer.  Today it was over 90 degrees out!  I have been wearing skirts and dresses non-stop, and the other day I got the urge to make some ice cream.  I like to keep bags of frozen berries in the fridge as they are great for whipping up a last minute cobbler, pie, or sorbet, and I had been wanting to try making a berry ice cream.  Most of the times I have made ice cream I have gone all-out and made a custard but this time I kept it simple and made it "Philadelphia Style" which just means I used cream (or half-and-half, in this case) straight, with no custard.  As a result, this lands somewhere in between a rich ice cream and a light sherbet - deliciously fruity with a hint of creaminess.  This recipe is pretty low fuss, the only somewhat time consuming part is straining out the seeds, but it makes the texture of the ice cream much nicer so it is definitely worth it.

Straining Puree


Mixed Berry Ice Cream - Philadelphia Style
Inspired by a few recipes in The Ultimate Ice Cream Book
  • 2 cups half and half (or if you wanted it to be more like sherbet, you could probably use milk)
  • 3/4 cup sugar
  • 1 pound frozen mixed berries - I used a mixture of blackberries, blueberries, raspberries and strawberries, but really any berry mix should be fine
Take the berries out of the freezer and put them in blender to begin to defrost.  Put the half and half and sugar in a saucepan over medium heat and stir until sugar is mostly dissolved, not letting the half and half boil (it should be warm but not too hot at this point).  Pour the warm half and half over the berries in the blender and puree thoroughly.  Strain the puree through a fine strainer to get out the seeds.  The mixture should still be somewhat cool, but if it is not, refrigerate until cool, then freeze in your ice cream maker according to the instructions.  Enjoy!

Wednesday, May 25, 2011

Giveaway winner!


Thanks so much to everyone who entered my giveaway!  I am just thrilled that so many of you liked my patterns and clutch and wanted to win them!  And I had such a great time reading about all your projects - so much great sewing and crafting being done, I totally recommend reading through the comments if you are ever at a loss for what to make.  I normally reply to comments and I tried to reply to some this time around... I couldn't reply to all of them, but I did read all of them (or will, for the last ones that came in).  Thank you again to everyone who entered and also to all the new followers/readers - I hope you enjoy my blog!

Without further ado, here are the two winners - I will contact both of you by email:

Winner #1, of the clutch and pattern of your choice:


#133, Mrs. Maple, who says "My last sewing projects were appliqued onesies and burp clothes!"

Winner #2, of the pattern of your choice:


#340, Dawn K., who says "My recent project was a clock made from a plate!"

Everyone else, if you would like to purchase one of my patterns or handmade items, head on over to my Etsy shop!  I actually lowered the prices on many of my items just before the giveaway for a bit of a spring clearance so there are some good deals to be had, if I do say so myself!

Thanks again everyone, I hope you won something in one of the giveaways if you didn't win mine :)

Rainbow Rail Quilt Progress/WIP Wednesday

Rainbow Fence Block Layout

Thanks to everyone who voiced an opinion about the layout for this rainbow colored quilt from last week's WIP Wednesday!  While I had been hoping to make a stacked coins quilt I ended up feeling (as many folks did) that this rail fence layout really looked the best, and it worked the best for me to be able to incorporate all the colors I had wanted to include without it looking totally over the top rainbow-y.  I sewed up all the blocks and laid them out, but still need to assemble the quilt top, quilt and finish it.

Binding options

I started thinking about options for binding the quilt and pulled a few solids (the veggies are the quilt backing)... I am actually leaning towards the brown although I will have to see how it looks once everything is put together - it might be too dark or too much.  Also I am bad at naming things generally but I have been thinking of this quilt as a "rainbow rail".

Drunkard's Path bee blocks

My one quilting-related finish this week was these bee blocks for do.Good stitches - I got super excited about the drunkard's path design and wrote a tutorial for wonky drunkard's path blocks and shared a bunch of possible design options with these blocks.  I am hoping to finish my rainbow rail quilt next week so that I can jump right into making a drunkard's path quilt!

Fabrics for 2nd Central Park Quilt

I already pulled the fabrics from my stash that I will use for the quilt - greens, yellows, and oranges from Central Park with some stash fabrics mixed in as well.

Drunkard's Path Possible Design

I have been further exploring the design possibilities for the inward facing 1/4 circles block option (if anyone knows if this block layout has another name, let me know!) and am considering these two options, as well as a few others.  I am so excited about this quilt I can't wait to get started!
Drunkard's Path Design Option 2

It has been a creative storm here lately... it helps that Lawson was out of town for four days - I missed him a lot but got a ton done! In addition to working on blocks and quilt designs I also learned to sew with knits and to needle felt - more on both of those soon :)

I'm linking up again to WIP Wednesday over at Freshly Pieced:

WIP Wednesday at Freshly Pieced

Tuesday, May 24, 2011

Drunkard's Path Block Variations

Drunkard's Path bee blocks

To follow up on my Wonky Drunkard's Path quilt block tutorial, I wanted to share some layout and design ideas for these blocks.  You could make any of these blocks using the wonky technique or using a more exact traditional drunkard's path.  There really are so many different options for this block, it is quite amazing!  In addition to the ones shown here, you can find many more with a google images search for "drunkard's path quilt design".  The two blocks that I made for the bee are shown above, one with a design where all the quarter circles face inward, and one where they make diagonal lines.  I played around with the block pieces before piecing them together, here are a few other possible designs:

Circles are a common drunkard's path block arrangement - you could also stagger the rows or columns of circles.

Drunkards path circles

A pinwheel design.

Drunkard's path pinwheel

This is the inverse of the inward facing circles design - the 1/4 circles all face outwards, creating a curved plus in the center.

Drunkards Path outward facing arcs

You can also have all the 1/4 circles facing the same direction.

Drunkards path same orientation

Hopefully you can start to get a sense of the wide range of possibilities from these arrangements, but I think this block gets most interesting when you use two (or more) colors, and are choosing not only the orientation of the 1/4 circles but which colors to use where for the overall design.  Since my bee blocks were monotone, I drew up some sketches to show more possibilities:

These are all pinwheel variations, with the same layout but different color choices to create the different designs.

Drunkard's Path Sketch - Pinwheel blocks

These are different layout options for diagonal designs.

Drunkard's Path Sketch - Path Blocks

The top two blocks are inward facing blocks and the bottom two blocks are outward facing blocks - although if you combine these blocks you get the inverse design at the intersection of the blocks (see 2nd picture below).

Drunkard's Path Blocks - Circles blocks

I think these inward/outward facing squares are my favorite of the layout options, you get a great overall pattern when you combine the blocks and there are so many ways to vary the design within this layout!

Drunkards Path - Circles arranged

Here's how the design looks when you combine the inward facing blocks with the 1/4 circles colored.

Drunkards Path Sketch - Circles combined

And here are two more design options within the same layout - see what I mean about how there are so many ways to vary it?

Drunkards Path Sketch - and more circles

Drunkard's Path Sketch - more circles

As you can tell I got pretty excited about all the possibilities! I had so much fun with this, I am pretty sure I will be doing a drunkard's path design for my next quilt. Which layout/design is your favorite?

I'm linking up to Quilt Story's Fabric Tuesday:

Fresh Poppy Design

Monday, May 23, 2011

Giveaway Day!


I'm excited to be participating again in Sew Mama Sew's Giveaway Day!  I'm giving away two items to the lucky winner:

First, your choice of either of my two PDF sewing patterns:


More info about each pattern if you click on the photos.

Second, this green patchwork zip clutch, or your choice of any other zip clutch/pouch or tote bag in my Etsy shop.


To enter leave a comment on this post telling me what your most recent sewing project was (or your most favorite recent project).  As a thank you to my readers, you can get one bonus entry if you are (or become) a follower, feed subscriber or like my facebook page, for a total of two possible entries - leave me a second comment letting me know that you follow, subscribe and/or like on facebook for your second entry.

The winner will be picked at random, and the giveaway is open to both U.S. and international entries.  The giveaway will close at midnight 11 pm Eastern time [updated so I get some sleep!] on May 25 and I will contact the winner via email - so make sure you have an email address in your blogger profile, or include it in your comment!

Thanks, good luck and happy giveaway day!


UPDATE:  Thanks to everyone who has entered so far!  I am loving reading about all your projects.  To keep the odds of winning good, if there are more than 250 entries I will pick a second winner who will get their pick of either sewing pattern!

GIVEAWAY CLOSED - WILL POST WINNER SHORTLY!  Thanks :)

Sunday, May 22, 2011

Wonky Drunkard's Path Quilt Block Tutorial

Wonky Drunkards Path - Circles


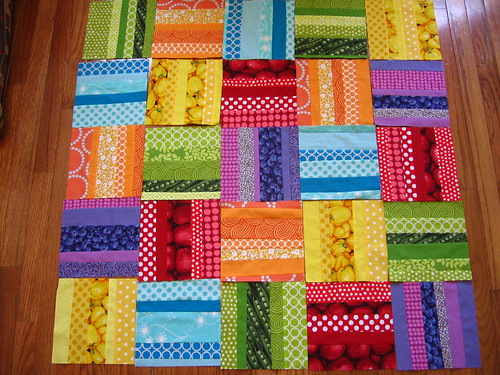
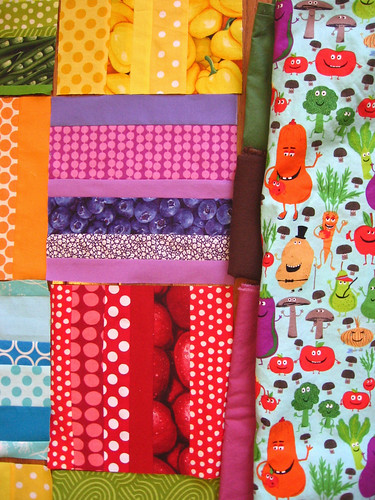
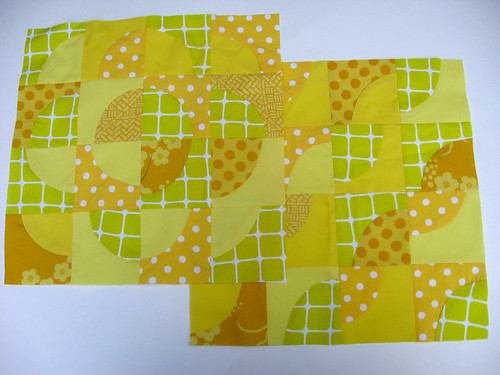
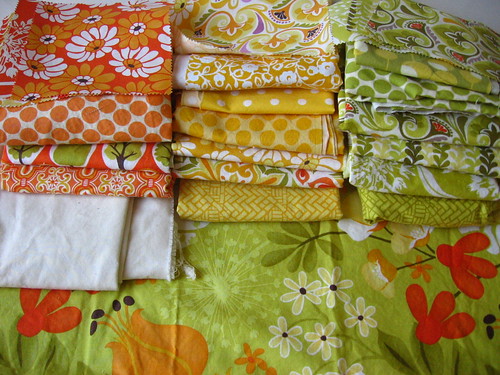
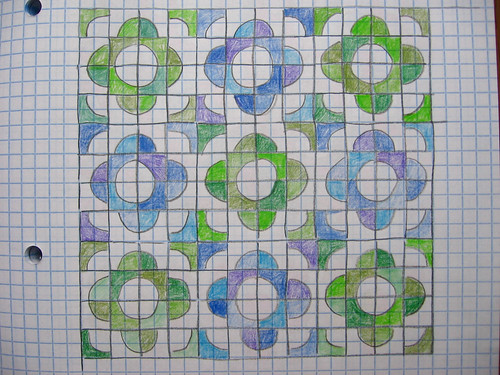
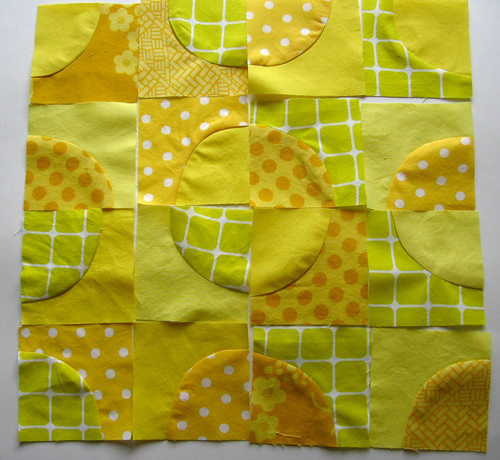
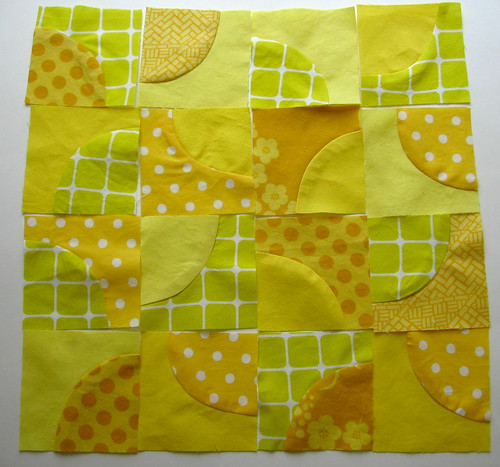
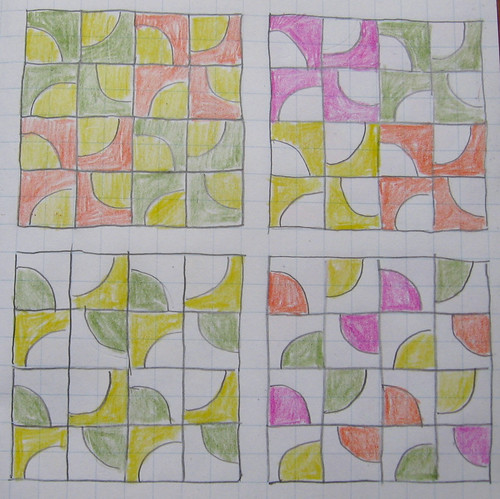
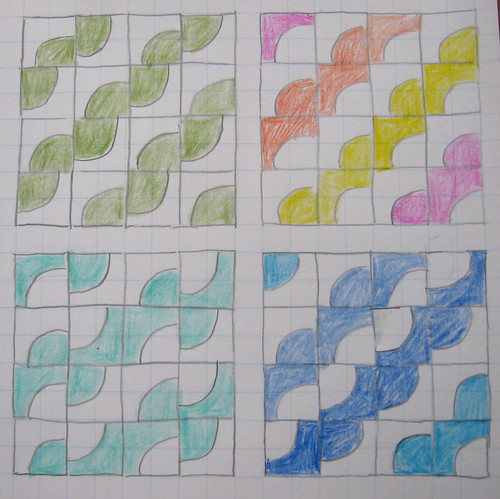
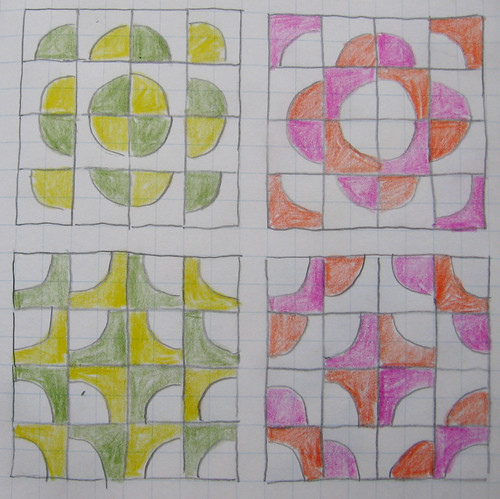
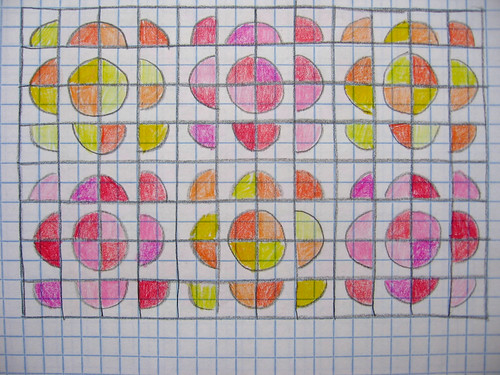
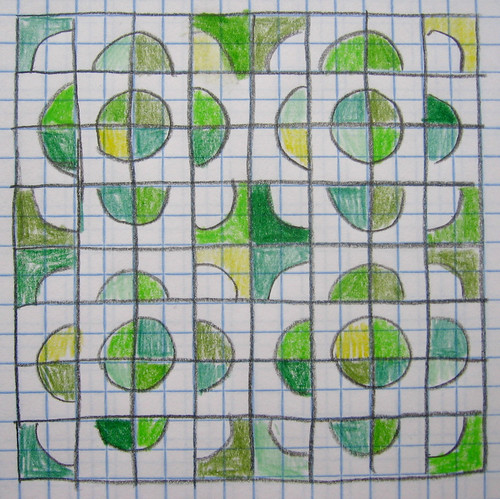
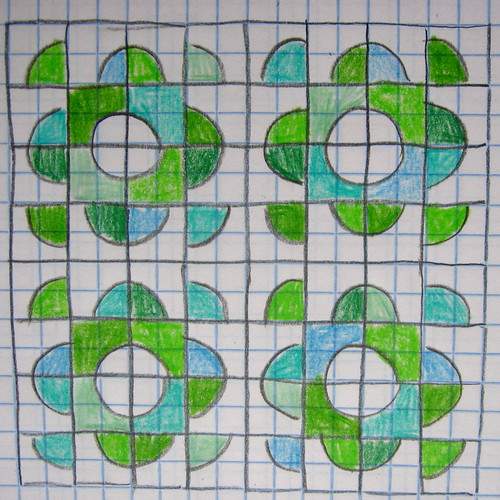
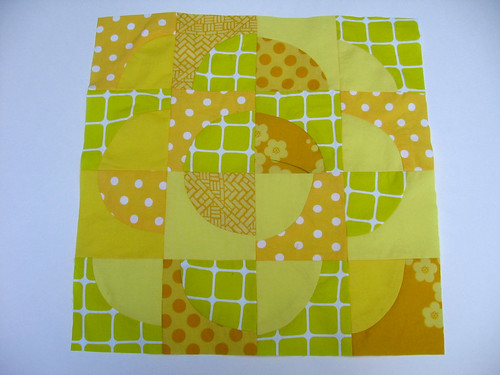
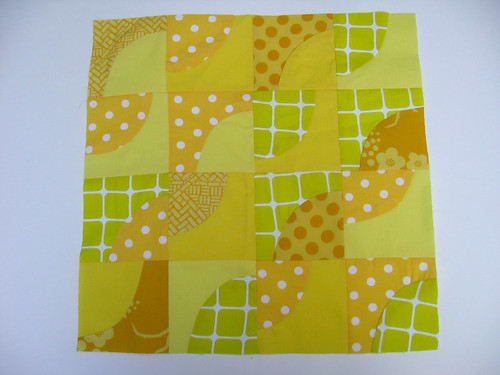
For our May blocks in the do.Good stitches bee in my circle, we each chose a color and are making our blocks all in that color in any design we want to make a "box of crayons" quilt.  I got yellow and was excited because I have a lot of fun yellow fabrics, although when I actually looked through them I realized some were more mustardy... I tried to balance the orangey yellows with other bright lemony yellows, so hopefully these will still read as the yellow blocks in the finished quilt.  I chose a wonky drunkards path for my two blocks, and had fun playing around with different arrangements, finally settling on these two layouts.

Wonky Drunkards Path - Diagonal

The drunkard's path block holds a special place in my heart because it was one of the four blocks in the first small throw quilt that I made - all hand pieced and hand quilted, as I learned in a class I took that taught a very traditional approach to quilting.  Handpiecing the curves, it is not hard to get them all to line up, but it takes a while obviously.  I thought it would be fun to try a looser, more wonky approach to the curves where I could piece them on my machine without worrying too much about cutting the shapes according to an exact template and then exactly matching the edges. It worked so well that my first batch of blocks didn't feel wonky enough and I intentionally made some of the later ones more wonky!

Since I know a lot of folks are intimidated by piecing curves, I thought I would share a tutorial for how I made these blocks.  The circles may not match exactly when you piece them (although you could probably adapt this approach to get a less wonky result) but I really like how the finished blocks look.  If you are interested in learning how to sew curves more exactly, Lesly on PickleDish is hosting a Ogee quiltalong and today she had a post and a video showing how she pieces curves - it's pretty similar to how I do it below, but she is more careful to keep an exact 1/4" seam allowance and she uses fun tools like tweezers!

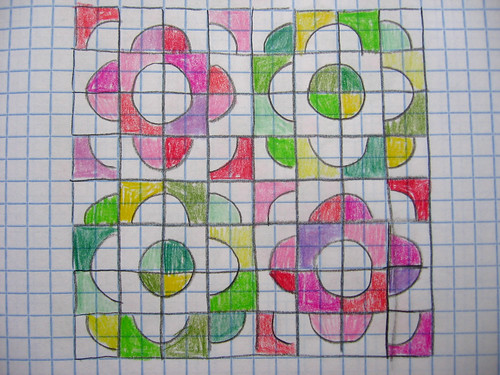
Today I'll show you how to sew the curved piece which you assemble into a finished block, and Tuesday I'll be back to share different layout options for this block [Update: layout options post here].

This makes a 12.5" square block (12" square when pieced in a quilt), but could easily be adapted to other sizes.

Fabric requirements: Sixteen ~5" square pieces of fabric (after you have done a few to practice you could get away with somewhat smaller squares).  This would work great with charm squares!  Or you could make a block out of two fat quarters and have a bit left over.  (Because you make the blocks large and trim them down, this approach is a bit fabric intensive).


Wonky Drunkards Path - tutorial 1


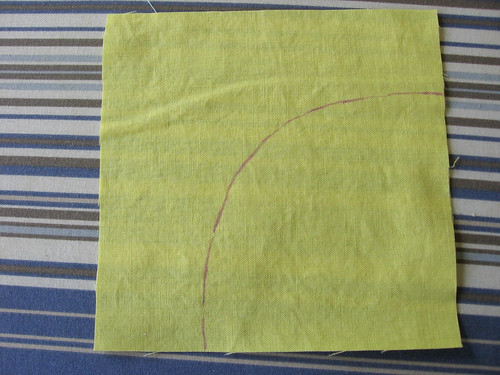
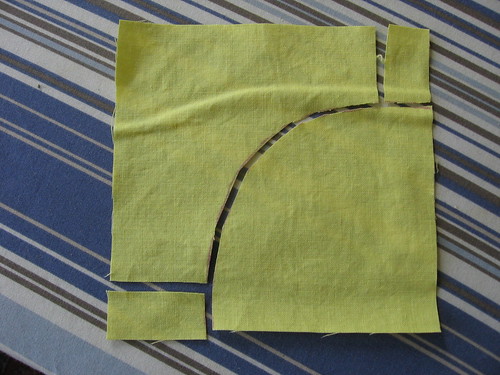
To start, freehand draw a curved 1/4 circle line on your fabric square starting about 1/3 of the way along the edge.

Wonky Drunkards Path - Tutorial 2


Cut along the line you marked, and then cut off about 3/4" from either end of the outer curve piece, as shown above.  You can cut these using scissors several at a time and can use either half of your first one as a template to cut along as you go.  Cut out all the fabric squares and you will have 16 outer curve pieces and 16 inner curve pieces.

Wonky Drunkards Path - Tutorial 3


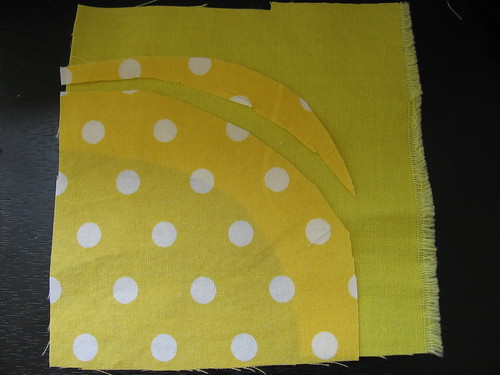
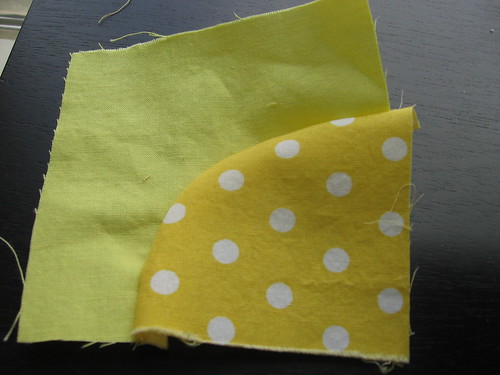
The next step is optional but helps the blocks come out nicely and not puckered.  You'll see if you lay an inner curve piece on top of the outer curve piece that the two curves don't totally match.  You want the two edges to be an equal distance apart (~1/2"-3/4") the whole length of the curve - to echo each other if that makes sense (like arcs of a rainbow - sorry for the cheesy example).  So, you can just trim a bit off the curve of the inner curve piece to make it less of a sharp curve.  It really doesn't have to be exact, and you can either do them all at once or do them as you go to sew them.

Wonky Drunkards Path - Tutorial 4


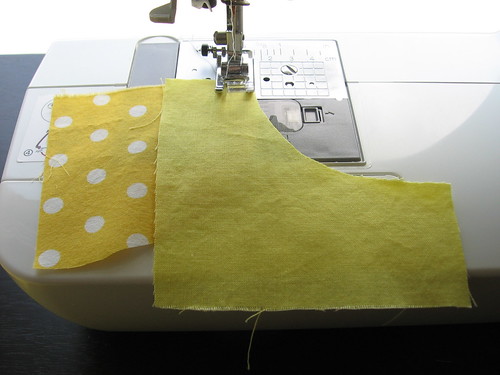
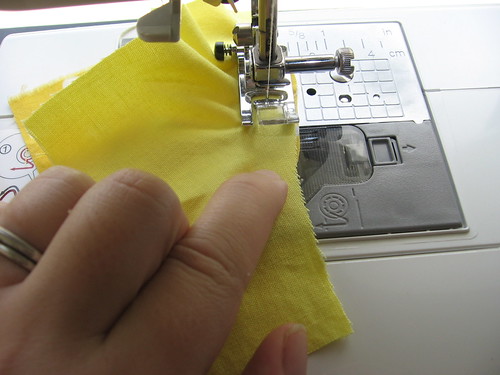
Put the inner curve piece facing up with the corner facing to the upper left, and then place the outer curve piece facing down on top, with the corner facing to the lower left, as shown above.
 
Wonky Drunkards Path - Tutorial 5


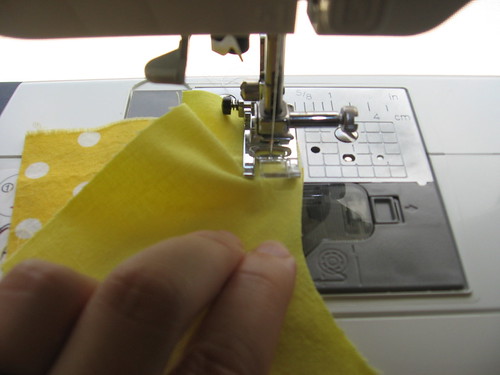
Start sewing down the seam, and pull the upper curve piece as you go to keep it lined up with the inner curve piece.  You will be slowly turning both pieces as you go to follow the curve of the bottom (inner curve) piece and continue sewing roughly 1/4" from both edges.  The fabric only needs to be lined up a bit at a time, so you can tug it into place, sew a few stitches, tug some more, keep sewing, etc.

Wonky Drunkards Path - Tutorial 6


It may look a little puckery behind or in front of your foot as you go, but as long as you don't sew over a pucker it should be fine.  This may sound like it will take a long time, but really it doesn't take long, especially once you have done a few and gotten the hang of it.

Wonky Drunkards Path - Tutorial 7

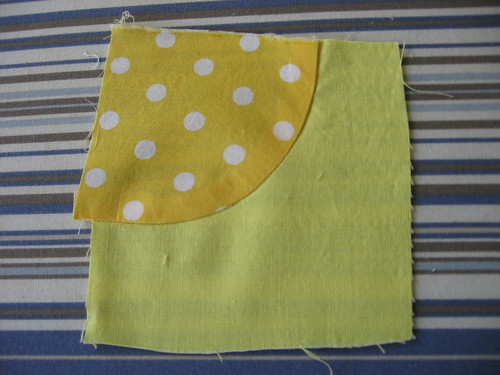
When you are done sewing the seam, flip it open and it should look about like this.

Wonky Drunkards Path - Tutorial 8

Press the curve in place.  You can either press the seam either in towards the inside of the curve or out towards the outside of the curve, it doesn't matter - sometimes the fabric seems to be wanting to go one way or the other, so I usually just did whatever seemed most natural.

Wonky Drunkards Path- Tutorial 9


After pressing, trim down to a 3.5" square (or just a smidge larger if you are worried about whether your seams will be exactly 1/4" in assembling the block).  Arrange blocks as desired in a 4 x 4 grid (see my second post for layout ideas) and then sew together the rows of four blocks into strips, and then the strips into blocks.

Let me know if you have any questions about this technique!  If you have been wanting to try sewing curves but unsure about it, I hope this will encourage you to give it a try!

DONATE TO SUPPORT THIS TUTORIAL - this tutorial is provided free of charge, if you would like to show your appreciation and support the free patterns I provide here, you can donate here (or it helps if you click through to any of the amazon links on this site, whether you purchase that particular product or not!).  Thanks for your support!

I'm linking up to Quilt Story's quilt block tutorial list:


Fresh Poppy Design
Related Posts Plugin for WordPress, Blogger...