Thursday, March 31, 2011

Two More Yellow and Grey Nesting Chairs Pillows


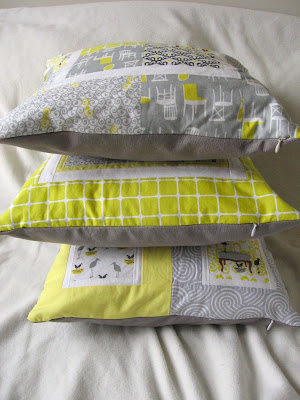
After making my first nesting chairs pillow with this fun Laurie Wisbrun fabric, I couldn't wait to make a few more.  I wanted the pillows to all go well together but not to have the same design, (and I wanted a chance to try out other ideas), so I made each with a different variation of square blocks.  Like the original pillow, both of these pillows feature some other grey and yellow fabrics thrown in, and also include a solid white square border in the design.


I am really happy with how this pillow turned out.  I thought it would be fun to have a mosaic of pieced squares and ended up selecting predominantly grey ones, so to balance it out I included a thin yellow outline border and then decided to use the yellow sanctuary fabric as the wider outer border too.  I used Elizabeth Hartman's tutorial for quick-piecing squares using lightweight interfacing and it made it super easy.  I figured the extra stiffness wouldn't matter much in a pillow.  Looking back at the directions now, I realize I didn't quite follow the tutorial because I didn't cut and press open each seam, which actually probably would have made this turn out better, but I am very happy with how it turned out regardless.


I wanted to mix it up a bit with the third pillow and not have a design with a large centered square but rather four squares.  I had fun fussy-cutting the chair and ottoman motifs from the nesting chairs fabric and like the balance of colors in this pillow too.  I tried to make the inner borders a bit narrower than the outer borders so the squares wouldn't seem to be drifting off the edge of the pillows, but I wish I had moved them even a bit closer together.  This is probably my least favorite of the three but I still like it quite a bit and am very happy with how they look together as a set.


I didn't get a good shot of all three together other than this one of the sides [Update: I went back and took a better photo of all three together - below].  As far as construction, I made these two the same as the first - with no batting, just a muslin lining, and only minimal "quilting" on the white borders.  I used the same grey fabric as backing for all three and did invisible zippers in all of them as well.  I have a good amount more fabric so I may make more of these in the future - including possibly one plain one with the main large print - but this is probably it for the near future (not least of all because I am out of this size pillow form!).

Tuesday, March 29, 2011

Carribean Sweet Potato Black Bean Gratin


I made this sweet potato gratin last week for the second time, and it again was really delicious.  It's from one of my favorite cookbooks, Moosewood Restaurant New Classics, which I find often has recipes that are interesting and delicious without being needlessly complicated - it's a good, solid everyday cookbook.  This dish actually took me a while to assemble but that also could be because I didn't have canned beans on hand so I cooked some in the pressure cooker, I had to pick the spinach and thyme from the garden, and I was just generally moving at a slow pace.  In any case, it is worth the effort.  I often make black bean and sweet potato dishes with southwestern flavor combinations, which I love, but the flavors in this dish are a welcome departure - sweet from the coconut and lime, but with an earthiness from the spinach and thyme - it really does taste carribean.  I couldn't quite think what to serve it with so we just had a salad but if you had time and wanted to make it more special I think fried plantains would be a great accompaniment!

Pottery note - the plate above is one that I made a few years ago, it has a simple carved design on the flange that I really like and a deep green glaze.  It doesn't match any of the other dishes we have which actually makes me like it even more.

Carribean Sweet Potato Black Bean Gratin
Adapted from Moosewood Restaurant New Classics
  • 1 garlic clove, minced or pressed
  • 1 1/2 teaspoons freshly grated lime zest (about 1 lime)
  • 2 tablespoons fresh lime juice (about 1 lime)
  • 2-3 tablespoons chopped fresh cilantro
  • 1/2 teaspoon dried or chopped fresh thyme
  • 1 1/2 teaspoons salt
  • 1/2 teaspoon ground black pepper
  • 2 1/2 cups light coconut milk (about 1 1/2 cans)
  • 4 cups peeled and thinly sliced sweet potatoes
  • 1 cup cooked brown rice
  • 1 1/2 cups cooked black beans (1 can, drained)
  • 1 1/2 cups fresh spinach, thinly chopped

For the topping:
  • 3/4 cup cornmeal
  • 1 tablespoon vegetable oil
  • 1/2 teaspoon dried or fresh chopped thyme
  • 1/4 teaspoon ground cumin
  • 1/4 teaspoon salt

Combine the garlic, lime zest and juice, herbs, salt and pepper and coconut milk in a measuring cup.  Pour a third of this mixture into a lightly oiled 9 x 13" baking pan.  Put half of the sweet potatoes in a layer on the bottom of the pan, followed by half of the rice, half of the beans, and half of the spinach.  Pour in another third of the coconut milk mixture and repeat the other layers.  Pour all the remaining coconut milk on top. 

Preheat oven to 350.  Mix together all the topping ingredients in a small bowl and distribute evenly over the top of the gratin.  Bake uncovered for about an hour, rotating the pan halfway through.  When topping begins to brown and the sweet potatoes are tender, remove and let cool for 3-5 minutes before serving.


Monday, March 28, 2011

Kid's Yellow Boxy Toiletry Bag


Our good friends just had a baby and when they saw the boxy toiletry bag that I made for Lawson they requested one for their daughter, too, but not in too girly colors.  I whipped up this fun yellow bag with a cute monkey fabric lining for them.  It feels even more boxy to me than the first bag since it is pretty much a square shape on the top.


Once I had made the bag, I couldn't resist filling it up with some other fun baby gifts before I sent it off to our friends!


So I pulled out these monkey bibs and shoes that I had made before, and some baby pants I had made before too, and then I made a new pair of baby pants to include, too.


Congrats Jen and Laurel and welcome baby Riley!  We can't wait to meet you.

Saturday, March 26, 2011

Winners of Japan Relief Raffle


Thanks to everyone who entered the raffle for Japan relief!  There were a total of 30 entries for the two bundles of baby goods, and the randomly selected winners are:


Numbers 8 and 30, so Lauren and Jocelyn.  Lauren will get bundle #2 and Jocelyn will get bundle #1.  Congratulations, I will email both of you to arrange having your items sent to you!

Thanks again to everyone who donated items and to everyone who entered!

Spring in DC


[Reminder - today is the last day to enter the Japan relief raffle of baby items - I will keep it open until ~9 pm Eastern time]

Spring is one of my favorite times in DC, with generally nice weather and a beautiful sucession of flowering trees, bulbs, and other plants.  Earlier this week, when it was a bit warmer out, I took a stroll around town with my camera to appreciate it all.   I walked by the Capitol, where the magnolias were starting to bloom, or in the case of the white magnolia below, in full bloom.


This weeping cherry was also right by the capitol:


I wandered through the small but well-landscaped gardens at the nearby U.S. Botanical garden where I saw some of my favorite plants.  I have a real soft spot for interesting plants that you don't see all the time, and which may not be as colorful or splashy as some others, but which have a subtle beauty that you really have to get up close to appreciate.  I guess it may be related to my love for wildflowers (which I actually used to study in college, but that is another story).

Hellebore (Lenten Rose)

Frittilaria

Japanese Andromeda

Not sure what this is - do you know?

I also saw lots of great bulbs and other flowers growing in people's gardens on my walk.

Daffodils and Narcissus

Creeping Phlox - one of my favorites

And we have a few things in bloom in our front yard, too!  A year or two ago my mom sent me some sweet bulbs, so I have the standard jonquil daffodils that I had before and a few other more interesting things too.

Jonquils and Scilla

Chinodoxa

Meanwhile, it is supposed to snow tomorrow in DC, and we are actually in New Hampshire this weekend (this post brought to you by the magic of pre-scheduled posting).  Hopefully spring will be back in DC soon, and whereever you are too!

What are your favorite spring flowers?  Are things in bloom for you too or not yet?

Friday, March 25, 2011

Nesting Chairs Yellow and Gray Pillow


I love these limited release nesting chairs fabrics that I got as a lovely birthday gift from my mom, and was really excited to make this throw pillow.  While we currently have a beige couch I am really hoping that there will be a grey couch in our future, and I thought these fabrics would be great accents.  I recognize that it is slightly nuts that I am making throw pillows to go with a future couch, but I think they will look good with our current couch too and I really just love these fabrics.  I also used a few prints from Patty Young's Sanctuary line, which coordinated really well.

I got the design idea from a quilt in this blog post (which I read when I first found out about the DC Modern Quilt Guild - which I am very excited to now be a member of!), and as soon as I saw the quilt I thought it would make a great pillow design.  I'm not sure if this has a name, it seems kind of like a bento box design, although I didn't piece it the way you would usually piece a bento box.  I pieced the central square, then the white border, and then the outside borders, rather than piecing each quarter separately before combining.  This way I didn't have to worry about lining up the white borders to make a perfect square.


I lined the pieced front of the pillow with muslin rather than using batting, and I didn't want it to have a super quilted look, so I just did some subtle accent stitching in the white square.


I backed the pillow in a mid-weight grey fabric that I had in my stash, and I put in an invisible zipper along the bottom edge.  I have previously just put regular zippers in my pillows and this was the first invisible zipper I have ever sewn, with much assistance from Sew Katie Did's invisible zipper tutorial.  I just have a regular zipper foot, not a special one for invisible zippers, so I was very happy to find out it was still possible - and I think it turned out very well!

Overall, I am really happy with how this pillow turned out and am excited to make a few more out of these fabrics. [UPDATE:  I made two more coordinating pillows - blogged here.]  I'm entering this pillow in the March Blogger's Pillow Party over at Stitched in Color:

Blogger's Pillow Party

Thursday, March 24, 2011

What's Sprouting in the Garden


A few weeks ago (on my birthday, actually!) I decided it had warmed up enough to plant my spring seeds - mostly greens and a few other things, and I am happy to report that nearly everything has come up.  Shown above are the radish sprouts, which were in need of thinning in this photo but I thinned them out a bit today.  I don't actually really like radishes, but Lawson loves them so I always plant some for him.  He didn't realize that I had planted any this time until the other day I mentioned it and he lit up with excitement. While I am the main gardener in the household he gets very excited about having fresh vegetables and really appreciates the effort that goes into the garden.


I planted several of my self-watering containers full of lettuce mixes, which I usually grow as cut and come again.  I planted them fairly thickly and will definitely need to thin them out too. 


I planted a number of containers of sugar snap peas (I believe they are the Sugar Ann variety); last fall I grew these with just a stake to support each one since the seed catalog said they were self-supporting, and they grew all over the place, so this year I planted them around the base of some tomato cages.  I also only planted a few plants last fall since my garden was so full then, and didn't really get much out of them - I am hoping with 10-15 plants I will get a more meaningful yield.


I planted a bed of arugula, which is one of my favorite greens to grow since it is so fast and easy to grow.  Again, this will definitely need to be thinned although I may wait just a bit so that I can add the thinnings to salad.


I also still have a number of things growing that overwintered from the fall, as I mentioned before... the kales in the photo above are purple so they are a bit hard to see, but I am hoping they will grow bigger before it gets warm (and the cabbage worms return, grr).


I had this pot of spinach too, although I actually cut off all the larger leaves to use in tonight's dinner, which was great since it worked out to just the amount the recipe called for...  I love it when the food growing in the garden comes in handy like that, like a strategic vegetable reserve!  Now I just have to bide my time (and do a little thinning) until the spring plantings get to be a more edible size.

I'm linking up with a new weekly Urban Homesteader blog party on Food. Soil. Thread.

Tuesday, March 22, 2011

Grateful

I love the kindness and generosity with which folks in the online crafting/sewing/knitting community treat each other.  Partly I mean giveaways, but also the time and care that people put into items for swaps, the supportive comments, and a general "I've got your back" mentality.  I know it's not all sunshine and rainbows and that there are frustrating and imperfect sides of it too, but overall I am really grateful for this community.  And I have been on the receiving end of a number of generous gifts in the past few months and I wanted to take the time to say thanks.


I participate in a weekly sewing/quilting chat on twitter, Talkin' Tuesdays, which is really just a lot of fun and a great chance to meet some lovely folks who are just as fabric-obsessed as I am.  Even better, they have prizes each week, and I was lucky enough to win this charm pack of Sugar Pop, a yard of coordinating ivory colored Bella solid fabric, and a cute table runner pattern, all from Fabrics N Quilts.  I am not sure when I will have time to make this quilt (and still need to get backing fabric) but I was so excited when it came in the mail that I starting laying it out right away!  So above is a preview of what I am currently thinking I will ultimately make with these cute fabrics.


I recently won the Felt Friends book in a giveaway on Stacy Sews and it came in the mail yesterday, and Leslie from A Friend to Knit with sent me this Classic Elite Yarns pattern booklet a few weeks ago.


Leslie had posted her finished Elizabeth sweater which I had seen in her previous in-progress post, and I left a comment mentioning that I loved how hers had turned out and hoped to make one in the future, but needed to track down the pattern booklet.  She emailed me a few hours later asking for my address and saying she was going to send me her booklet.  It was such a kind gesture and really meant a lot to me.  I can't wait to knit this sweater! (OK, I really need to finish my cables and O's sweater first though).  I am thinking I will make it in a single tone kettle-dyed yarn, maybe a charcoal or a burgundy color, so the striping effect will still be visible but a bit more muted.  I think I will wear it a lot and I'm excited that it uses worsted weight yarn so it should knit up fairly quickly (for a sweater).


I was really surprised I won the felt friends book, since I had the first entry in the giveaway, but I guess #1 has to be picked by the random number generator sometimes too!  The book is super cute - check out the monkey and elephant above (although I think when I make them I may skip the berets).


And check out these cute animals... you can tell it is a Japanese craft book because all the animals have oversized heads but maybe if I make some of these I can adjust the size of the body a bit.  Although the oversized head thing is pretty cute too!


Finally, I had sent my blog friend Shelley from Rebel Homemaker some vegetable seeds that I knew I wasn't going to use, and she sent me this lovely sampling of blue and green fabrics from Patty Young's Sanctuary line (which I love) as a thank you.  This was so sweet, she knows how much I love fabric and that green is one of my favorite colors.  Really, I was just happy that the seeds might have a chance to grow and I wasn't expecting anything, so it was a lovely surprise!  I'm not sure what I will do with the fabric but I am thinking I may make a pillow for our bed.

How about you?  Have you been on the receiving (or giving) end of this generous community lately?

And speaking of giving - don't forget to check out the raffle of handmade baby items to benefit Japan relief!

Monday, March 21, 2011

Black Bean Hummus


I'm calling this black bean hummus because the ingredients and proportions were inspired by hummus, but it could just as easily be called "delicious black bean spread" or "semi-spicy black bean dip" so if those sound more appealing to you then feel free to call it one of them, or something else.  In my family we like to adapt ingredients to fit what is on hand so there is a story about the time when a dish was made where all the ingredients had been replaced with something similar... pears for apples, and so forth.  This is a bit like that - I used black beans in place of chick peas, toasted walnuts in place of tahini, lime juice in place of lemon, and added some aleppo pepper flakes for a bit of kick.  It still does have garlic, olive oil, and salt like the original, however.   I have made this before and I'm very glad I kept track of the proportions this time because it was delicious and I will definitely be making it again.


A note on the aleppo pepper: this is one of my favorite seasonings; it has a mild, slightly smoky, rich spiciness to it.  You can use them in place of red pepper flakes or ground chili peppers in cooking, so if you are tempted to get them, don't hesitate, you won't regret having them around.  However, if you don't see the need to add another spice to your cabinet or just want to make this right now without tracking down my favorite obscure spice, you can substitute most milder chili peppers or even chili powder.  If you have ground or canned chipotle peppers I am sure those would work very well too.

Black Bean Hummus
  • 1 can black beans, drained (or 2 cups cooked)
  • 1/2 cup chopped walnuts, toasted
  • 2-3 cloves of garlic, peeled
  • juice of 1 lime (~3-4 tablespoons)
  • 1 1/2 teaspoons aleppo pepper (or other chili pepper to taste)
  • 1 1/2 tablespoons olive oil
  • salt to taste (~1/2 - 1 teaspoon)
  • water
Blend ingredients through salt in food processor or blender.  Add water to get desired consistency.  Serve with crackers, chips, vegetables, or as a spread in sandwiches, or however else you wish!

PS - Don't forget to check out the raffle for handmade baby items to benefit Japan!

Sunday, March 20, 2011

Far Far Away 2 Baby Quilt


I have been working on this quilt for a friend who is expecting for several weeks but haven't posted anything about it since it was a surprise.  Her shower was this weekend and I gave her the quilt (ok, well, showed it to her since I was still finishing sewing on the binding)... so I can go ahead and share it with you, now, too!


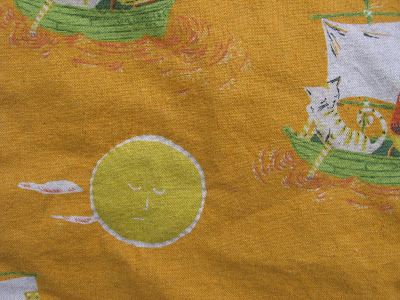
She is having a girl but didn't want something with a lot of pink... I thought about the fabrics in my stash and kept coming up with ideas that were just too girly.   My friend loves natural colors and fibers and the more I thought about it the more I realized that the Far, Far Away 2 fabric line by Heather Ross would be perfect for this quilt.  The fabric is a linen cotton blend and is a bit heavier weight than a regular quilting cotton, and the details in the prints are just adorable.


The fabric is so beautiful that at first I was having a hard time getting myself to cut into it and couldn't decide on a design.  So, I told myself to just go for it and starting cutting out the fabric, and laid it out until I decided to do a design with pieced strips of varying heights.  I had bought barely enough fabric for the sashing so I calculated what width I could use and still have enough.  I pressed all the seams open, which ended up being helpful for reducing the bulk at the seams when I hand-quilted it.


I thread-basted the quilt every 4-5 inches and then I hand quilted it.  With the thread-basting I was actually able to quilt it without a hoop, just holding it on my lap.  I originally wanted to just quilt in the sashing but then I decided it could use a bit more quilting and did some outline quilting inside the blocks.  The outline quilting ended up being one of my favorite parts of the quilt!  I love how it accents the sweet fabric designs.


I'm very happy with how it turned out!  Congratulations Suzanne and Grant and wish you all the best with your coming arrival!!

I'm linking up at Sew Mondern Monday...

{Sew} Modern Monday at Canoe Ridge Creations
Related Posts Plugin for WordPress, Blogger...