Showing posts with label bag. Show all posts

Friday, May 06, 2011

Screenprinted Tote Bag Tutorial

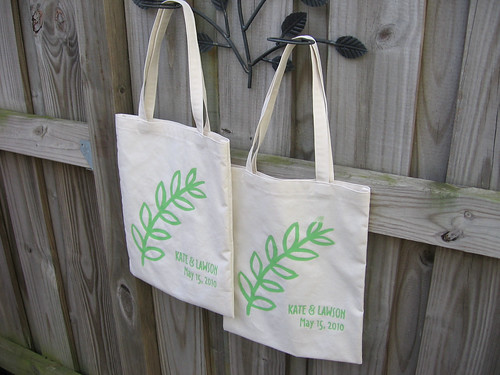
Screenprinted Tote Bag

Have you seen the Handmayde series on the Long Thread this month?  Ellen is featuring a different theme of homemade items each week in May, and kicked it off with weddings this week.  I am excited to be sharing the tutorial for the screenprinted tote bags which I made for my wedding last year. 

Screenprinted Tote Bags

We gave the bags as welcome bags to guests staying at the hotel, with a packet of information about the wedding and some snacks and a bottle of water (and we made some extras for friends who didn't stay at the hotel, too).  It was a great way to give our wedding a homemade feel from the moment guests arrived, and we were happy to be giving them a reusable bag rather than using something disposable.  These would also make great gifts for a bridal party if you wanted to do something smaller scale.  You can see some of the other DIY projects that I did for our wedding here if you are interested.

Screenprinted Tote Bag - Detail


I made the screen using drawing fluid as a resist to paint the design on the screen before blocking out the non-printed area with screen filler.  I like how this technique lets you create a more painterly design, although you could also use it for a more precise drawing.  Alternatively, you can create a screen from a design printed on a transparency using the photo emulsion technique.

DONATE TO SUPPORT THIS TUTORIAL - this tutorial is provided free of charge, if you would like to show your appreciation and support the free patterns I provide here, you can donate here (or it helps if you click through to any of the amazon links below or elsewhere on this site, whether you purchase that particular product or not!).  Thanks for your support!
Materials:

I recommend getting a basic fabric screenprinting kit to start, but you can also buy/assemble the materials separately (Dick Blick art supplies is a good source to buy, or your local art supply store):

You will also need:
  • Black india ink and sketch paper for drawing design
  • Computer and printer
  • Pencil
  • Plastic tape or masking tape to tape screen
  • Plastic spoons
  • Blank bags for printing - make sure you have at least 2-3 extra (for the wedding, I purchased bags similar to these; for the smaller number that I made this time, I just used my easy tote bag tutorial)
  • Cardstock or thin cardboard to place inside the bags while printing
  • A friend to help you print, especially if you are using a screen without a hinge and base
To Make the Screen:

You can either tape the edges of the screen before you transfer the design or after - in the photos before, I taped the screen first.  Also, you will notice that I made a different screen design below for the purposes of this tutorial, but then reprinted the original screen from my wedding to make the actual bags.


Start by sketching design ideas on paper using the paintbrush and india ink.  If you want to have text on the screen such as your names and the date of the wedding, play around with different fonts on your computer and print out a few options to see what looks best with your design.


Arrange your chosen design and font as desired and then lay the screen on top, flat side down.  Trace the design lightly onto the screen using pencil, tracing the entire outline of the letters but just the main lines of the sketched design.  Note - if you are using a screen with a hinges and a base, you will want the hinges to be at the bottom of your design.


Turn the screen over so that the flat side faces up and paint the design using drawing fluid, following the traced lines.  Let the drawing fluid dry, which should take 3-4 hours (if there are areas that are particularly thick, they may still be sticky, which is fine).


With the flat side of the screen facing up, pour the screen filler along one edge of the screen (I used too much, you will not need this much).  Also, I forgot to do this but it helps if you raise the screen by resting the sides on pieces of wood, bricks or other stable supports - otherwise when you spread the screen filler with the squeegee it can touch the surface underneath.


Spread the screen filler across the screen using the squeegee, trying to evenly coat the screen in 1 or 2 passes.  If you go over the screen multiple times the drawing fluid may start to be washed away - don't worry if you miss some spots or it isn't perfect, you can always touch it up later by brush with more screen filler.  Wipe off any excess screen filler from the edge of the screen and let dry completely (overnight is best).


With cold water and a spray attachment if possible, rinse the drawing fluid out of the screen.  It may take a while to completely rinse out and you may have to gently scrub it with your fingers or a nail brush to get it all off.  Let dry completely.

To Print Screen:

Place 1 or 2 pieces of cardstock or 1 piece of light cardboard inside each bag to prevent the ink from bleeding through to the other side.  Make sure that the cardstock or cardboard covers the entire area to be printed and that the bag is even and smooth.


With the screen lifted open (if you are using a screen with a hinge), position the tote bag under the screen such that the design will print as desired.  If you are not using a screen with a hinge, you may wish to make tape markings where the screen should be aligned.


You can use the screenprinting ink straight from the jar or you can mix your own colors - bear in mind that the ink will dry slightly darker, so you may want to test it on a swatch to make sure you like the final color.  Spoon 2-3 spoonfuls of ink onto the base of the screen and gently spread it over the screen with the screen lifted to "flood" the screen with ink.


If you are using a screen without a hinge, you will need to have a friend hold the screen in place while you do this step.  Lower the screen and pull the squeegee back and forth at a 45 degree angle, pushing down to force the ink through the screen.  The biggest problem I had with printing these bags was incomplete printing where I hadn't gotten enough ink through, so make sure you are thorough in this step - you may want to go back over areas of detail, such as the text, a few additional times.  Practice and see what works well for you - this is why it is important to have a few extra bags, because it may take you a few tries to get the hang of it.  Once you are done printing, again gently spread the ink over the screen to flood it - this prevents the ink on the screen from drying too quickly in between prints.


Carefully lift the screen off the printed bag, and continue on to the next print.  If you are stopping for more than a few seconds, or if you have printed 20-30 bags, you should stop and wash off the screen to make sure that ink doesn't dry on it and block it up (the screen will dry off relatively quickly if lightly patted dry with a towel and then left to dry completely).  Lay the printed bags out to dry (a wooden clothes drying rack is handy for this) and remember to set the ink according to the manufacturers instructions (usually ironing on high for 3-5 minutes with a pressing cloth).

Enjoy your bags!

Monday, March 07, 2011

More Tote Bags and Pouches!


I have been having a lot of fun sewing up tote bags from the easy tote bag tutorial I posted - mostly with a contrasting band of fabric at the top because I love how that looks - and also some more zip pouches.


Some of the pouches I made with my pleated pouch tutorial and some are basic rectangular pouches with a fun pieced stripe.  You may notice the similarity between these fabrics and the tote bags...


That's because I thought it would be fun to make matching sets!


Or really, I should say coordinating.  I had fun picking out fabric combinations that used the same main fabric and went well together but didn't use exactly the same fabrics.


For this one I used coordinating fabrics from the Modern Meadow line - I love this line and am stashing fabric to make a quilt with it someday, but decided I could spare a little for these bags.


I think there are all kinds of fun uses for a tote and matching pouch, including just using it as a purse and simple wallet, but the biggest one I was thinking of was as a knitting or hand-sewing project bag and matching notions pouch.  I always use tote bags to carry my knitting and love that I can hang it over my arm while standing and waiting and just stand and knit without my yarn getting everywhere!  Maybe there's a knitter or sewer in your life who would like a set?  You can whip them up using the tutorials or all of these are listed in my Etsy shop!

Thursday, January 20, 2011

Fabric Produce Bags


I have been planning to make these fabric produce bags (from this tutorial by Daisy Janie) since I first saw the post in December, but just got around to it this week.  I have long been a big proponent of reusable shopping bags and got funny looks from grocery store cashiers for many years... I was thrilled this past year when DC instituted a 5 cent plastic bag tax, not only because it helped push more people to use reusable bags, but because I no longer got the weird looks.  We even came up with a system in our household of keeping the bags in the trunk of the car so that Lawson wouldn't get to the store and realize he had forgotten to bring them.  I also am a huge fan of the roll-up/stuffable lightweight grocery bags and generally have at least one if not two or three in my purse (including the ones I made from my tutorial) so that I am never caught without a bag when out and about.


But... I have never had a good solution for produce bags, short of holding on to them and reusing them (which I have done inconsistently).  So I was super excited when I saw this tutorial, both because it meets that need and because it has a great design.  Check it out - you loop the handle through the shorter loop as a closure, securing the fruits and veggies inside but leaving room for a cashier to peek inside and see what you have.


And the same handle and loop can be used to roll up the bag for ease of carrying - love it!


Best of all, you can loop the bags into a chain to keep them all organized and together so you aren't digging in the bottom of your purse in the produce aisle!

I have recently been going through my stash and weeding out some of the more old-fashioned fabrics that I got when I first started quilting/sewing over 10 years ago.  This yellow print was one that I didn't want to just give away but that I also didn't see myself using anytime soon... although as I used it for this project I realized I actually did like it pretty well.  I made coordinating blue and red bags (and actually a few other blue ones that aren't shown here) with other fabrics from my stash, so we have really a pretty good set of these bags now! I made the first 3 or 4 with squared off bottoms and then got lazy and didn't bother for the rest, but they all seem like they will work fine.

I am not sure I will use them for everything - some foods like greens I really think store better in the fridge in a plastic bag - but I will definitely use them for the bananas/apples/potatoes types of foods.  Luckily I have been doing more of the shopping lately, I am not sure I could convince Lawson to go for fabric produce bags, much less yellow flowered and red polka-dotted ones.  I think we may be about to start getting weird looks at checkout again, but that's OK, I can deal.

Thursday, November 18, 2010

Roll-up Shopping Bag Sewing Tutorial


I made this roll-up shopping bag earlier in the fall and had been meaning to make a tutorial for it, so the Sew Mama Sew Green Grocery Bag Challenge was a good excuse to finally get around to it.   This bag is inspired by one my very talented friend Mandy made a year or two ago... I love the roll-up shopping bags that you take with you in your purse, so the idea of making my own was very exciting!


The bag is made with a single layer of quilting weight cotton (unlined).  This helps to keep it lightweight and small enough to roll up easily.  I have gotten a ton of use out of the first one I made (on the right in the photos) so I am excited to have another one!  You can't see it in the top photo but you can sort of see in the photo below, the bag is constructed similarly to the plastic bags you get at the grocery store, with side gussets.  This little bag can hold quite a good bit of stuff!  Since it is only a single layer of fabric, I wouldn't advise using it to carry 2 gallons of milk home, but it has proven to be more sturdy than I expected and can carry quite a bit of weight.   You can use the ties at the top of the bag to tie it closed when it is full to keep it secure.


So here is the tutorial - enjoy!  Oh, and I will be posting more fun sewing tutorials over the next month or so, so be sure to come back and check them out - you can subscribe to or follow my blog using the links in the sidebar if you like.  And if you make a bag with this tutorial I would love to see how it turned out - you can share a photo in the Needle and Spatula Flickr group.

TERMS OF USE:  For personal, non-commercial use only.  If you are interested in making these bags for small-scale commercial sales (eg craft fairs, etsy), please contact me and we can discuss a licensing agreement.

DONATE TO SUPPORT THIS TUTORIAL - this tutorial is provided free of charge, if you would like to show your appreciation and support the free patterns I provide here, you can donate here (or it helps if you click through to any of the amazon links on this site, whether you purchase that particular product or not!).  Thanks for your support!


What you will need:
  • 32"x13" piece of main fabric color (for bottom part of bag body)
  • Two 30"x3" pieces of main fabric color (for straps)
  • 32"x5" piece of contrasting fabric color (for top part of bag body)
  • Two 3/4"x30" pieces of lightweight fusible interfacing
  • Two 10" long pieces of coordinating narrow ribbon or bias tape
  • Thread in a color that looks nice with your fabrics
If you use two colors as above, a half yard of the main color and a quarter yard (regular cut, not fat quarter) of the second color, will be sufficient.  If you prefer to have just a single colored body, you will just need one 32"x17.5" panel for the body, and you will probably need 3/4 of a yard for the whole bag.  You could also have a larger top panel, or have three stripes, etc, if you prefer a different design...

The bag construction uses french seams to keep things neat inside the bag (since it is unlined) and to add strength.  If you have never done french seams before, don't worry, they aren't hard... it can be a bit counter-intuitive at first, but follow the directions and you will be fine!


First, take the fabric for the bottom of the bag and the top of the bag and pin them together along the long edge, wrong sides facing.  If your fabric has a directional pattern, make sure that it is facing up (the top of lower fabric is the pinned edge, and the top of the upper fabric is the unpinned edge).


Sew along the pinned edge with a 3/16" seam.  Snip any frayed edges along the seam and then fold the fabric along the seam so that the right sides face, and iron it flat.  Pin this edge and sew with a 1/4"-5/16" seam (enclosing the first seam within this second seam).


Iron the seam to one side (I ironed mine down), and then top stitch along the edge - this is easier to do from the wrong side where the seam is showing.


Now, fold the bag body wrong sides together - you are taking the long rectangle and folding it in the middle to make the bag shape.  Pin the side of the bag together, taking care to line up the seam you just sewed.  Sew a 3/16" seam along just that one edge, then trim any loose threads or unevenness.  After you sew the seam you will basically have a tube which is open on both the top and the bottom.


Turn this tube inside out so that the right sides face, and iron the side seam you just sewed flat.  Pin and sew a 1/4"-5/16" seam, again enclosing the first seam inside the second seam.


Now, put aside the bag body.  Before the next step you need to make the the handles and ties.  You could also make these first if you prefer.

Iron each long handle strip in half lengthwise (wrong sides facing) to create a crease down the length of the strip.  Open the strip and put interfacing on one side of the crease, then iron to fuse it to the fabric (see top strip in photo below).  Then, iron the fabric edge below the interfacing up and over the interfacing strip (see bottom strip in photo below).


As shown in photo below, fold up on the original crease and iron in place (top strip shown), then fold one more time and iron again.  You will basically have a roll of fabric ironed in place.


Open up the roll (as shown in the bottom strip below) and then tuck the last edge inside the fold (as shown in the top strip below).


Top stitch along both edges of the strips.


To make the ties, either use narrow ribbon, or sew a piece of bias tape shut to make a tie.  Fold the ends under as shown below and sew them in place to make a neat end.


Back to the bag... with the bag still inside out, fold the top edge down 3/4" all the way around and iron in place.


Fold the edge over again (another 3/4") and iron in place.  Measure 3 3/4" in from each side of the bag and mark with a pin.  Turn over and place pins on the other side to match.  Place the ends of your handles just inside these marker pins, tucked under the folded over edge, and pin in place, making sure to keep them perpendicular (at right angles) with the folded edge and making sure that handle is not twisted (see the two photos below).  Pin the tie in place between the handles, and repeat for the other side.  Then pin the rest of the edge in place.


Top stitch the bottom of the folded over edge (closer to the handles etc) all the way around the bag, and remove pins.


Iron the handles and ties to face up and pin them in place on the edging, as shown below, again making sure to keep them at right angles with the edge.


Top stitch the top edge of the bag, securing handles and ties as you sew all around the bag.  I recommend sewing this seam on the right side of the bag as it will be easier to make it look nice that way.


Now, to make the bottom of the bag.  First, you need to fold the fabric to create the gussets.  Iron the bag flat so that you will have a clear crease on the side which doesn't have a seam to indicate where the side is.  Starting on the side with a seam, fold the fabric in towards the middle of the bag until the gusset is 2.5" deep.  Use a ruler to measure as shown below to ensure that you are not including the additional depth of the french seam.  Make sure that the top and bottom folds are even and that the sides are straight, then iron in place.  Repeat with the other side, making sure that the crease you ironed in place is correctly aligned at the back of the gusset.


Now, pin across the bottom edge of your bag, pinning the gussets into place.  Don't worry if your bottom edge is frayed or isn't totally even, we will clean it up in a sec.  Sew a 1/4" seam across the bottom (or more if needed to be sure you are catching all the layers), then trim off any frayed or uneven edges.


Turn the bag inside out.  You will have to turn the gussets to one side or another, but it doesn't matter which, just pick one.  Poke the corners all the way out, then pin in place and sew across the bottom with a 5/16" or greater seam.


Turn the bag rightside out, you are done!!

Here are quick instructions on how to fold the bag:

Lay the bag flat, lining up the edges and making sure the gussets are tucked in, then fold the handles down.


Fold the bag into thirds lengthwise, leaving the ties hanging out loose at the top.


Roll the bag up from the bottom, keeping it as tight as possible.


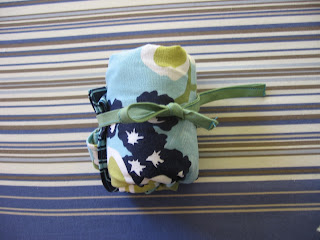
Wrap the ties around the bag and tie with a knot or a bow to secure!

Related Posts Plugin for WordPress, Blogger...