Showing posts with label glass. Show all posts

Tuesday, July 05, 2011

The Process of Making Stained Glass

Stained Glass Seagull

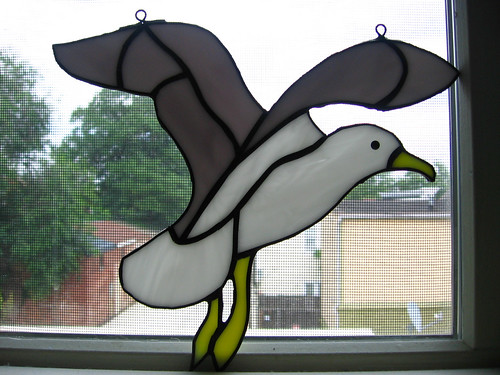
I made this sea gull stained glass suncatcher a few weeks ago, after having made a number of other stained glass items recently (see here, here, and here).  Since I have posted quite a few of my finished pieces stained glass, I thought it would be fun to show a bit more about the process of making it.  While this isn't really intended to be a full tutorial (making stained glass is pretty complicated), it can give you a flavor of what is involved... maybe you will want to learn more and try it yourself!

This shows the process of making copper foil stained glass - the other major technique is lead came stained glass, which I have also done (for instance, my recent prairie style window, or my earlier window that I designed).

stained glass process 1

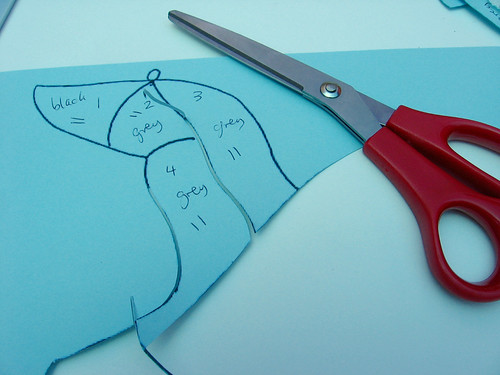
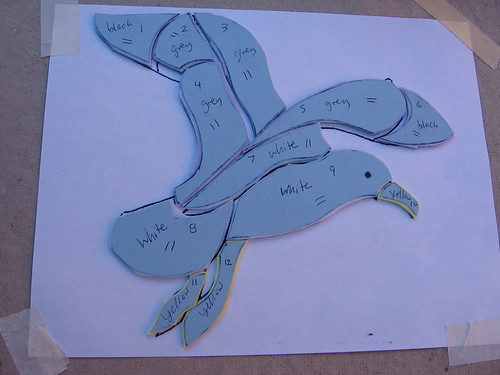
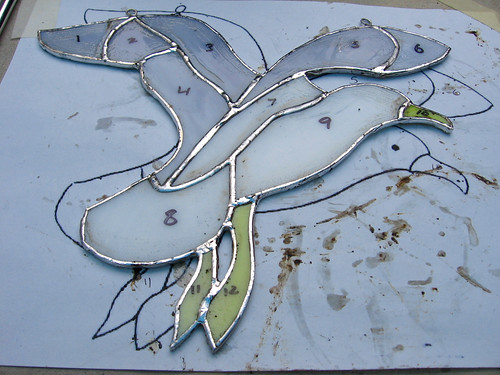
For both techniques of making stained glass, the way I learned to do it is to start with a paper pattern (here is the sea gull pattern I used for this piece).  Then you cut apart the pieces of the pattern using a special kind of scissors that removes a thin strip of paper to make room for the lead or copper that will ultimately go between the pieces (a thinner strip for copper than for lead).  Before you cut it apart you number the pieces and label them with which color glass they will be, and directional markings if needed.

stained glass process 2

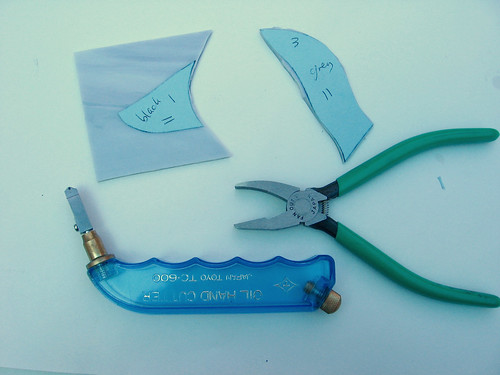
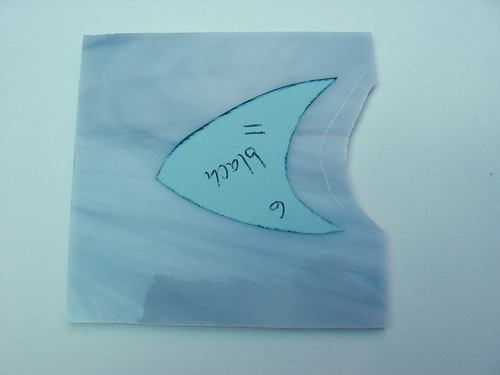
After cutting out the paper pieces, you glue each piece to the corresponding piece of glass (being careful to orient it as desired along the pattern/grain of glass).  You need to leave a fair amount of glass around the shape so that you will be able to cut it out as accurately as possible using a scoring wheel and grozing pliers.

stained glass process 3

For each cut, you basically score a straight or curved line and then snap off the excess glass with the pliers - for steep curves, you can't do it in a single cut but rather must make a series of nested cuts one at a time.

stained glass process 4

I am still working on refining my cutting skills - I am getting better but still definitely find that there is extra glass that sticks out past the paper edge (I think it is pretty hard to avoid this).  The goal is to get the pieces to fit together perfectly with just that small gap in between to leave room for the copper foil.

stained glass process 5

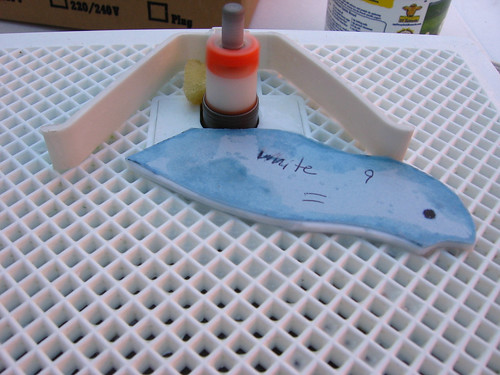
To get the pieces down to that size, you can use a glass grinder, which uses a diamond blade to grind off the extra glass.  After the pieces are ground down to the right size, you remove the paper by soaking the piece in water.

stained glass process 6

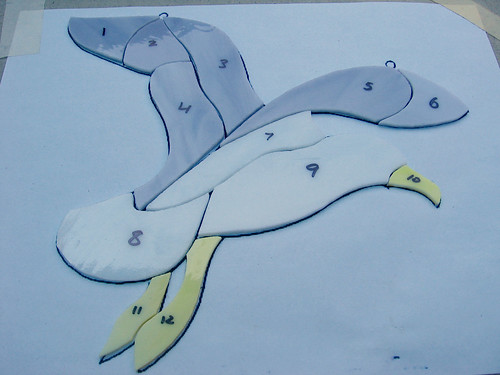
I tend to overgrind my pieces (so they are too small) so I was happy that I did a pretty good job on this one getting all the pieces to fit together well!  You can see that after I took off the paper I relabeled each piece with permanent marker right on the glass to be sure to keep track of which piece went where and which side was up.

stained glass process 7

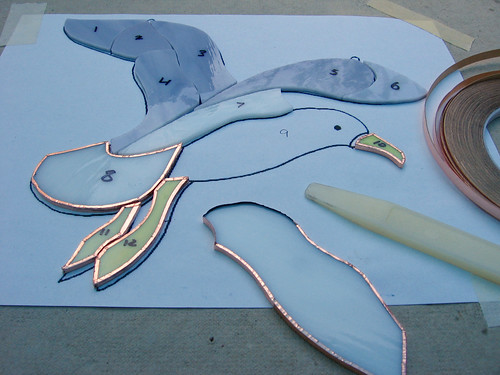
Since I was using the copper foil technique, I then wrapped each piece of glass in an adhesive backed copper foil tape, adhering the tape to the glass by pressing/rubbing it with a plastic tool called a fid.

stained glass process 8

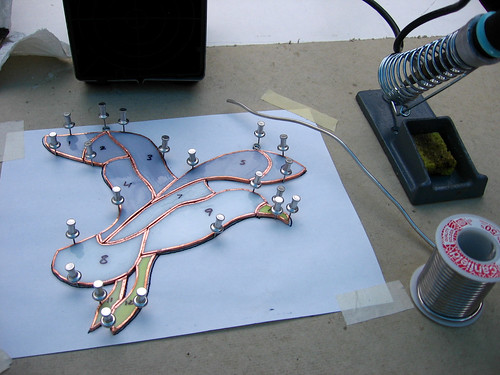
Then I fit all the pieces together again and held them in place using special metal pushpins - see how they copper foil fills in pretty much all the gaps?

Stained glass process 9

Then I painted a flux on the copper foil and soldered all the pieces together, and coated the edges in solder too.  For larger pieces you would be fitting them into a zinc or lead frame, but since this is a small suncatcher it should be fine with just the copper foil edges.  You can see I also soldered in copper wire loops for hanging the piece.

Finally, I used a special soap to clean off the flux and then I applied a chemical patina to turn the metal black, and the piece was finished!

I hope you enjoyed this quick overview of the stained glass making process... This will probably be the last stained glass I make for a while since I work outside and it is now ridiculously hot out in DC, plus we are getting ready to pack up for our big move to Oregon soon!

Thursday, June 09, 2011

Trillium Stained Glass Suncatcher

Trillium Stained Glass Window


Since taking the class to learn the copper foil technique for making stained glass, and making my ladyslipper window, I was excited to try this technique on my own and make another window.   Since this technique allows for a more detailed and realistic representation than the other technique I have used before (lead came), I thought it would be fun to make another flower to go with the ladyslipper - plus, I have a total soft spot for wildflowers and loved the idea of having a pair of wildflower windows.  After making the ladyslipper, I immediately thought that a trillium would be a good subject for a second window, since they grow in similar habitats (eastern forests) and both flower in the spring.   I drew the pattern myself, with inspiration from several sources, including this beautiful window, and these patterns.

Trillium and Ladyslipper Stained Glass


I love having this pair of cheerful wildflowers in the window in our study/my sewing room to look at while I work on my projects!  I am excited to make more windows - I would love to make a quilt-block inspired one, and possibly more wildflowers.  Plus I have a number of gift ideas.  I'm hoping the weather cools down next week as predicted since I do my stained glass outside and it was ridiculously hot when I was working on this earlier this week (and has since gotten hotter)!

Sunday, May 15, 2011

Prairie Style Stained Glass


I made this prairie-style stained glass window for Lawson as a first wedding anniversary present.  The pattern is from a book called Prairie Style Panels, and I adapted the design to add a repeat.  Although I just learned how to make stained glass windows using the copper foil technique, I went back to the lead came technique for this one, both because I already have all the supplies and because it is better suited to this kind of geometric straight line design.  I hope to do more copper foil panels soon too, though (once I get the supplies), especially since I can really only do stained glass outside and this is the perfect time of year for it.


With this technique you cut out all the glass pieces, leaving a gap in between for the lead, and then you build up the panel by cutting the lead to the right sizes and shapes and fitting it all in place (the nails hold everything in place as you work).  As you can kind of see from the extra pieces of lead at the bottom of the photo, there is a channel in the lead that the glass fits into.


Once you have the whole panel fitted together, you solder the joints and then you finish the panel with putty to hold the pieces of glass in place and then apply patina to color the metal black.  The putty process is kind of a pain so one thing I am really looking forward to about making more copper foil panels is that you don't have to putty them!


Even though I have now made probably half a dozen windows using this method, since it is often a year or more in between I pretty much have to relearn the process each time.  There are definitely things about this window that I am not super happy with how they turned out, partly because I was using old lead, and partly because I could have been more accurate with cutting the glass... just like in quilting, relatively small cutting errors add up across the piece and can make a big difference.


I was feeling somewhat frustrated as I finished the window and sad to be giving something to my sweetie that wasn't perfect, but in the end the mistakes aren't all that noticeable (especially if you don't make stained glass yourself), and he loves it.  He loves that I made it, and that I made it for him, in a design he had previously said he liked... and while he believes me that it isn't perfect he is happy to overlook the flaws.  This is actually a great encapsulation of all the things I love about him and what makes our relationship great, so it turns out that giving him a not-quite-perfect gift may be just the right thing after all.

Monday, May 02, 2011

Ladyslipper Stained Glass

Ladyslipper Stained Glass

I took a stained glass class over the weekend to learn the copper foil technique for making stained glass.  The other stained glass I have made in the past has been using the lead came technique which is great for geometric designs but doesn't lend itself well to more detailed designs, so I was excited to learn this new technique.  Since I had previous experience cutting glass and soldering, I picked a more complicated design from a book of state flower stained glass designs.  It was definitely a challenge but I am really happy with how it turned out.


As I was working, I thought a bit about the similarities between quilting and stained glass - both involve precisely cutting up a material and reassembling it in a new design, carefully fitting all the pieces together.  The glass, like fabric in quilting, has a specific color, texture, and pattern when you get it, but you can think about how those characteristics of the pattern will interact with your design - and you can cut strategically (or "fussycut") as I did with the leaves above to create the look of veins.  In looking at stained glass patterns online, I have seen that there is actually a style of applique quilting called stained glass quilting, and I have been thinking about quilt blocks as potential inspiration for stained glass designs.

Sometimes I think I may have too many hobbies (especially when I get into ones that involve a lot of tools and materials like stained glass), but I love trying new things and thinking about the cross-inspirations between different media.  What about you - do you stick mainly to one craft or do you dabble in many different ones?  How do you find that working in different media inspires you or changes the way you think about your projects?

Monday, July 19, 2010

Glass four ways

Last summer I took a break from my usual pottery class and enjoyed having a more flexible schedule and a bit more free time... and I also took the opportunity to explore some new crafts that I hadn't tried before.  One great thing I tried was a beginner glass lover's weekend class at the washington glass school.  I had done stained glass before, but I had never tried any other glass techniques so it was fun to get to try out a variety of things.

My favorite was fusing and slumping.  You use a piece of glass as a base (we used clear glass) and then cut out shapes out of special "bullseye" glass (which melts well) and arrange them on top of the base in a pattern of your choice.  Then they are fired in a kiln and melt together (fusing) and you can either keep it as a flat piece or fire it again over a mold to give it a shape (slumping).  Here is the piece I made:


We also did some kiln casting - we made a shape out of wet clay, and then poured a plaster mold around it.  The next day after the plaster had hardened, we pulled out all the pieces of clay and then filled it up with glass shards.  They fired it in a kiln and then broke apart the plaster, revealing the shape we had molded.  I made a fairly intricate christmas tree (I had tried to think what figural glass object I might want to have around the house and that was what I came up with... although it has been sitting out year round since then which is a little strange now that I think of it).  It was hard to get all the plaster picked out of the nooks and crannies of this shape so I don't totally love how it turned out, but it was fun to learn the technique.


Finally, we learned another technique that they actually invented at the Washington Glass Studio (the studio affiliated with the school), dry plaster casting.  They have a kiln where the bottom is covered in fine dry plaster (kind of a dust), with bricks dividing it into tile sized areas.  You press objects into the plaster to make an indentation, and then put two pieces of glass on top stacked on each other; when they fire the kiln, the glass melts into the indentations and takes on the shapes you created with really a lot of detail.  One of the glass artists there had some neat 3-D leaf shapes she had made which I really liked (given my affinity to all things leaf-shaped or themed), that she was nice enough to let me use.  I used my fingertip to make a dot border around the edge.


All in all it was a great class!  Of all the techniques I learned I am most interested in doing more fusing.  It reminded me of stained glass but without having to be so precise (in stained glass the pieces really have to fit together exactly) and without all the soldering.

I also took a glass-blowing class last summer at Glen Echo which was something I had always wanted to try.  It was really hard!  The hardest part for me was the heat, especially when you were working in the "glory hole" but even when you had the glass out in the open, it radiated a lot of heat just from the glass.  It was also really physical and required a lot of lifting and constant movement... and a lot of coordination.  I was glad I tried it but don't think it is something I will probably do again.  I made a tumbler but actually never went to pick it up (it is pretty far away from our house).

Finally, another glass project from last summer was that I made another stained glass window.  This is the fifth or sixth one I have made I think - all using the lead technique.  Sometime I would like to learn the copper foil technique which allows you to make more intricate designs.  This is the first window I have made where I drew the design myself!  I am really happy with how it turned out although I definitely learned a few things about how to draw stained glass window patterns to make them easier (or harder) to make.

Posted by Picasa
Related Posts Plugin for WordPress, Blogger...