Tuesday, October 12, 2010

Festive Felt


I was very excited when I won the giveaway on the long thread for Fa la la la felt, a book full of holiday decorations made from felt.  I was initially excited just to have won something, but I was even more excited when the book came in the mail and I saw all the cute ideas for felt projects.  I especially liked the ideas for ornaments, since we don't have a ton of ornaments for our tree yet and have been enjoying building our collection.  Last year we got a number of different bird ornaments so we have a bit of a bird theme going... so I was especially excited to see a number of bird related patterns in the book.


When the book came in the mail, I ordered a sampler of felt squares on etsy, and then I was raring to go... despite not having the right kinds of embroidery thread, or having made enlarged copies of the patterns in the book.  So I made a few things with the materials I had on hand (and sketching out the patterns) and ended up with the adorable baby owl on the left above.  I didn't realize until I made the enlarged copies how much smaller it would be than the actual intended design, but I actually think it is super cute to have a big one and a baby one to go with it.


These birds were a great chance to use up some william morris fabric that I have had for quite a while - I love how the leafy patterns look like feathers on the wings.


These ornaments are super adorable, they were one of my favorite designs when I first looked through the book and I am thrilled that they turned out looking so much like the design!


I liked the snowflake ornaments in the book, but decided to make something simpler (this shows the two sides).  Snowflakes are one of my favorite holiday motifs so I have a few more ideas of snowflake ornaments I'd like to make.


And here are ones that I made up myself.  I thought it would be fun to do a pointsettia... my first attempt is on the right, my second attempt on the left.  I like how the petals of the second one are separate, I think it looks much more like a pointsettia, but I like the shape/outlining on the first.  So maybe I will do a third attempt to try to perfect the design.

I hope to make several more projects out of the book, and am also inspired with more ideas for my own designs.  In keeping with the bird theme, I was thinking I should possibly make a penguin ornament.  Or maybe I should get the backyard birds kit and learn how to needle felt?

Sunday, October 03, 2010

Easy Roasted Tomato Polenta


As you know if you have ever done it, making polenta the traditional way, which involves near-constant stirring on the stovetop for a half an hour, is a real pain.  So I was very excited last year when I first heard about making polenta in the oven - this is a good general recipe that I have used as a guide.  While this technique is often called "no-stir," that is really a misnomer, since you do stir it a few times, but it is much less labor intensive.  I have made it just plain, and served it with a sauce on top or as a side dish, but I also like stirring in other stuff to make it more interesting.  Earlier this summer we had a bunch of uncooked veggie skewers left over from a party with zucchini, peppers, tomatoes and onions, so I roasted them in the toaster and then later stirred them into the polenta, which was delicious.  This rendition was inspired by the slow roasted tomato bruschetta in the Gourmet cookbook, but really you could stir in any roasted veggies and it would be yummy.  Another good fall/winter option is to add sauteed mushrooms and kale. 


Easy Roasted Tomato Polenta
  • 2 lbs assorted tomatoes, coarsely chopped (halved or quartered depending on size)
  • 4-5 cloves garlic, minced or pressed
  • Olive oil
  • 1 1/2 cups dried polenta/coarse cornmeal
  • 5 cups water
  • 1 1/2 teaspoons salt
Spread the tomatoes on a baking sheet, then mix the garlic with 1/2 cup olive oil and drizzle the garlic/oil mixture over the tomatoes.  For slow roasting, bake at 250 for 4-5 hours or longer (I did this the night before); you could probably roast at 350 and just put them in 20 minutes before the polenta and they would be roasted enough, if you want to make it all in one night.

For polenta, add dried polenta, water, salt, and about a tablespoon of oil to a large baking pan.  Stir to ensure that there are no dry lumps in the polenta - the polenta will settle at the bottom.  Bake at 350 for 40 minutes, at which point the polenta will be mostly cooked but there will be wetter and drier spots.  Take out of the oven, add the roasted tomatoes and stir to combine and to fully mix the polenta.  Bake for another 10 minutes.  Remove from oven, let cool for a few minutes and serve.

Thursday, September 30, 2010

Mustardy Wheatberry Cabbage Salad

Suddenly it has started feeling like fall, and it just didn't seem right to make coleslaw out of the head of cabbage I had in the fridge.  Plus, we are basically out of mayo and I was trying to figure out what I could make with materials on hand.  This felt much more seasonally-appropriate and used only things that I already had in the fridge (and yes, I am the kind of person who keeps whole grain mustard and wheatberries on hand just in case)....  Overall, I was happy with how it turned out, it was nothing spectacular but it has been quite good for eating for lunch all week.


Mustardy Wheatberry Cabbage Salad
Adapted from How to Cook Everything Vegetarian
  • 2-3 cups cooked wheatberries (I cooked mine in my handy pressure-cooker, but you can also soak overnight and then cook on the stovetop in about an hour)
  • 1/2 small or medium head of cabbage, shredded
  • 1/2 small or medium red onion, finely chopped
  • 2 tablespoons whole grain mustard
  • 1/3 cup (or less - mine turned out on the oily side) olive oil
  • 2 tablespoons red wine or cider vinegar
  • salt and pepper to taste
 Combine wheatberries, cabbage and onion in a large bowl.  Stir mustard, oil and vinegar together to combine, then toss together with the salad ingredients.  Enjoy!

Monday, September 27, 2010

Yosemite Socks


I'm calling these my Yosemite socks since I knit basically all of the second sock on the way to and from our recent quick trip to Yosemite (not to mention in Yosemite).  Plus as Lawson points out it sounds bit like Yosemite Sam and that is fun too.  Yosemite was beautiful!


The yarn is Stroll Handpainted from Knitpicks in the Make Believe colorway.  I was happy with how the yarn striped and the colors.  I have another pair of socks I made with Essential (the old name for Stroll) and I find that it feels a bit artificial as it wears and not that soft, but it is certainly durable.  I'll have to see how these socks do...

I used my favorite More Sensational Knitted Socks as a general guide for the pattern and I tried the round toe which I have never done before.  I was pretty happy with how it turned out - I think it shows off the stripes nicely - and I appreciated not having to do any grafting at the end (which I really don't mind too much, but it did save some time). 


I keep telling myself that after I just finish this next project I will really buckle down and work on my sweater (I haven't made much progress since this post).  Somehow I always hit a rut about halfway through knitting a sweater.  So I have been pushing myself to get back to it because I know I will really like it when I am done.  However, as you may have gathered from the fact that I practically didn't have any time to post here in September, things have been a little hectic in our lives lately and finally I decided to just give myself a break and knit whatever I feel like knitting.  Which I think means there will be several more pairs of socks on the horizon and probably some more pumpkin baby hats (have to get those done before halloween of course!). 

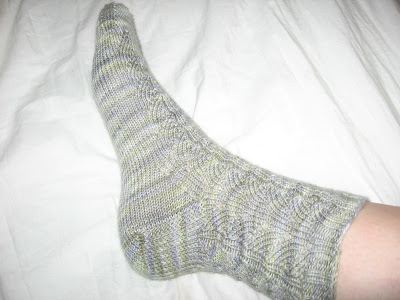
Here is the next pair of socks I am working on - made with really subtle, pretty yarn from Spunky Eclectic using the dragonfly socks pattern.  A lot of the socks I have knit myself have been in really bright fun colors so this is a nice change and I think that I will really enjoy wearing these - they feel a bit more classy.  These are also my first lace socks (or really, socks with any pattern significantly more complicated than a rib), and it has gone really well!  Socks are often my mindless project that I pick up for a few minutes here and there, so I was worried that I would lose track of the pattern but it hasn't been an issue really, the pattern was quite easy to learn.  I made a few mods including replacing all the sl1 k1 psso's with ssk's, which I find much easier to work, but mostly the pattern has been great.


Related Posts Plugin for WordPress, Blogger...