Sunday, December 04, 2011
Asterisk Bee Blocks and tips
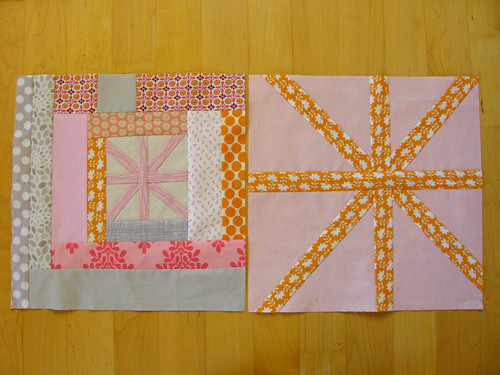
For last month's do.good stitches blocks for the Love circle, Lee from Freshly Pieced asked us all to make asterisk blocks in pinks, oranges, greys and whites - what a lovely winter palette! She directed us to this tutorial for the basics of how to make an asterisk block, but gave us free rein to play around with the blocks as long as they had one or more asterisk in them. I love these kinds of structured creative challenges so these were fun blocks to put together!
I made a smaller asterisk for one of my blocks and used it as the center of an improvisational log cabin block, which was really fun to make!
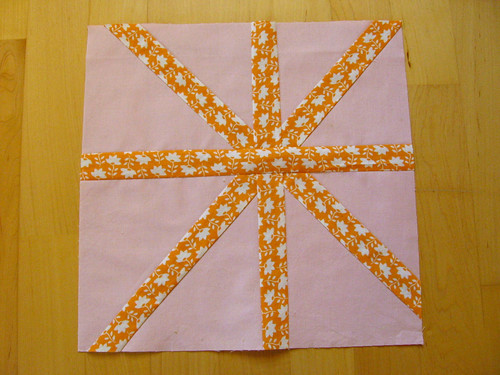
For my other block, I wanted to make a wonky/off-center asterisk with thicker fabric strips than the original tutorial called for. I didn't go much thicker, I used 1.5" strips (1" finished), rather than the 1" strips/0.5" finished that the tutorial called for. I wanted to share a quick tip for how to keep your asterisk strips aligned when using a wider strip. I imagine others have figured this out and may have blogged about it elsewhere, but I thought I would share in case this is helpful to anyone!
The original tutorial is great because it uses 1" strips of fabric, which means that when you cut the fabric and then insert the pieced strip, the 1/2" of the original quilt square eaten up by the two seam allowances is exactly replaced by the 1/2" of strip that shows on the top after it also loses 1/2" to seam allowances. So everything stays well aligned.
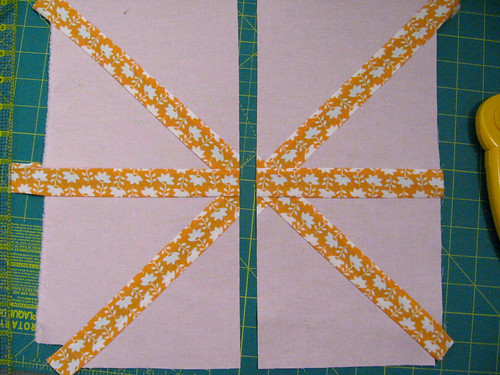
You may have seen asterisk blocks where the strips get kind of misaligned... I cut my in progress block and pulled it apart about 1/2" to show how this can happen - this is about how far apart the two sides would be if I had just cut it and then pieced in my 1.5" strip. It's not too extreme with such a small misalignment, but you can see that each of the diagonal strips kind of jumps across the divide rather than being a straight line. This problem would be more extreme and much more noticeable when using even wider strips, since the two pieces of the quilt block would be getting moved even farther apart.
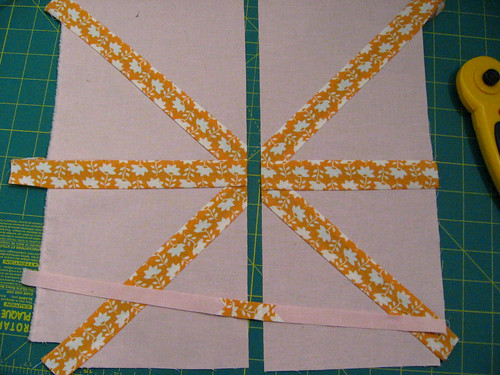
The solution is simply to cut a strip out of the block where you are going to add the pieced strip. To figure out how wide a strip to cut out, you just subtract 1" from the size strip you are piecing in, to account for the 1/2" in seam allowances eaten up from each of the background and the strip you add. So, for my block, I cut out a 1/2" strip, since I was using 1.5" strips. I only did this for the final strip that I added, but in looking at it and thinking it through, I think I really should have done it for the final two (eg, the straight up and down segments, not the diagonal segments). You could do it for every strip you add, but it's definitely not necessary for the first one (nothing to line up yet) and for the second one, you can eyeball it to keep it lined up. I think my block turned out fine even though I only did this for the last strip, since I was not piecing with super thick strips, but I will remember to do it for both of the last two next time.
I definitely recommend the asterisk block if you have never made one before - they are really quick and fun to make!
Labels:
bee blocks,
quilting,
sewing
Subscribe to:
Post Comments (Atom)


Oh, what an awesome tip! Thank you so much for posting this, Kate! I haven't made my own blocks yet, so it didn't occur to me that this would even be a problem.
ReplyDeleteOooh, interesting. Thanks for these tips. I've never tried the asterisk block before but may need to give it a try!
ReplyDeleteThanks for the tips! This block is on my list to try. And I love your asterisk in the cabin!
ReplyDeleteOoh, thanks for posting this! I'm up to my neck in my Drunkard's Path quilt right now, but I'm going to bookmark the link to the asterisk block instructions. I always assumed that you had to do this block by applique. Maybe it's the season, but I'm getting a snowflake vibe from this block and I could see a table runner or small quilt with navy and metallic starry background, and pretty white asterisk snowflakes in a few different sizes...
ReplyDeleteI definitely enjoyed making these this month. Your log cabin version is my favorite!
ReplyDelete