
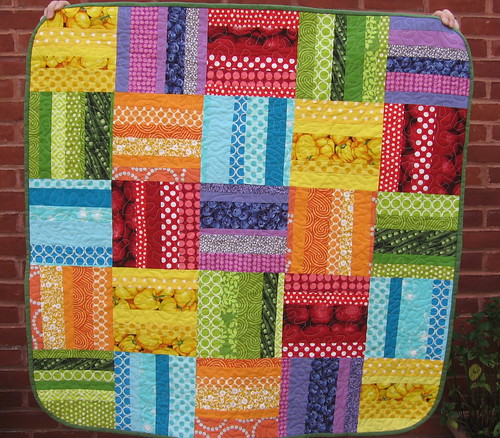
I finished up my "rainbow rail" quilt last night and am very happy with how it turned out! (earlier posts about this quilt are here and here.) I love how my friend Mandy usually rounds the corners of her quilts (like these), and I thought it would provide good balance to all the straight lines and blocks in this quilt, so I went for it. I like it this way, especially since it's a baby quilt, but I also think I would have liked it with square corners.
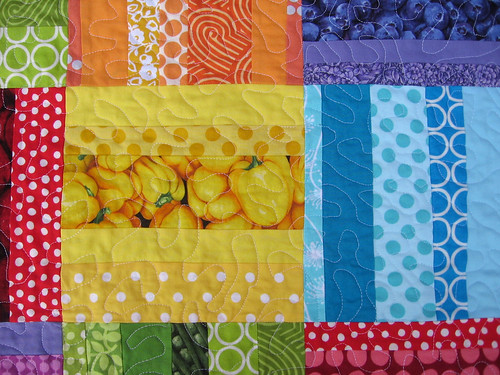
This was my first attempt at free-motion quilting a whole quilt - I had been practicing on some smaller projects, and I decided this was a good time to take the leap, especially since I wasn't sure how I could straight line quilt this in a way that complemented the design well. It definitely isn't perfect - my stitch length is a bit variable and there are just some out and out mistakes - but for a first try I think it is not bad at all! I used white thread to quilt it which stands out more than I'd like in some places, but seemed like the best choice given the rainbow of colors in the quilt.
I also used spray basting for the first time, which I figured would be easier than taking out pins as I quilted, and it worked really well. I got Sulky because they had it at my fabric store (I later saw it at Joann's too, so if I buy more I may get it there with a coupon), but I also liked that it said it was non-toxic and safe to spray indoors. It seemed to work well but since I have never used another brand I can't make any comparisons - I'd be interested to hear what brands other folks use and how you like them.
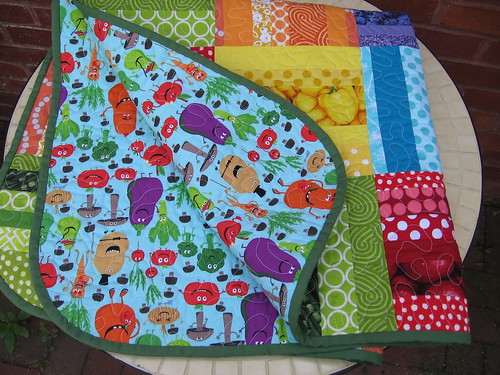
While I had originally thought about binding the quilt with a solid brown, I decided that was too dark and went with a forest green color from my stash (pretty sure it is Kona but I don't know which shade unfortunately). I feel like I could have probably come up with a more perfect fabric to complement the front of the quilt - maybe rainbow polka dots or a stripe? although maybe rainbow would have been overkill - but I think this works fine. And I love how it looks with the cute veggie backing fabric!
I went out of my way to make bias binding for the quilt to go around the curves, but I wasn't paying attention and I am embarrassed to admit that I messed it up and didn't actually cut it on the bias! I was basically following this technique (although I didn't make it into double fold tape, I just ironed it in half to make the binding), but after made the parallelogram shape I accidentally drew my cutting lines parallel to the grain rather than along the bias cut edge... OOPS. I didn't figure it out until I had sewn around two of the rounded corners on the back, and it just didn't seem to be acting like bias-cut binding should. In retrospect, I am actually impressed that it went around the corners as well as it did!
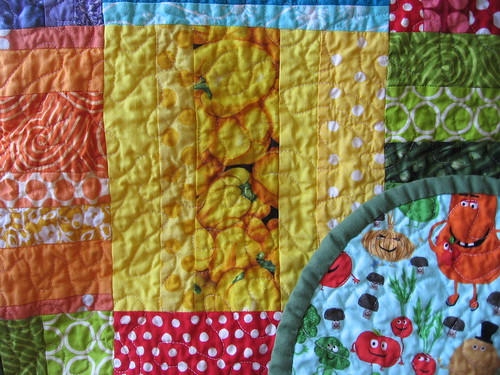
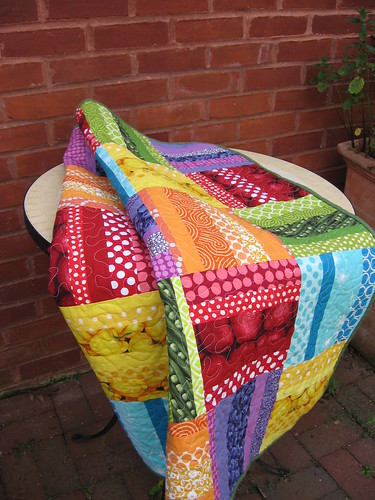
I also tried a new stitch to attach the binding to the back of the quilt, and was really happy with how it turned out. In the past I have done a blind hem stitch, but inspired by this post, I tried a ladder stitch (which I have done before, but not on binding), and I agree that it makes the binding more even; I also suspect that it will be more durable, which is good since I am hoping this baby blanket will get a lot of use and love! The photo above shows the quilt after washing, all crinkled up.
I'm posting a bit early, but I'll be linking up to Sew Modern Monday on Canoe Ridge Creations on Monday - check it out to see others' modern sewing projects!

This quilt came out great! I think the green binding looks good with both sides. :) Loving all the bright prints together!
ReplyDeletei love this quilt and how you used the food fabrics in the blocks. i just joined rainbow swap and i just might copy this. so cute
ReplyDeleteGorgeous quilt and your quilting turned out great. I prefer free motion quilting. I find it so much more forgiving than straight line.
ReplyDeleteI love the quilt! I was never sure how the produce prints would work in a quilt, but they're fabulous in that quilt!
ReplyDeleteThat looks really cute. I especially liked the veggies and the rounded edges.
ReplyDeleteThis is adorable!! I love the colors and the fabric you chose for the backing. The quilting looks great as well. Good job!
ReplyDeleteBeautiful! The quilting looks great and I love the rainbow colors.
ReplyDeleteI love how this turned out!! And I really think the green binding is just right :)
ReplyDeleteIt looks great!! The rounded corners really add to it, I just did that for the first time on a baby quilt and loved it. I'd like to hear your tips on free motion quilting. Do you have a walking foot?
ReplyDeleteFabulous quilt! Love, love, love that backing fabric! :) Thanks for linking up to {Sew} Modern Monday and have a great week!
ReplyDeleteThis is gorgeous, love the curved corners. I always use a ladder stitch, its easy to do and invisible, you did a great job
ReplyDeleteThanks everyone! I am definitely a free motion quilting newbie, but here are my tips, since Jenny asked... I do have a walking foot, although that is more for straight line quilting, I think you need a free-motion foot to do free motion quilting - I am lucky that I have a cheapo brother machine but it amazingly came with both of those feet (and a bunch of others). For FMQ, I think the key thing is just to practice - I practiced on my quilted wine totes and on some mug rugs before trying it on an actual quilt. Since the size of your stitches is determined by how fast you move the piece combined with how fast your machine is going, it helps to play around and see what works best for you - I actually prefer working at a pretty quick pace but I think its a personal preference. Also I got the "quilting gloves" that are kind of grippy and it helps a lot with keeping a good grip on the quilt top as you are moving it around. I have also heard folks suggest doing drawings to practice the motion before you try stitching, which I haven't done but may do at some point (especially if I am going to try more complicated designs).
ReplyDeleteAhhh! this is a really cute quilt! I absolutely love the color blocks AND the Edgie Veggies on the back. One of my favorite fabrics! Well done indeed!
ReplyDelete